DIY Laundry Room Makeover
Disclosure: This blog contains affiliate links. I will receive a commission for items purchased through these links at no extra cost to you. I appreciate your support. Please read all labels and follow all manufacturer safety recommendations when working with paints, stains, and other equipment.
Another DIY day in Pretty Distressed world because I’m doing my very own DIY laundry room makeover, and I can’t wait to show you the full reveal. The star of today’s show is spray painting unfinished Home Depot cabinets with my Wagner Flexio 3000 spray painter.
Not only am I going to be painting my Hampton Bay cabinets, but there will be some bonus tutorials today on installing open shelving, some fun wallpaper, and other laundry room knick knacks.
My laundry room is where I spend a lot of my time during the cleaning process of my furniture painting, so I want this space to go from a cluttered mess to a beautiful space that will bring me joy.
Check out the laundry room before picture!

DIY Laundry Room Makeover Products
Hampton Bay Unfinished Beech Cabinets
Wagner Flexio 3000 (Detailed Finish Nozzle) HVLP Spray Gun
Dixie Belle Chalk Mineral Paint Driftwood
Surf Prep 3" x 4" Electric Ray (Use Code PRETTYDISTRESSED10 for 10% off your order)
3M Household respirator w/ particle filters for sanding
Liberty Brushed Brass Pulls and Knobs
Home Decorators 8 in. Matte Gold Shelf Bracket
Brass Wood Screws - #8 1 1/2 inches & #8 3/4 in
Decor from TJMaxx / Homegoods
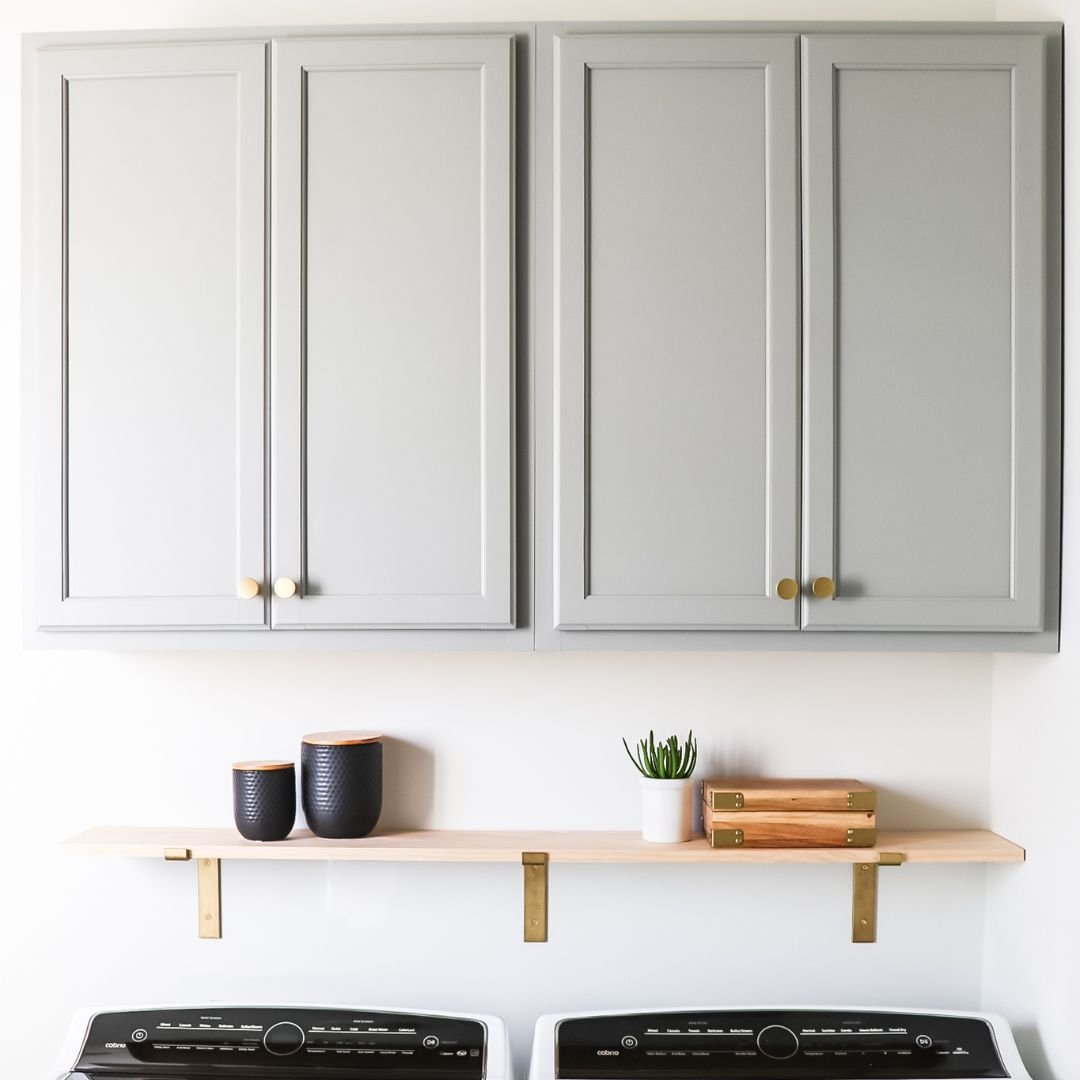
Spray Painting Laundry Room Cabinets
As I mentioned, I purchased two unfinished Hampton Bay cabinets from Home Depot that I’m going to paint and install above the washer and dryer where the wire rack is. So Even though my cabinets are unfinished, I’ll try to include some tips on refinishing existing cabinets as I go along.
Prepping Cabinets
Before even prepping the cabinets, I want to make sure I prep my garage! I used my Wagner spray pop-up tent which you’ve probably seen me use before. It’s so easy to set up and take down.
Now it’s time to prep my cabinets. I did give them a light scuff sand with my Surf Prep Sander and 220 grit sandpaper. If you don’t have a power or orbital sander, you can easily do this by hand. It will just take a bit longer. Also, you’ll want to be sure to clean the surface with some good TSP soap before sanding when working with existing finished cabinets.

The last prep step for my cabinets was masking off areas I didn’t want the paint to get on. I used painter’s tape that already had the plastic attached which is so convenient and such a time saver.
Prepping Paint

For this DIY laundry room makeover, I’m using my trusty Dixie Belle chalk paint. I got the color Driftwood which is a nice neutral tone. I’m using chalk paint because this is my comfort zone when it comes to spray painting and I have a lot on hand, so I didn't have to go out and buy any. You can definitely use latex or acrylic or whatever your most comfortable with.
To prepare my paint for the spray gun, I strained the paint into the spray gun container to make sure there aren’t any big clumps. I then diluted it by 10%. Dixie Belle says that you can dilute their paint up to 20%, but 10% is the consistency that I like.
Lastly, I always suggest testing your sprayer on a piece of cardboard to make sure you’ve got the right flow.
Spray Painting Cabinets
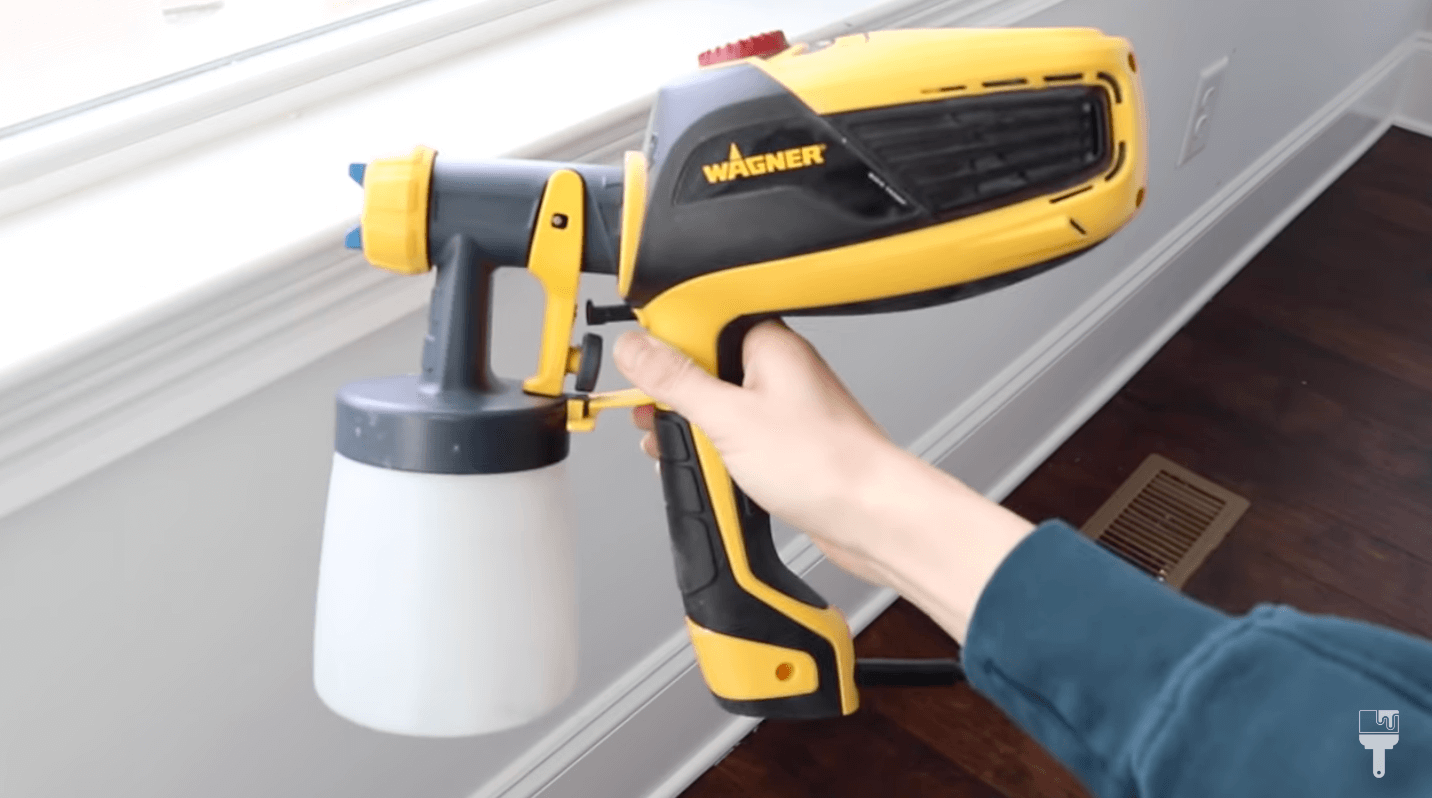
As I mentioned, I’m using the Wagner Flexio 3000 for this project. I have the fine detail nozzle on it because it gives you a really smooth finish.
I had my nozzle pointed down because I was mostly spraying in a downward motion. I also put my setting between a 7 and 8 to start with my flow really low. I bumped it up as I got more comfortable.
When you're painting with a spray gun, you want to make sure that you’re overlapping back and forth by about 30% to get that smooth finish. For more tips, check out my blog on Paint Spray Gun for Beginners.

What was super easy about my project was that my cabinets were not attached yet, so I was able to do all my painting in my garage before installing them. If you’re refinishing existing cabinets, I would suggest removing the doors and painting those separately. You can paint the bases still attached, but just make sure to mask off your room really well!
The last note I have here is that I did sand with super fine sandpaper (400 grit) in between my two coats to get the smooth finish that I was going for.
Two coats were enough for me because the wood was light. So if you’re working with darker wood, you might need three coats.
Seal with Dixie Belle Gator Hide
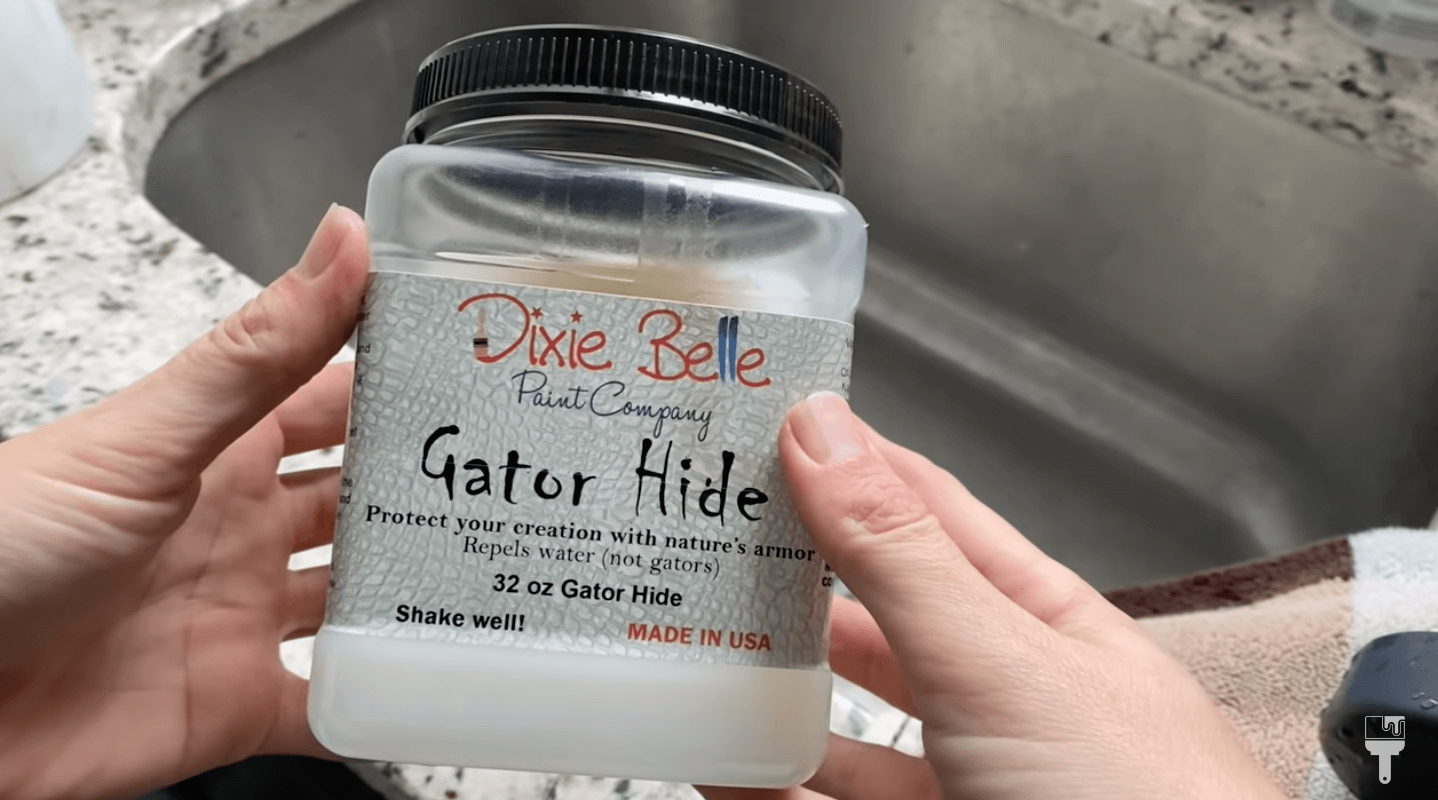
It’s time to seal! I’m going to be using my sprayer again for the top coat. I cleaned it after I was done with the paint (I’ll share more about cleaning in a minute).
For this project, I used Dixie Belle’s Gator Hide which is their most protective topcoat. This topcoat is much thinner than the paint, so I started my setting between a 2 and 3 and took the flow level back down to the lowest setting. And again, I tested it on cardboard before taking it to my cabinets.

The prep for the topcoat is minimal because you don’t need to dilute it like your paint. And spraying it is just like spraying paint: overlapping by 30% and keeping it 6-8 inches away from the surface.
I ended up doing three coats of the Gator Hide letting it dry for about 4 hours in between each coat.

Spray Paint Clean Up
I know a lot of people are intimidated working with spray guns, but it's actually really easy cleanup. Begin filling the sink with warm soapy water, take it all apart, and use a little scrubby brush. Set it out to dry, and that’s it! Easy!
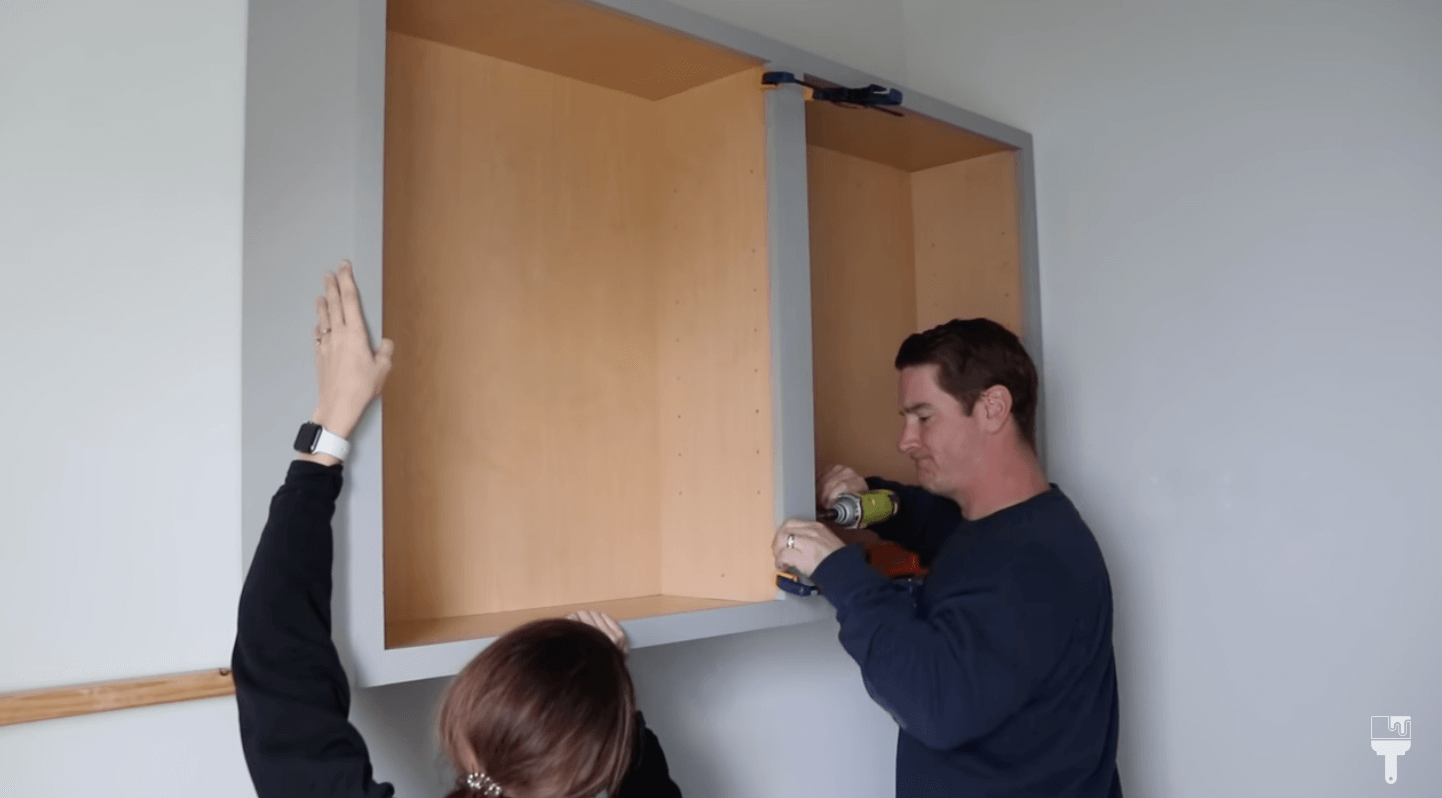
Hanging DIY Laundry Room Cabinets
After cleaning out my cluttered laundry room and removing the wire rack, it was time to get these beautiful cabinets on the wall! For this job, I did enlist my husband because teamwork makes the dream work.
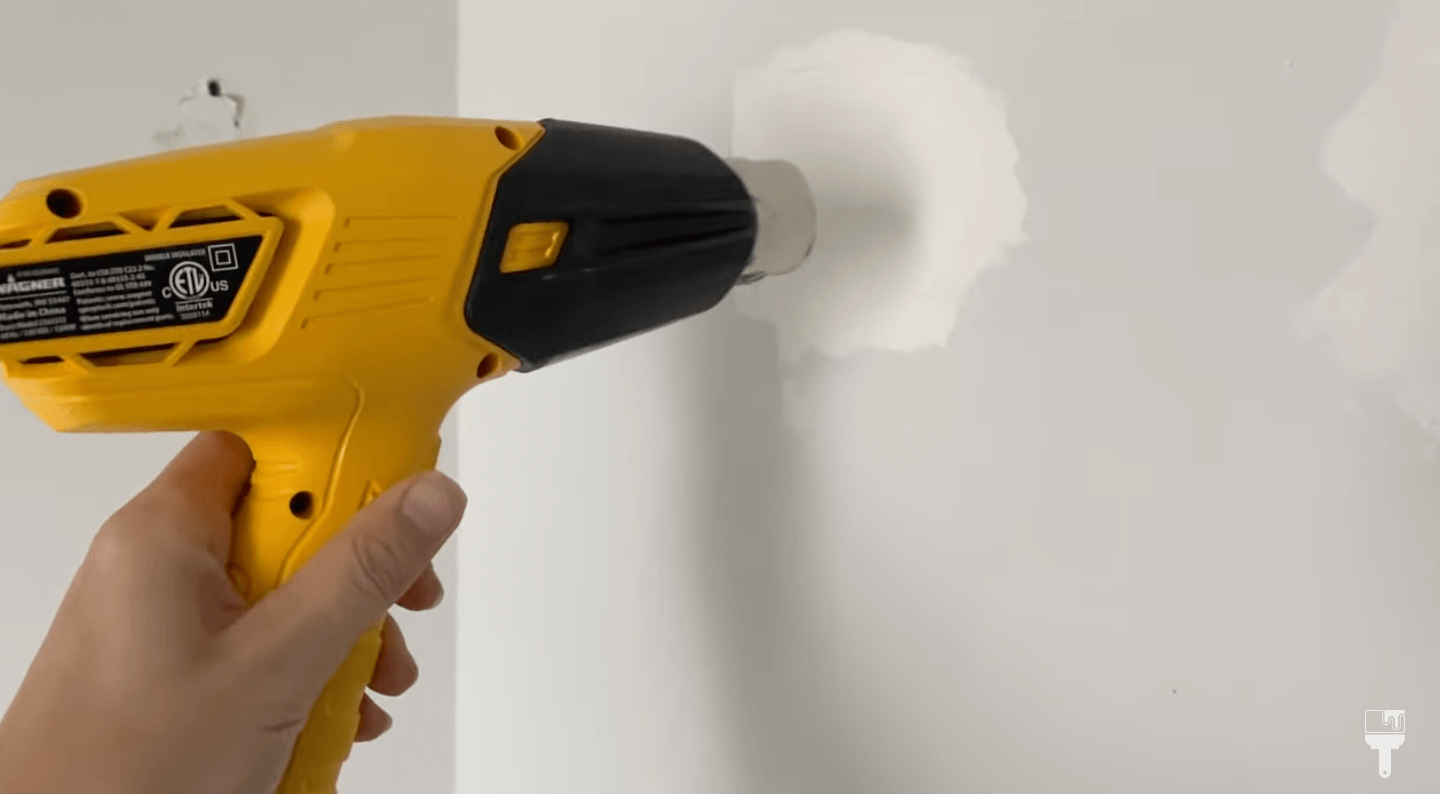
The bummer about the wire rack was that they did leave pretty big holes in the wall, so I had to patch those up. I sanded them down and used some paint to touch them up. My little trick to speed along the process was to use my Wagnor heat gun to help them dry faster. Worked like a charm.
After the repairs, we used a stud finder to mark our studs because you definitely want to screw cabinets into your wall studs.
Since there were only two of us hanging these, but my husband had the smart idea of pinning a 2 x 2 to the wall to help us steady and level out the cabinet. So we got the bases up and made sure they were level. We then screwed them into the wall with some heavy duty screws where we had marked our studs.

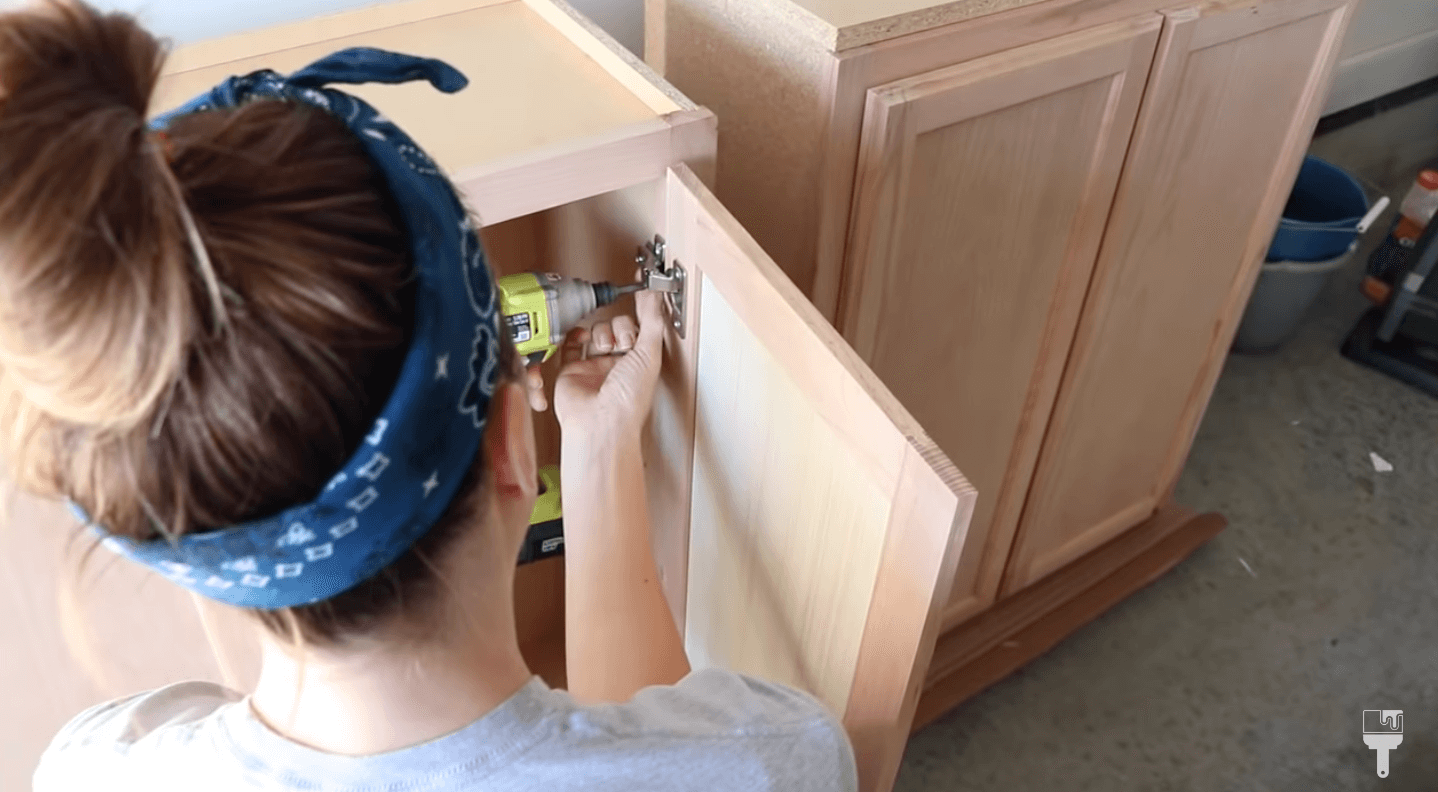
If you’re hanging more than one cabinet side by side, you want to screw them together. So we clamped them together to screw them to each other before securing the second cabinet to the wall. All of these instructions were in the cabinets that we purchased, so we simply followed along. Once the cabinets were up, I reinstalled all the hardware so I could put the doors back on.
Once you get the doors on, there are lots of different screws that you can play with to make sure that they're level with each other and that they close without having a gap in the middle. After I got the doors where I wanted them, I added little protective pads to each corner to help protect the paint as you open and close the doors.
I also added some beautiful brushed breasts knobs to the doors.
Decorative Wallpaper
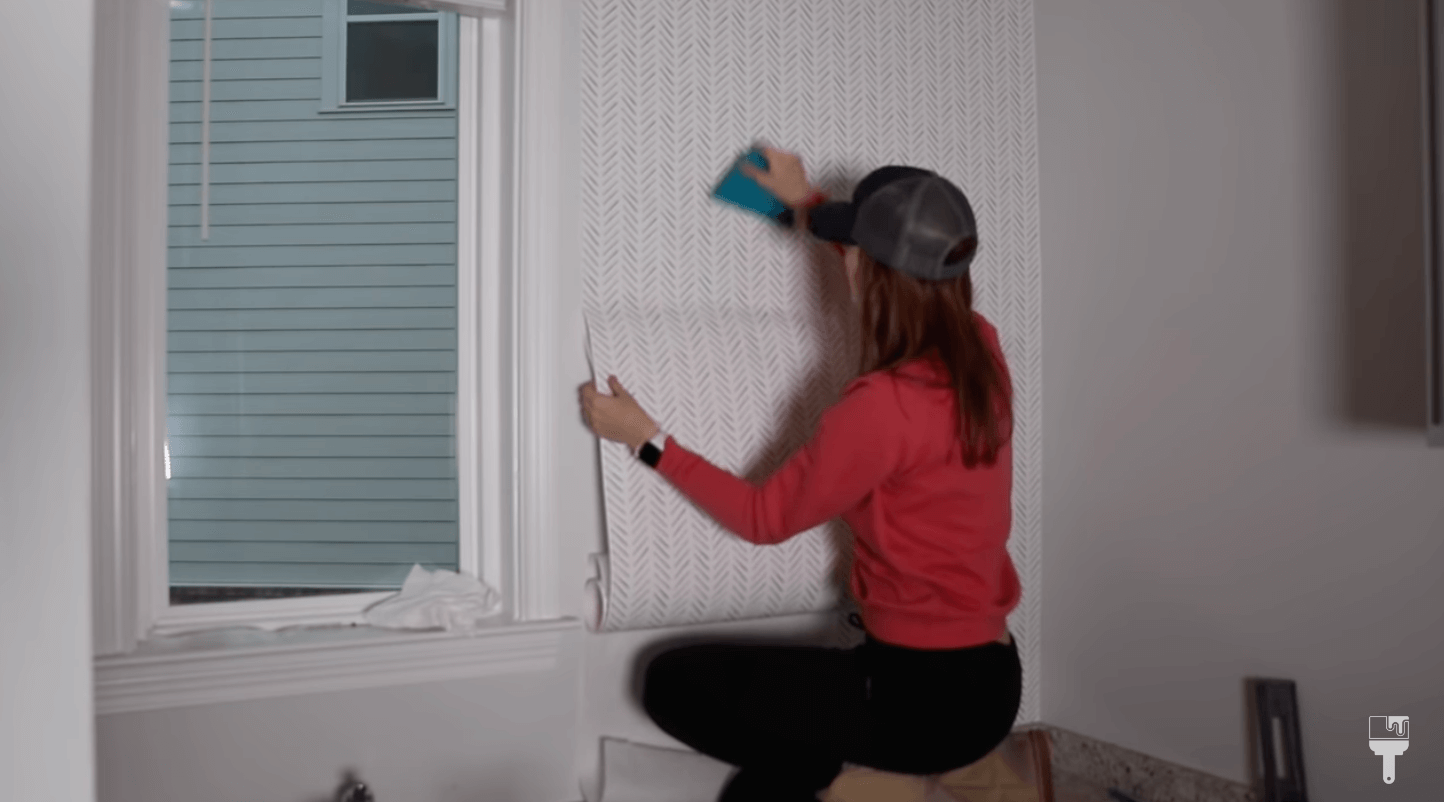
This DIY laundry room makeover is coming together! I decided that I wanted to install some decorative wallpaper around my sink area because I splash a lot, and this wallpaper is going to be wipeable and easy to clean.
I went back and forth about doing tile, but that was going to be a lot of work. I figured wallpaper was a quick, easy, and inexpensive solution.
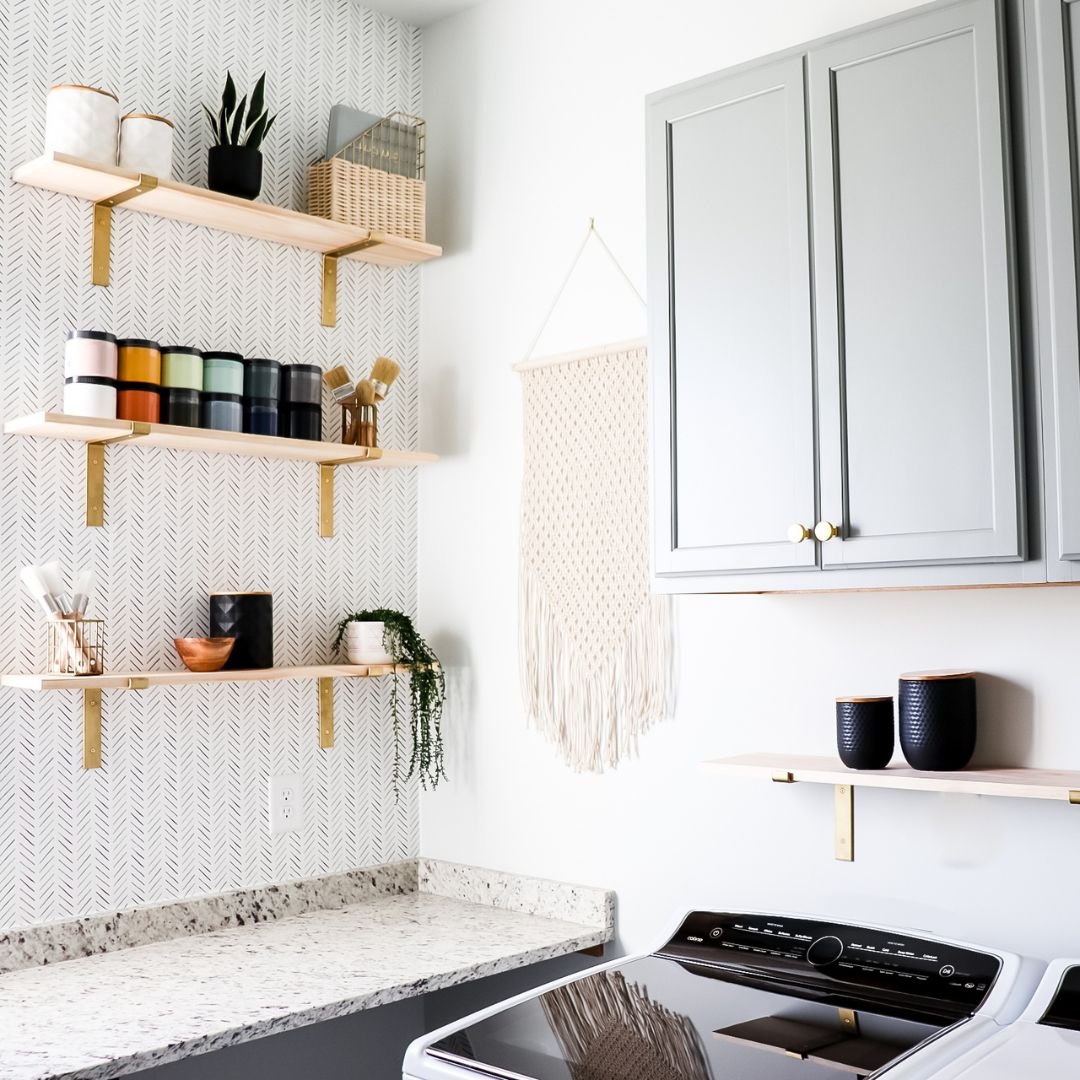
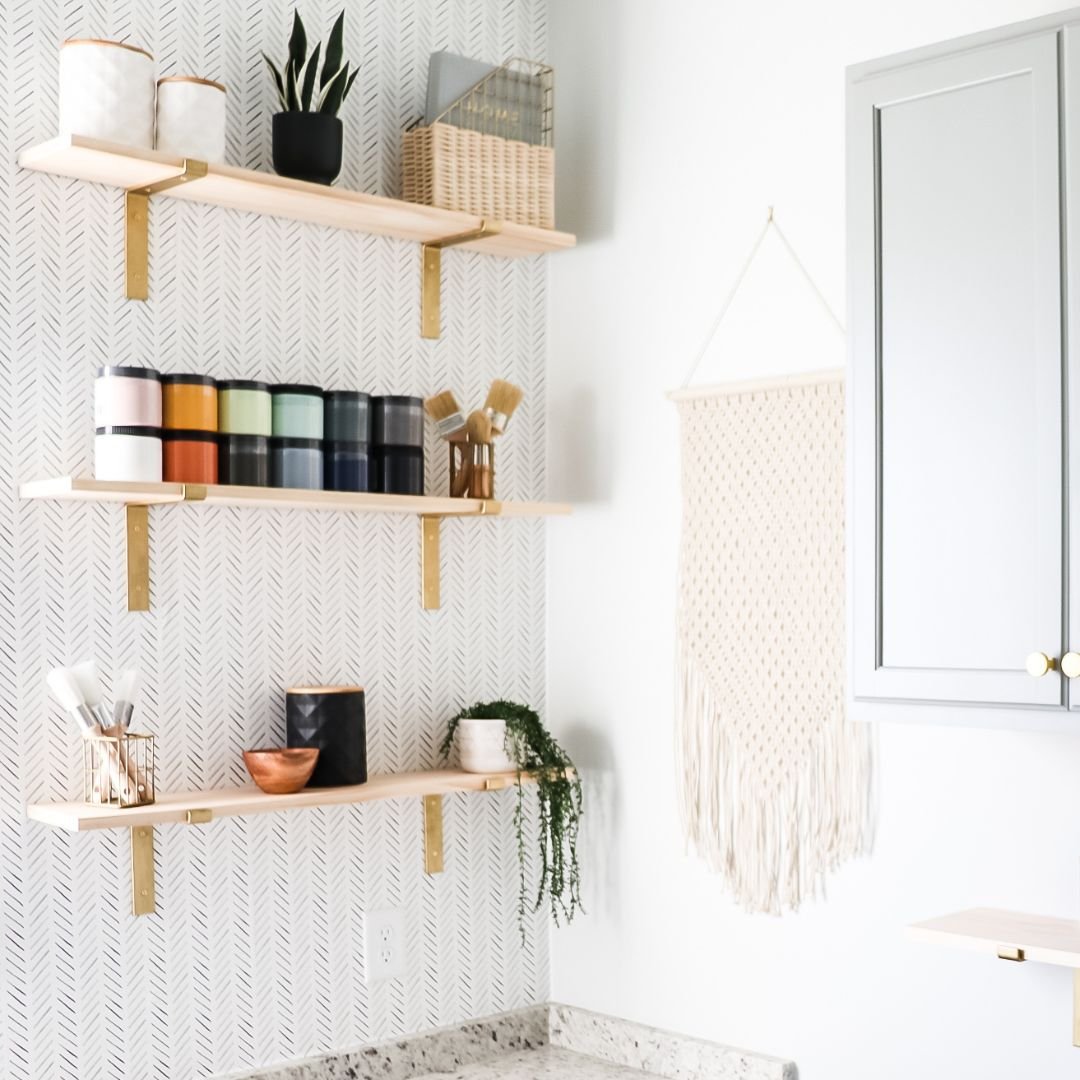
Open Shelving

Everything is looking beautiful, but I wanted to add even more decorative elements. I decided to do open shelving to elevate the look.
I marked off where I wanted all of the shelves so we could get the boards and the brackets that we needed for that. I had to order the wall brackets online because they didn’t have the gold that I wanted in store. When they came I wasn’t digging the color gold. They were a little more dull than I wanted, so I actually got some Dixie Belle gold gilding wax and applied it to all of the brackets. A little bit of extra work, but totally worth it because they turned out amazing.

To make it easier on myself, I got brass wood screws to attach brackets. I was able to secure one bracket to the stud while using anchors for the other side since it didn’t line up with another stud.
For the boards for my shelves, I got select pine because it was going to be smoother and have less knots than common board. I also wasn’t going to have to do any prep to them or seal them because they were in such great shape. All I had to do was cut them down to size.
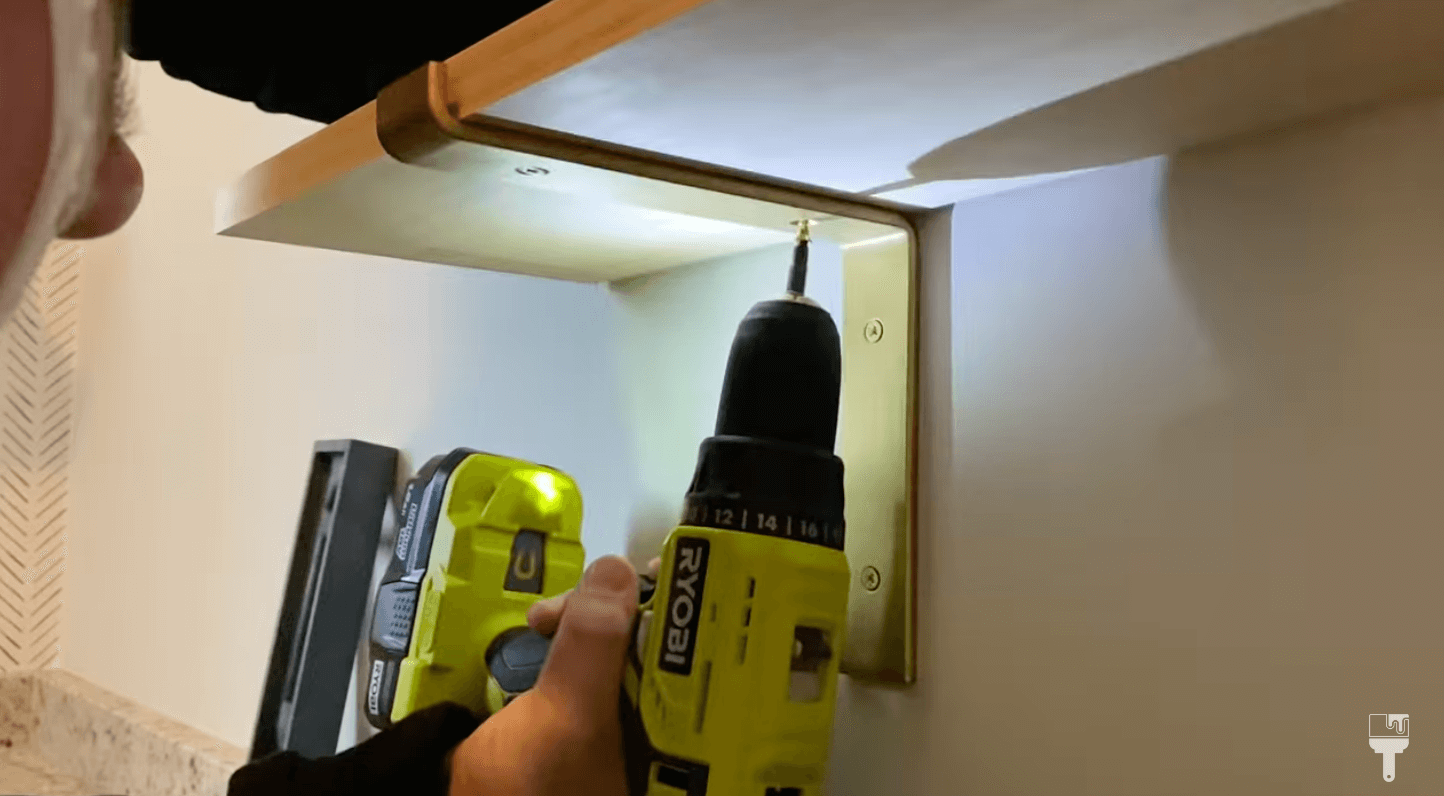
I put three shelves on the wall next to my sink and one shelf under my new cabinets. Our ceilings are pretty high, so I wanted to hang the cabinters high enough so that it didn’t look awkward. This left plenty of space to put a shelf under to store my most commonly used some laundry items.
I love this open shelving so much that I was already brainstorming where else in my home I could put them!
DIY Laundry Room Finishing Touches

Now for some finishing touches. I went to a Home Goods™ and bought some items to stage my wall but make it functional too. I got some canisters to put my Tide Pods™ in so they’re easy for us to reach. I also found a wooden box that was the perfect size for the dryer sheets.
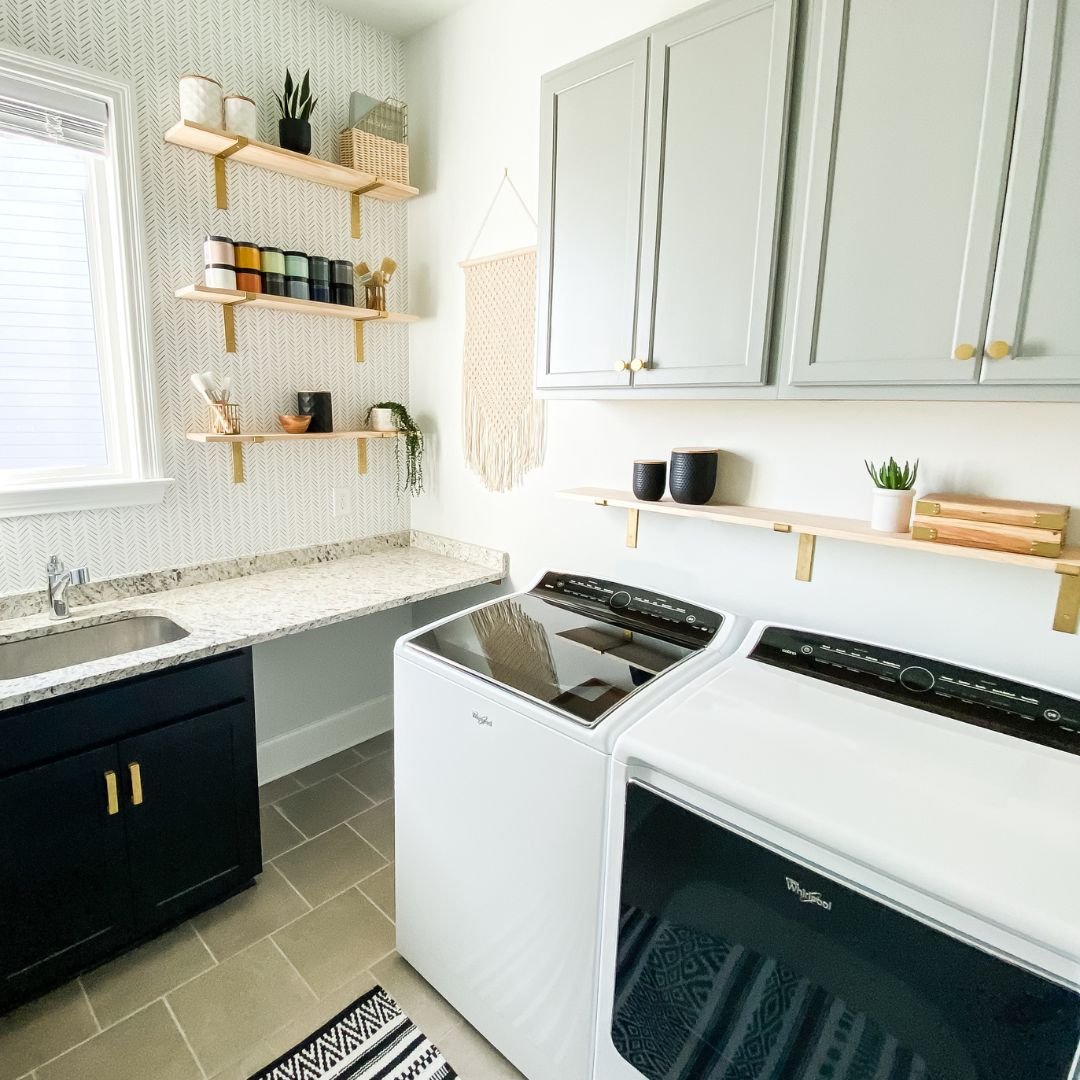
DIY Laundry Room Makeover Reveal!
For being a DIY laundry room, this is now my favorite room in the whole house. Haha. I’m so excited to be rid of all the clutter, and the best part is that it’s so functional!
Using the Wagner sprayer on these cabinets just saved me so much time. They turned out looking so smooth and professional. I’m in love. I honestly can't believe that I did it myself.
I can’t wait to show you the reveal, but remember that if you want to see this DIY laundry room makeover come together one step at a time, head over to my YouTube™ channel to see the full tutorial.