Paint Spray Gun For Beginners: Smooth Furniture Makeover
Disclosure: This blog contains affiliate links. I will receive a commission for items purchased through these links at no extra cost to you. I appreciate your support. Please read all labels and follow all manufacturer safety recommendations when working with paints, stains, and other equipment.
If you’re about ready to tackle a big furniture piece, using a paint spray gun may be the way to go. But if you’re a paint spray gun beginner, it can feel intimidating. I recently refinished our huge gentleman’s chest piece that’s a part of our bedroom set (see before picture below).
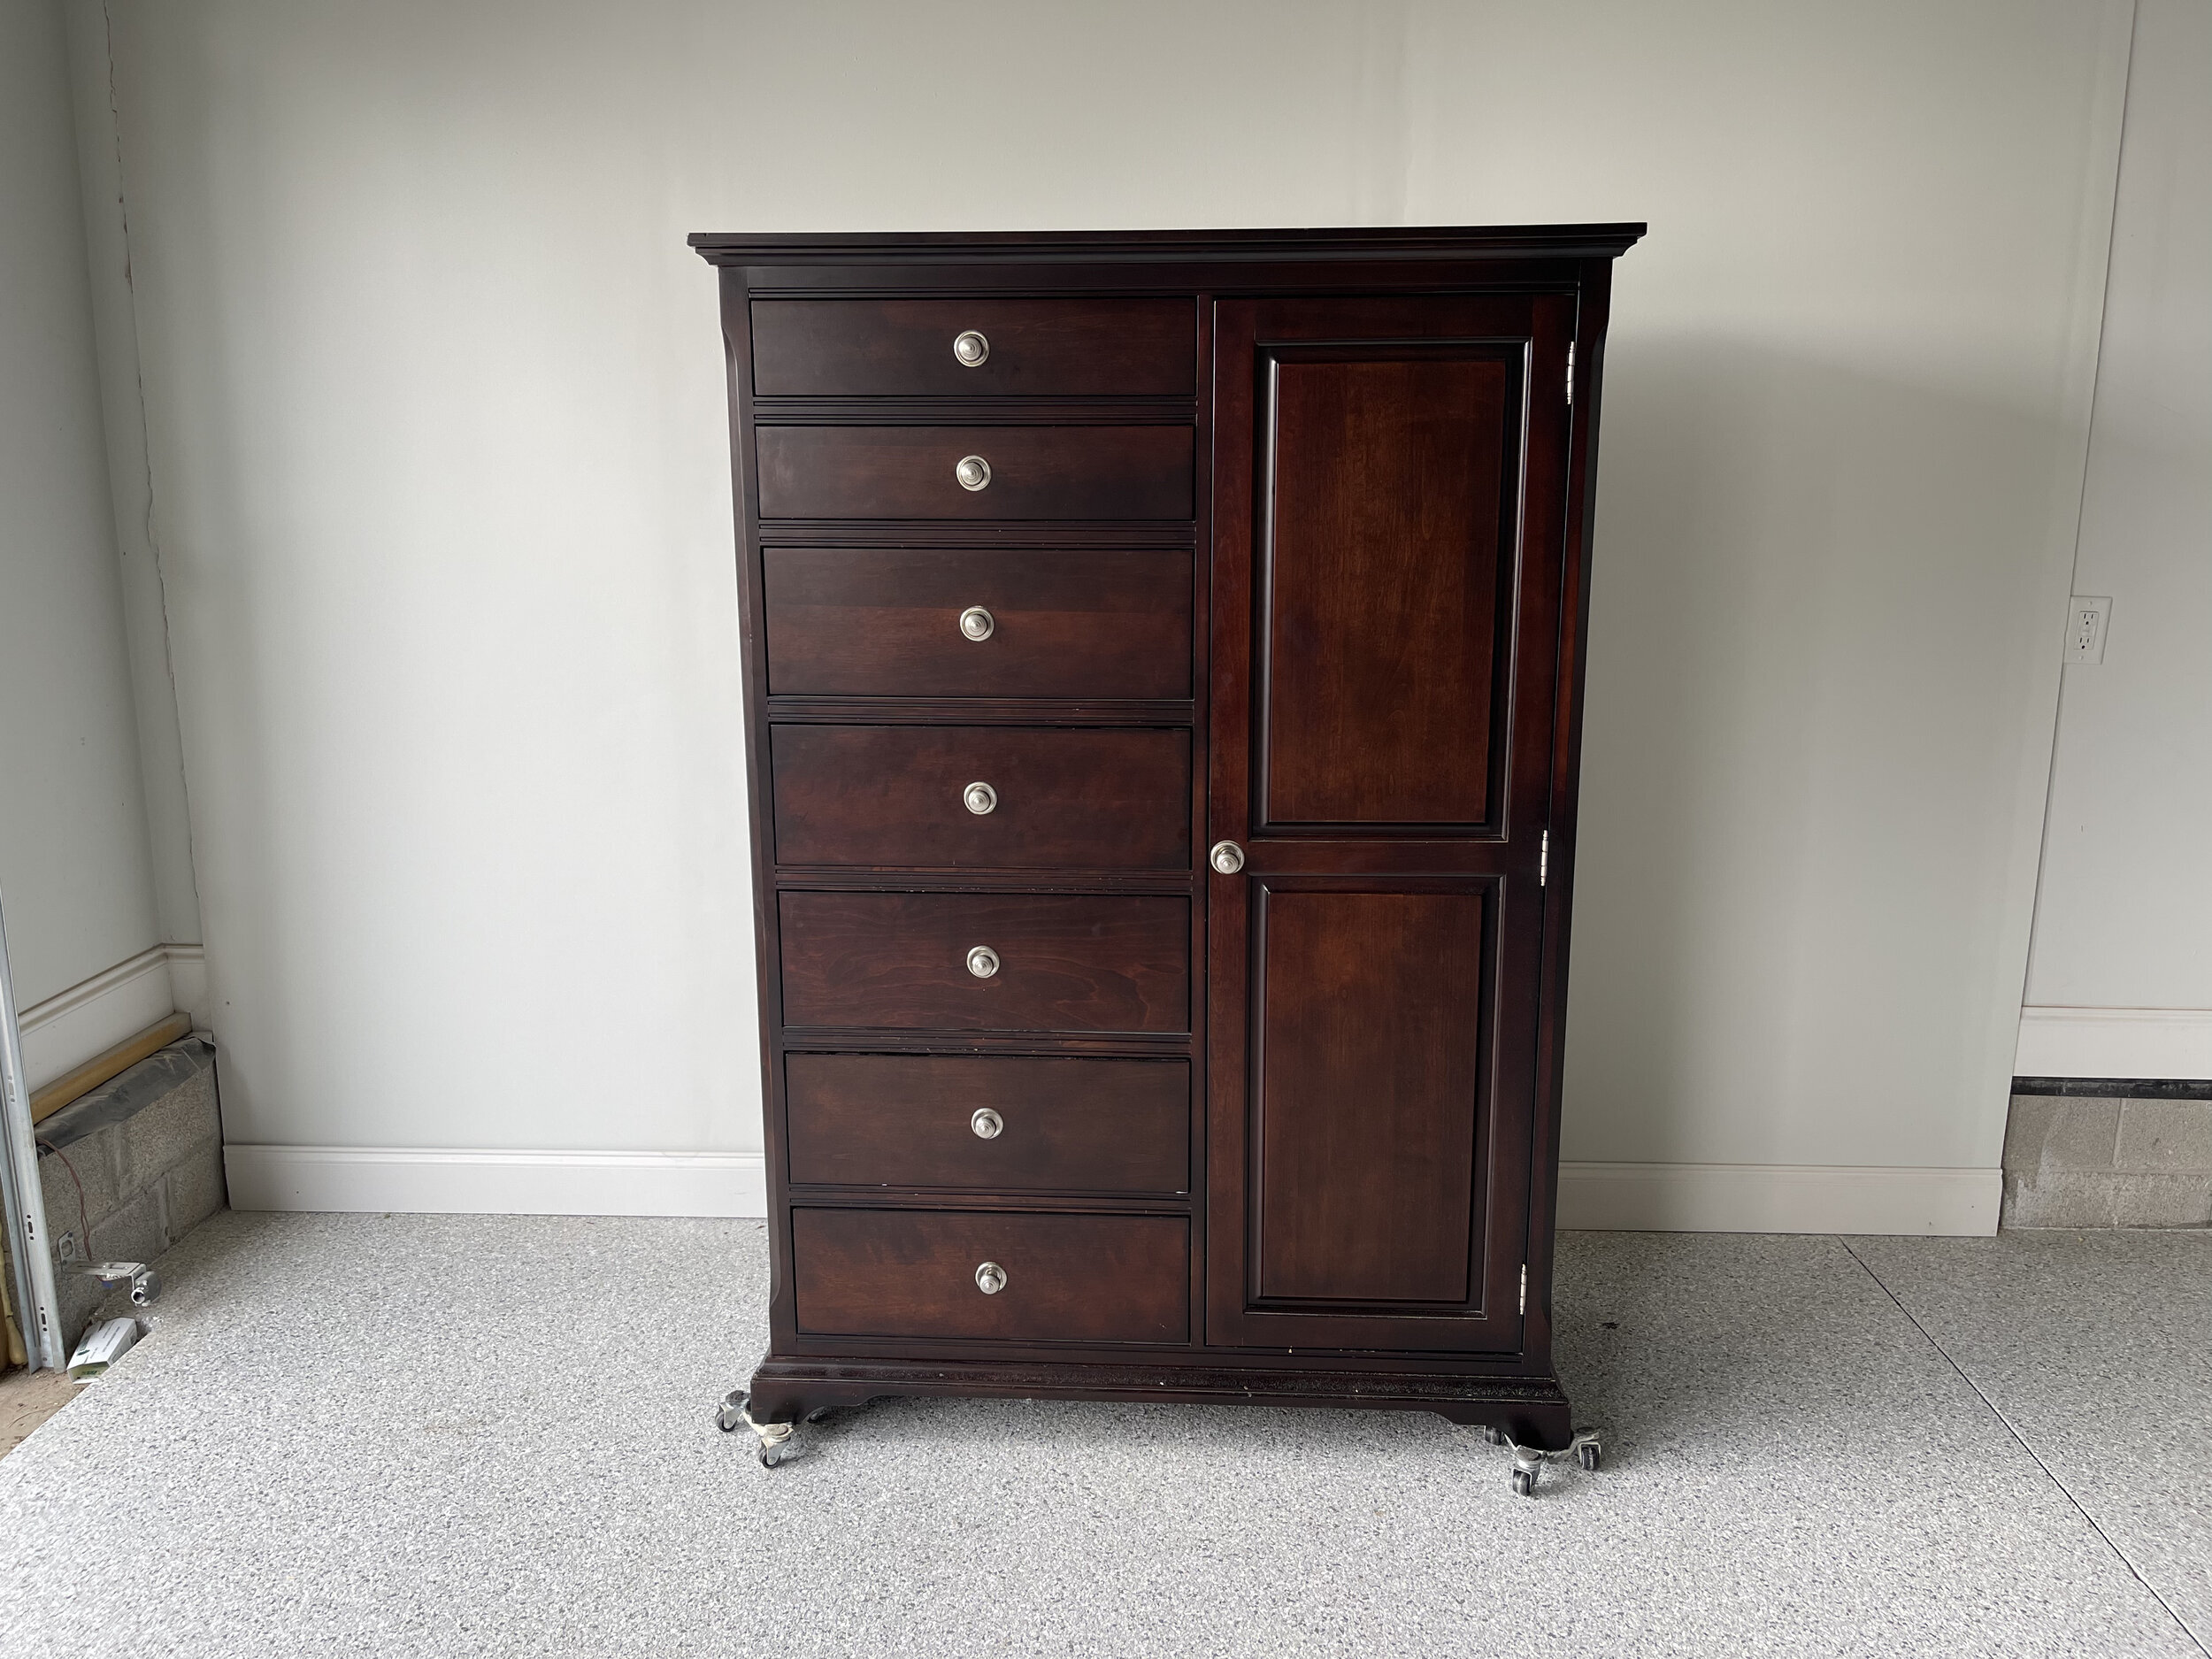
I’ve made over our nightstands and bed from this same set and have been putting this piece off because it was so intimidating. But guess what? The paint spray gun made this project so much faster and easier than doing it by hand.
So if you’re looking for a step-by-step list and bonus tips on how to use a paint spray gun for beginners, keep on reading. This is for you.
But first, let’s talk about a couple of frequently asked questions when it comes to Paint Spray Guns!
How Much Do Paint Spray Guns Cost?
A quick Amazon search will show you that Paint Spray Guns range anywhere from $40-$500. So I can understand how that might be overwhelming in making sure you choose the right one.
But what I’ve learned very quickly in the furniture refinishing world, as it is with most anything, investing in a good quality piece is the right way to go. And the reason why I love the Wagner Flexio 3000 is that it’s great quality AND pretty dang affordable.
What Is the Best Spray Paint Gun For Furniture Projects?
This is only like my fourth or fifth time spraying. And I get a lot more confident every time I do it. I think this Wagner sprayer is a great beginner's sprayer. It's really easy to clean and it's really easy to use.
So don't be hard on yourself. Don't expect perfection the first time you're going to get better at spraying each time you pick it up and try it out. I get better each time I try it out and it saves so much time. I wonder every time I use the sprayer, why I don't spray more often!
Materials Needed for This Project
Surf Prep 3" x 4" Electric Ray (Use Code PRETTYDISTRESSED10 for 10% off your order)
Step-By-Step Tutorial: Paint Spray Gun for Beginners
Step 1: Prepping the Piece
Clean the piece
I'm starting with my Dixie Belle White Lightning, which I like to put in a spray bottle like this, and just using a scrubby sponge to remove any dirt grease. I used to pledge this thing a lot. So the TSP soap is really going to help break that down. And once I'm done cleaning, I'm going to grab that clear water and give everything a good rinse to remove that soap residue.
Remove Hardware
I am going to be reusing this hardware today, but giving it an update. These are recessed hardware holes, and I have filled these on the other two pieces. And I definitely did not want to do this at this time because it is a lot of work filling, deep holes like that.
Repair Dings, Gouges, etc
I just have a few nicks dings to fill. So I'm grabbing some Dixie mud letting that dry overnight. And then I'm using a Surf Prep RAD pad to sand this down to show you guys how easy that is to do. But I am going to use my surf prep sander. You guys know you see this in every makeover. It just makes my job go a lot faster. And I'm using one of the foam abrasive so that I can get into these details really well.
Sand it Down & Wipe Off the Dust
And then I'm using a Surf Prep RAD Pad to sand this down to show you guys how easy that is to do. But I am going to use my Surf Prep sander. You guys know you see this in every makeover. It just makes my job go a lot faster. And I'm using one of the foam abrasive so that I can get into these details really well.
Note: If you don't have a sander, you could definitely do this by hand with that Surf Prep RAD pad or regular sandpaper.
And after I'm done with all my sanding, I'm just taking some water and a clean rag and wiping back all that dust.

Bonus Tip #1:
Slick Furniture - Scuff it Out: I am going to give this a scuff sand so that my paint will adhere just a little bit better. And this sander is going to make that go really fast and look at these foam abrasives, go to work.
Tape Over any Hinges or Hardware left on Piece
Since my drawers are flush with the frame, I'm not going to have to remove drawers or the doors to spray this thing, but I am going to tape up these hinges because I don't want them to get clogged up with paint. And I definitely want them to function.
Step 2: Prepare for Spray Painting
Protect from Overspray with Wagner Pop-up Tent
There is a little more prep when it comes to spray paint because it can get pretty messy. So I'm setting up my Wagner Pop-up Tent to protect my garage from any over-spray. Do what you can with what you have, but I love this pop-up tent because it’s quick, easy, convenient, and not very affordable.
Strain Paint
I'm going to be going with Dixie Belle Caviar today. This is their blackest black that they have to prep this to put this in my sprayer. I'm just going to mix it up really well. And then I'm going to run it through a strainer so that I don't have any bits that are going to clog up my gun.
Water Down Thick Paint
This paint is really thick, so it takes a little while for it to run through the strainer. But once it's done, I water mine down. So it'll run through the sprayer more easily and it will give you a smoother finish for this particular paint. I find that I like to water it down about 20%. So I think this is about 20 ounces of paint. And I ended up using four ounces of water.
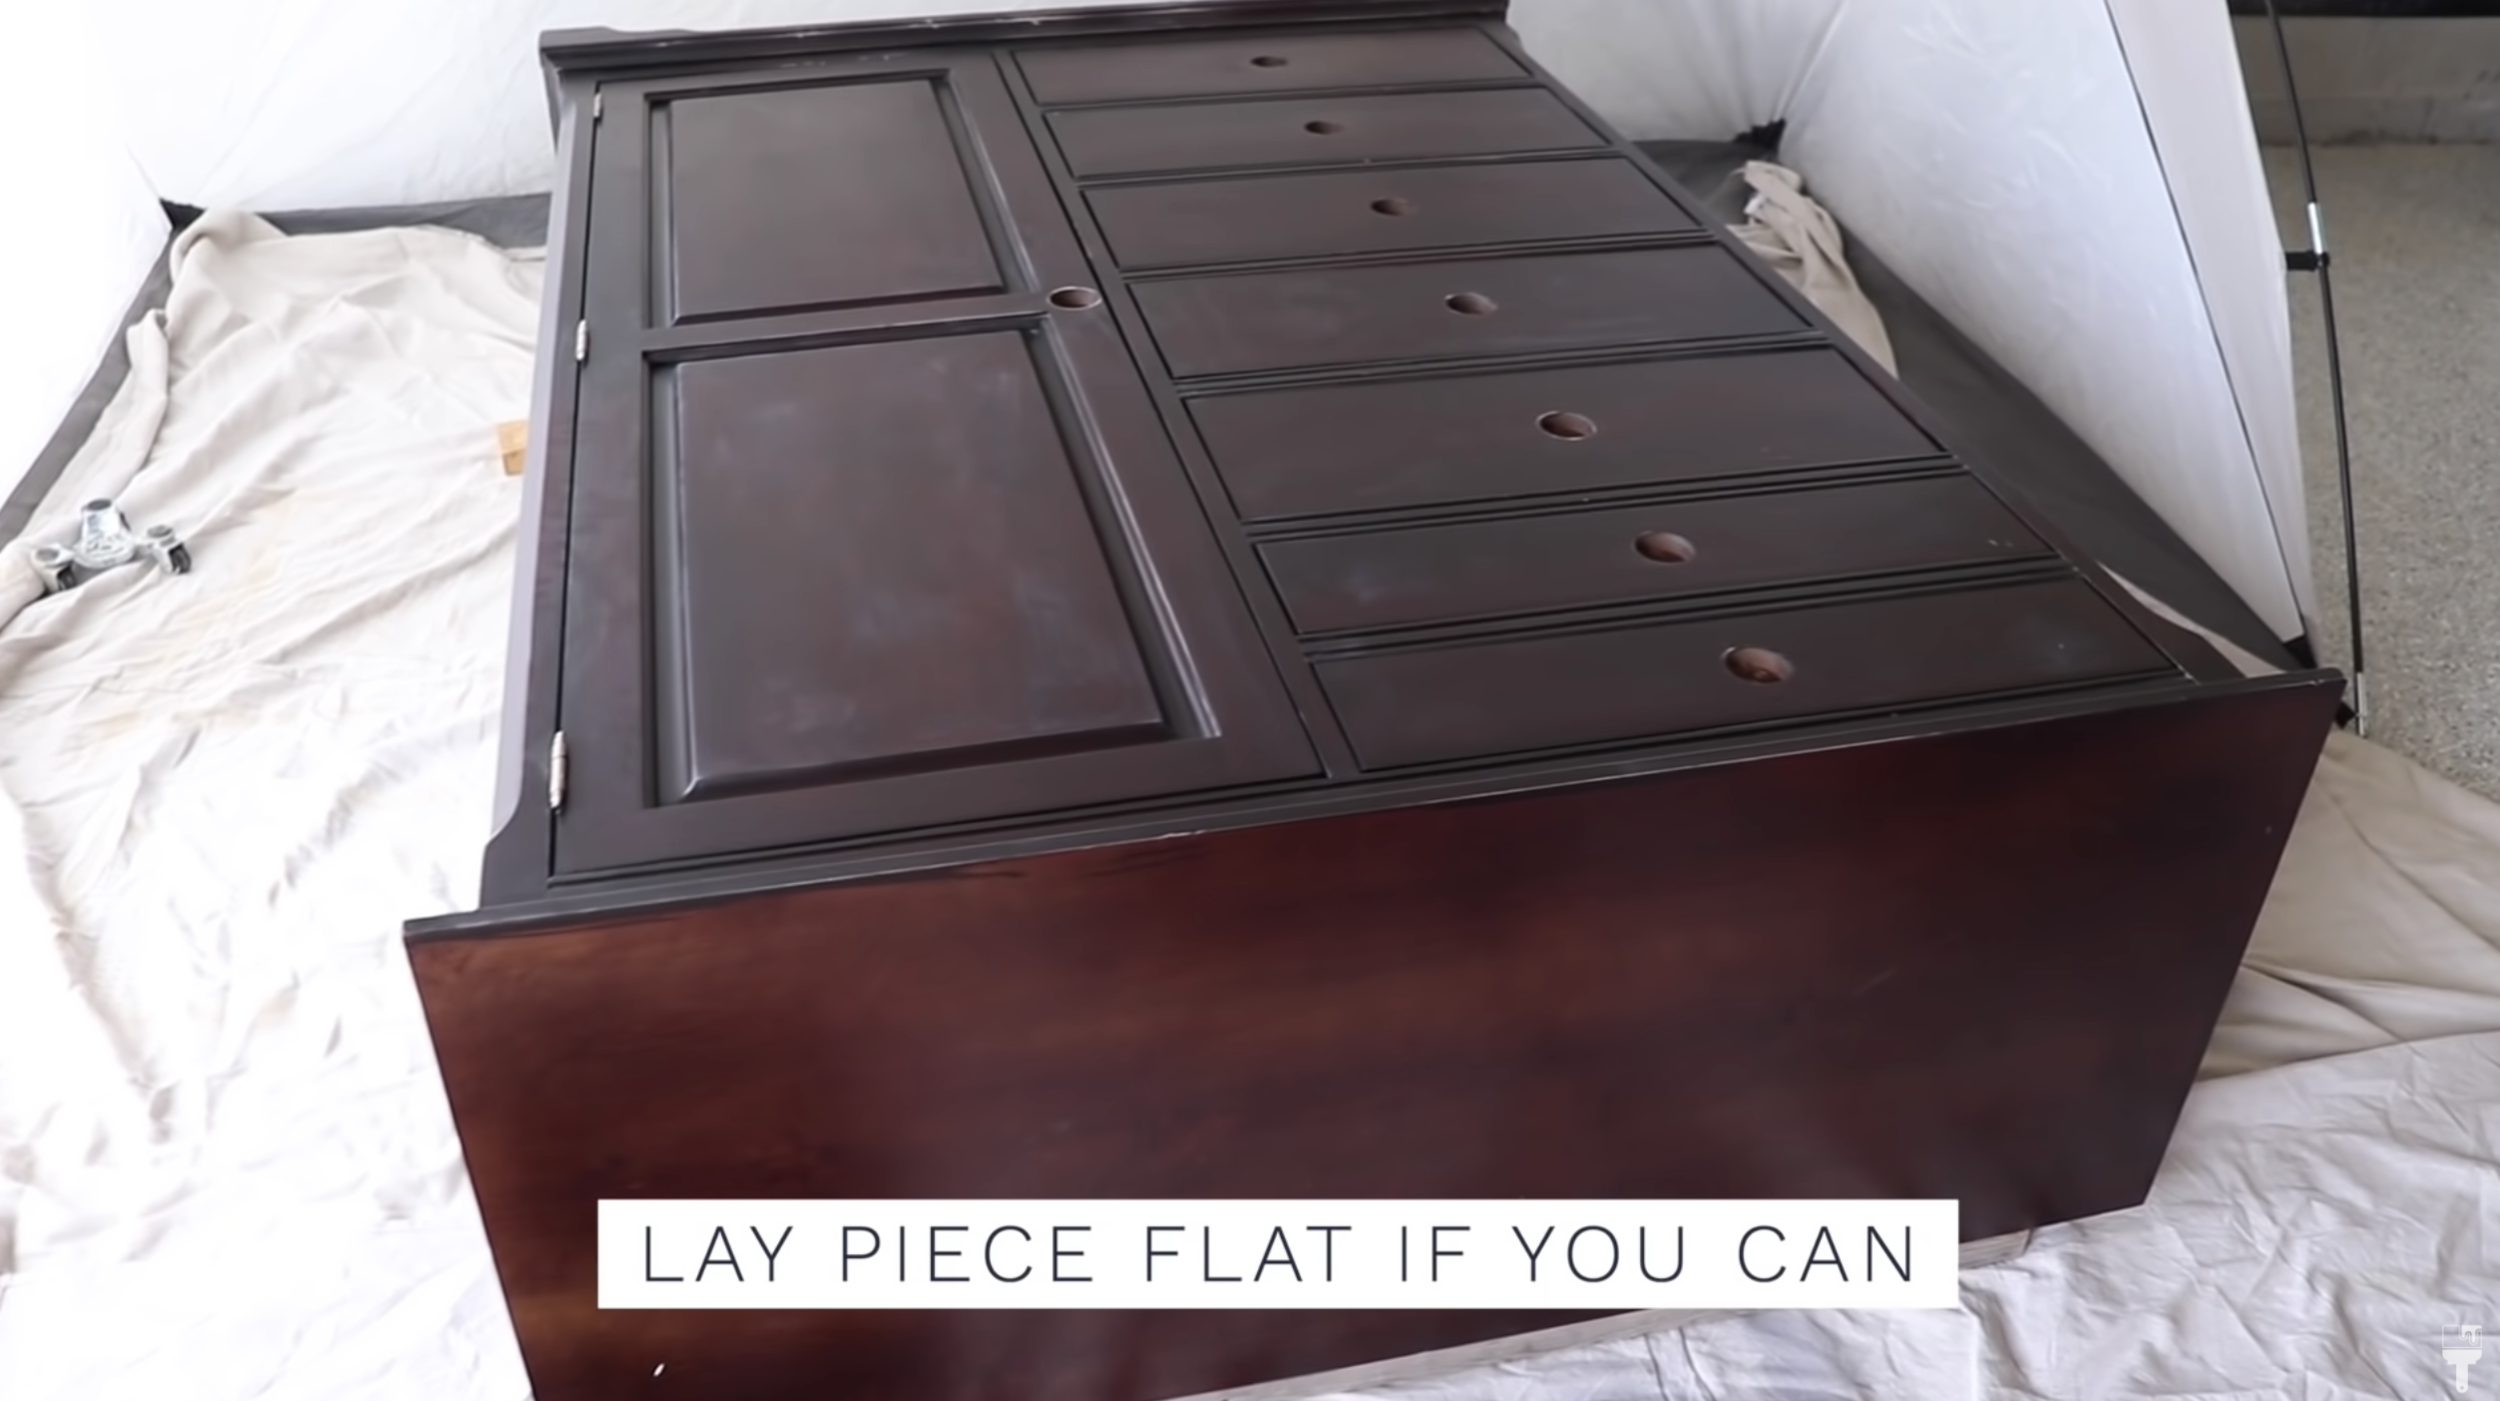
Bonus Tip #2:
My number on spray gun tip for beginners is to lay your piece flat like this, it's just going to give your paint a little bit of extra help from gravity and have everything level out in case you use too much paint.
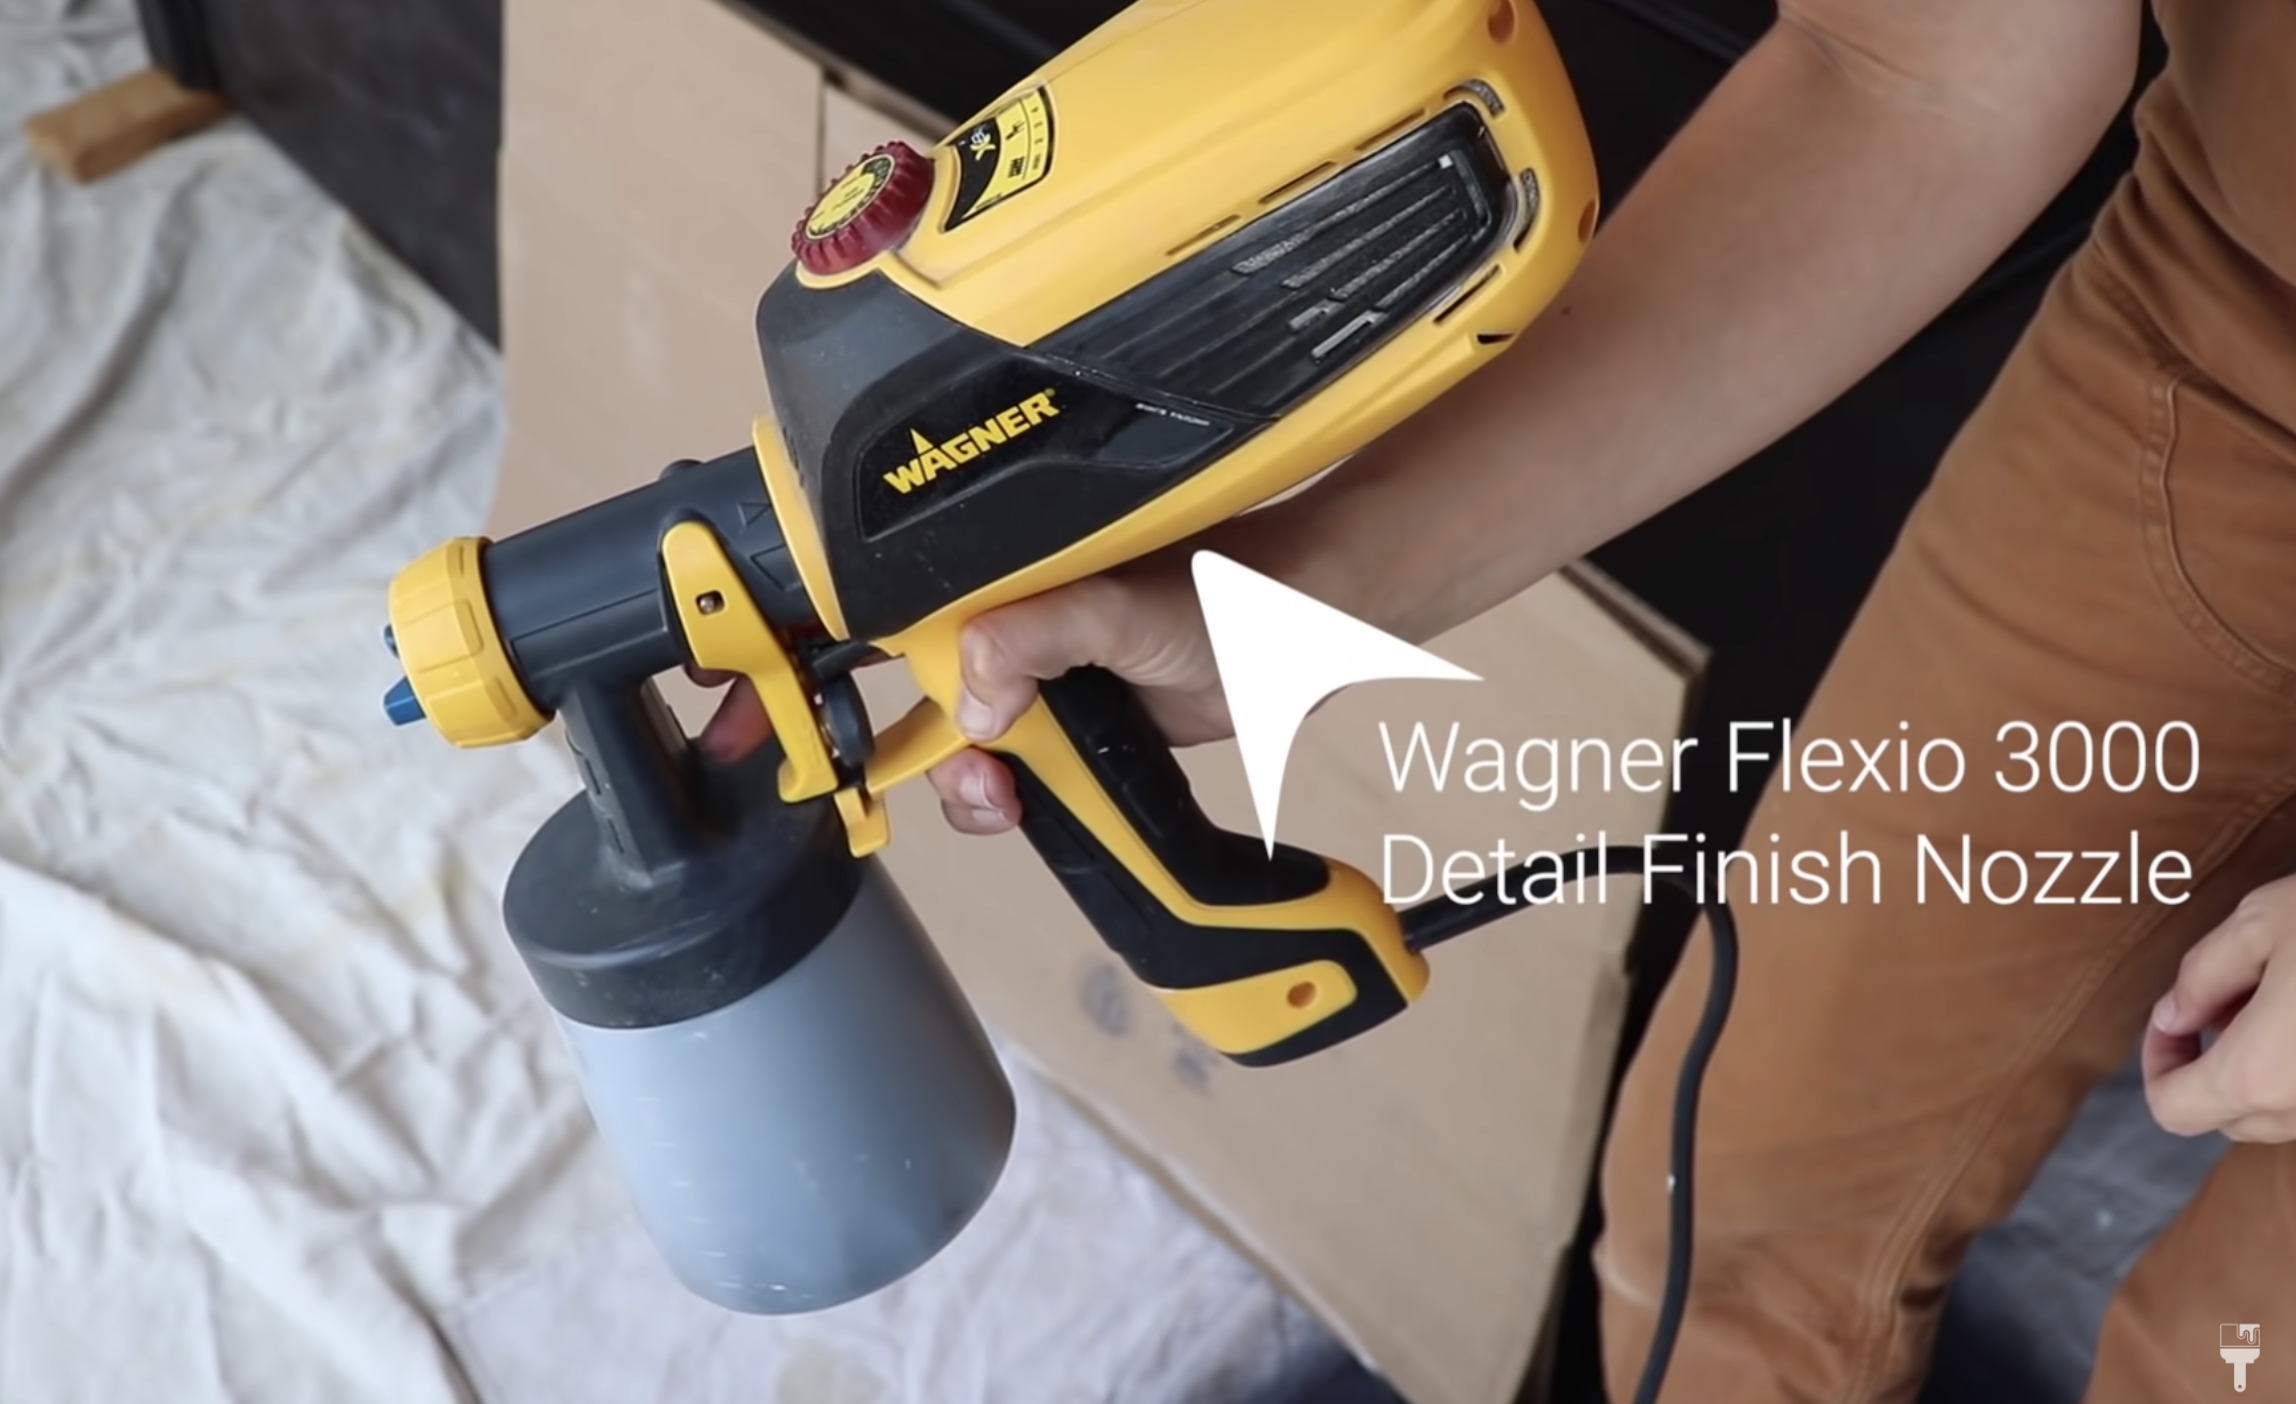
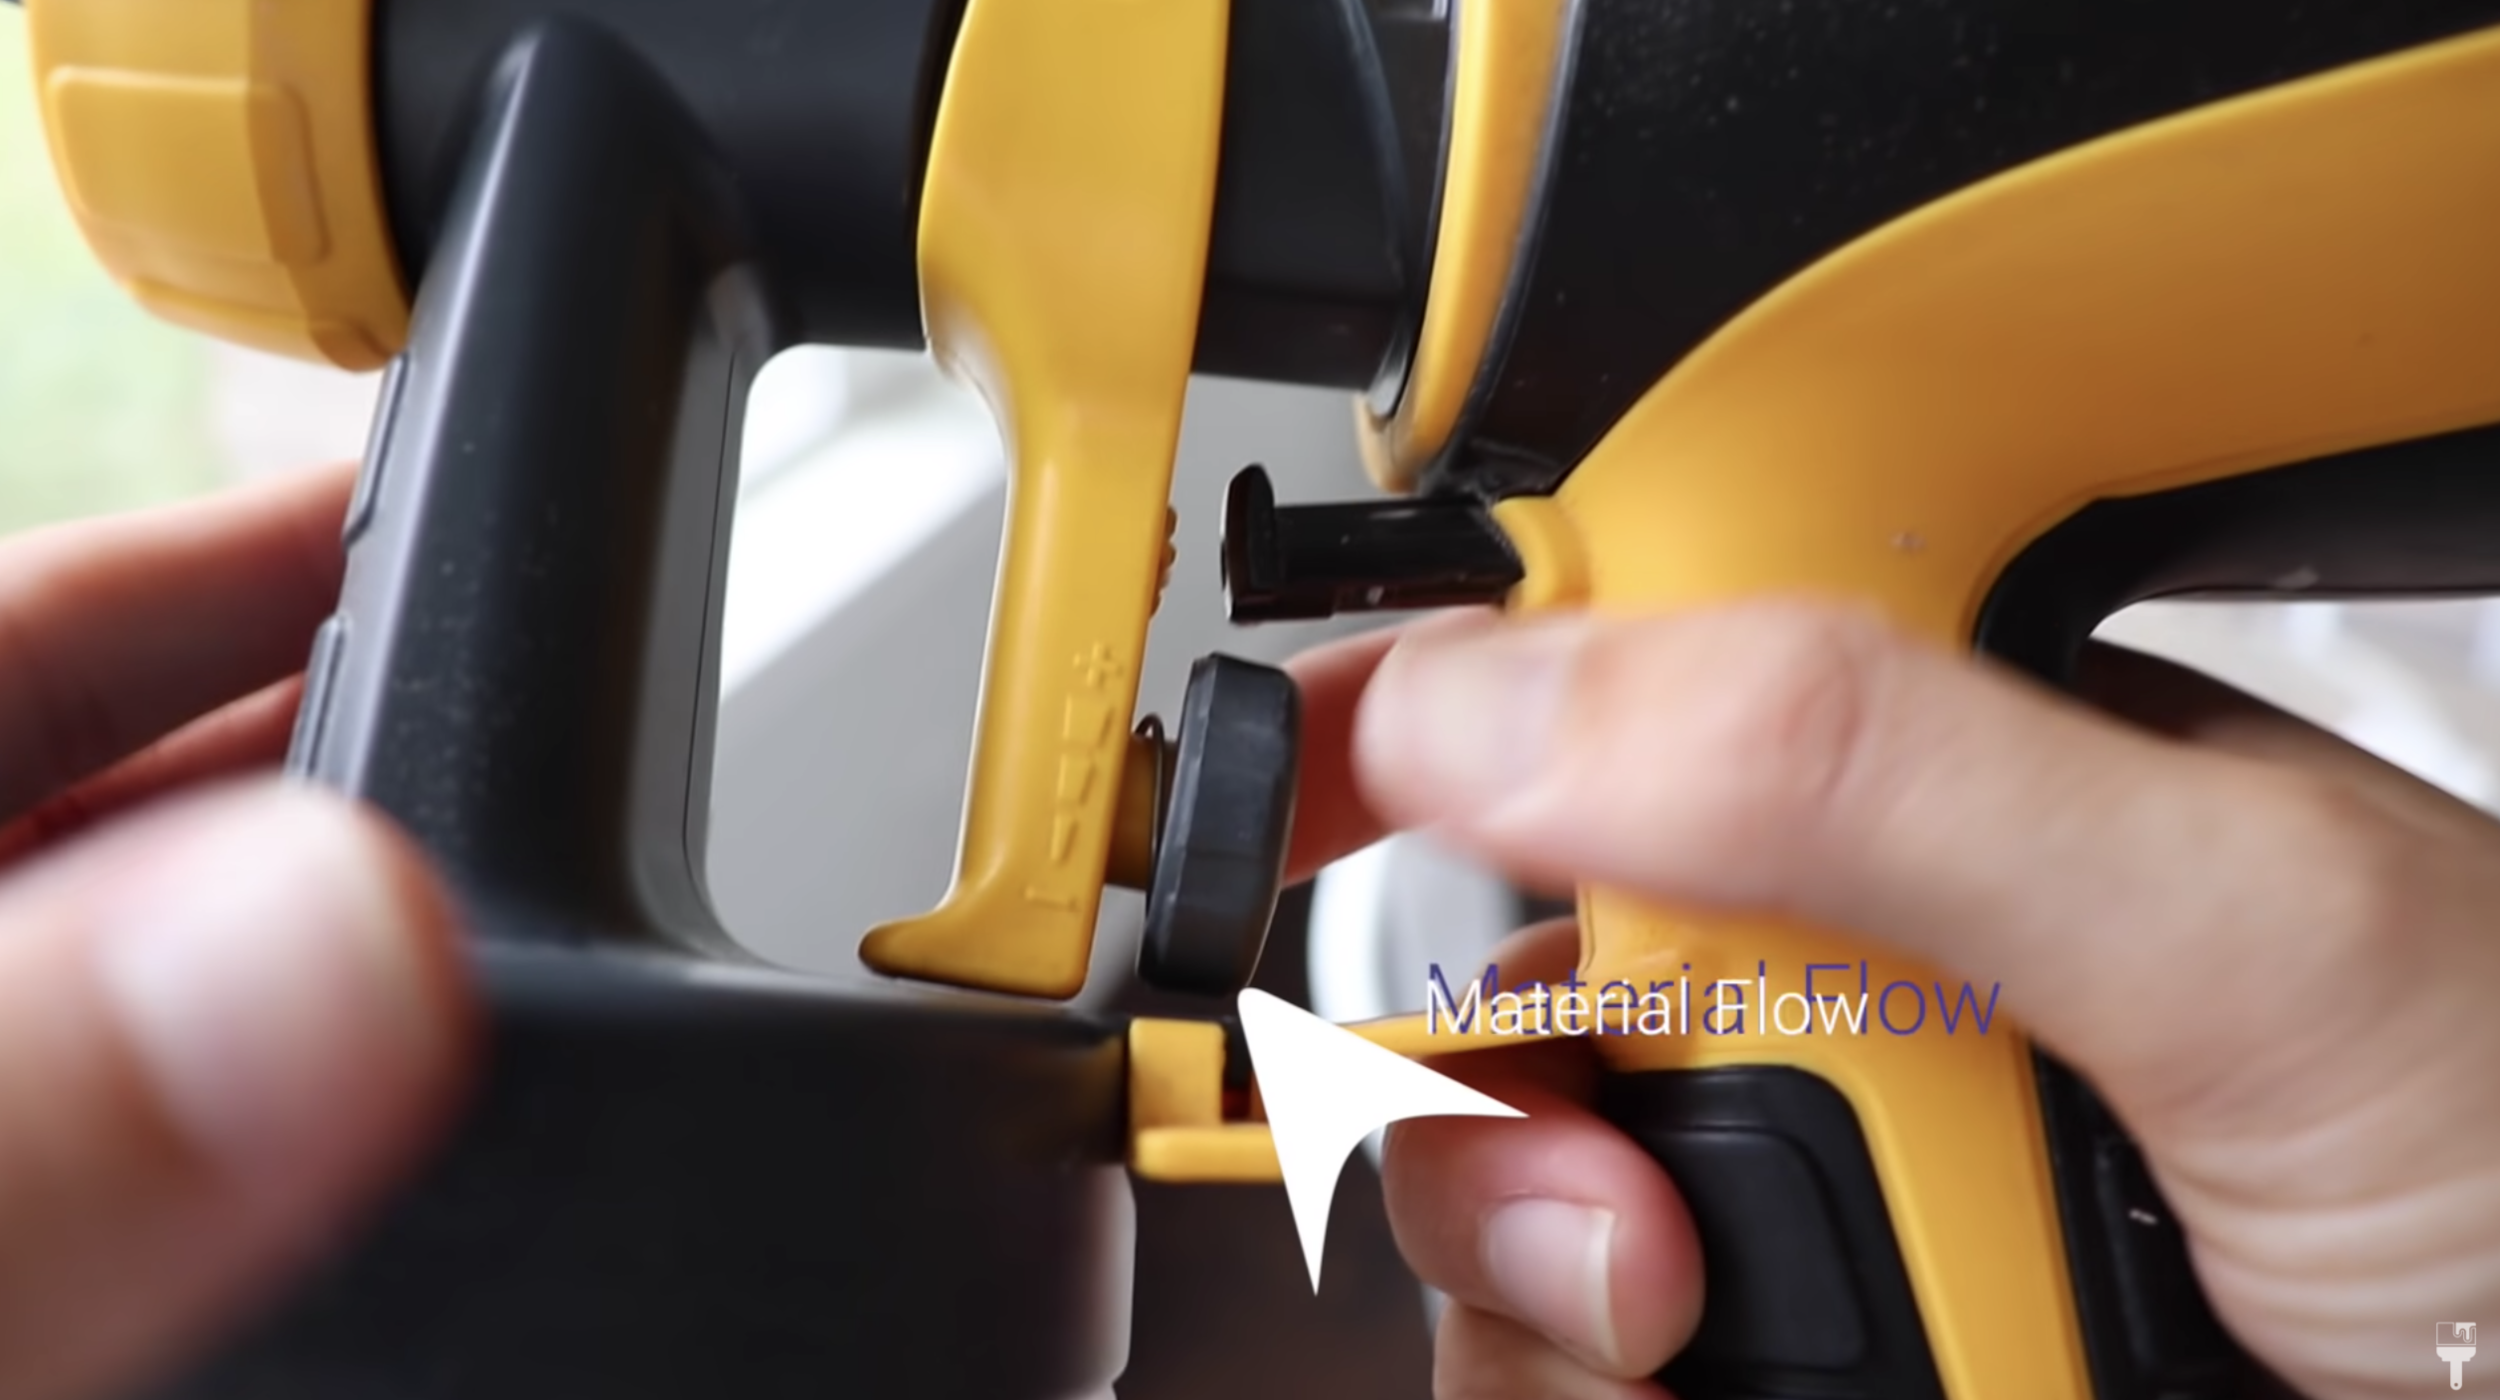
Adjust Nozzle & Air Power
For this project, I used the “detail finish nozzle” on my Wagner Flexio 3000. I made sure that the intake tube was pointing down because I mostly painted in a downward motion, I have found that my best spraying is to set the air power at about a five because it is a thicker paint.
I also start with my material flow pretty low, but I usually end up bumping that up too (see image below).
Lastly, make sure that the nozzle is in the horizontal setting if you are spraying side to side (left to right) and in the vertical setting if you are spraying up and down.
Note: I do have a full YouTube tutorial on this because, so if you’re more of a visual person, head over there to get more details!
Step 3: Spray Paint the Furniture Piece
Test On Cardboard Box
The best thing that I can tell you to do as a beginner is to test your paint flow out on a cardboard box right before spraying on the piece. You want to do those every time you pick up your sprayer so that you can adjust your flow and get it just right before you actually take it to your piece of furniture.
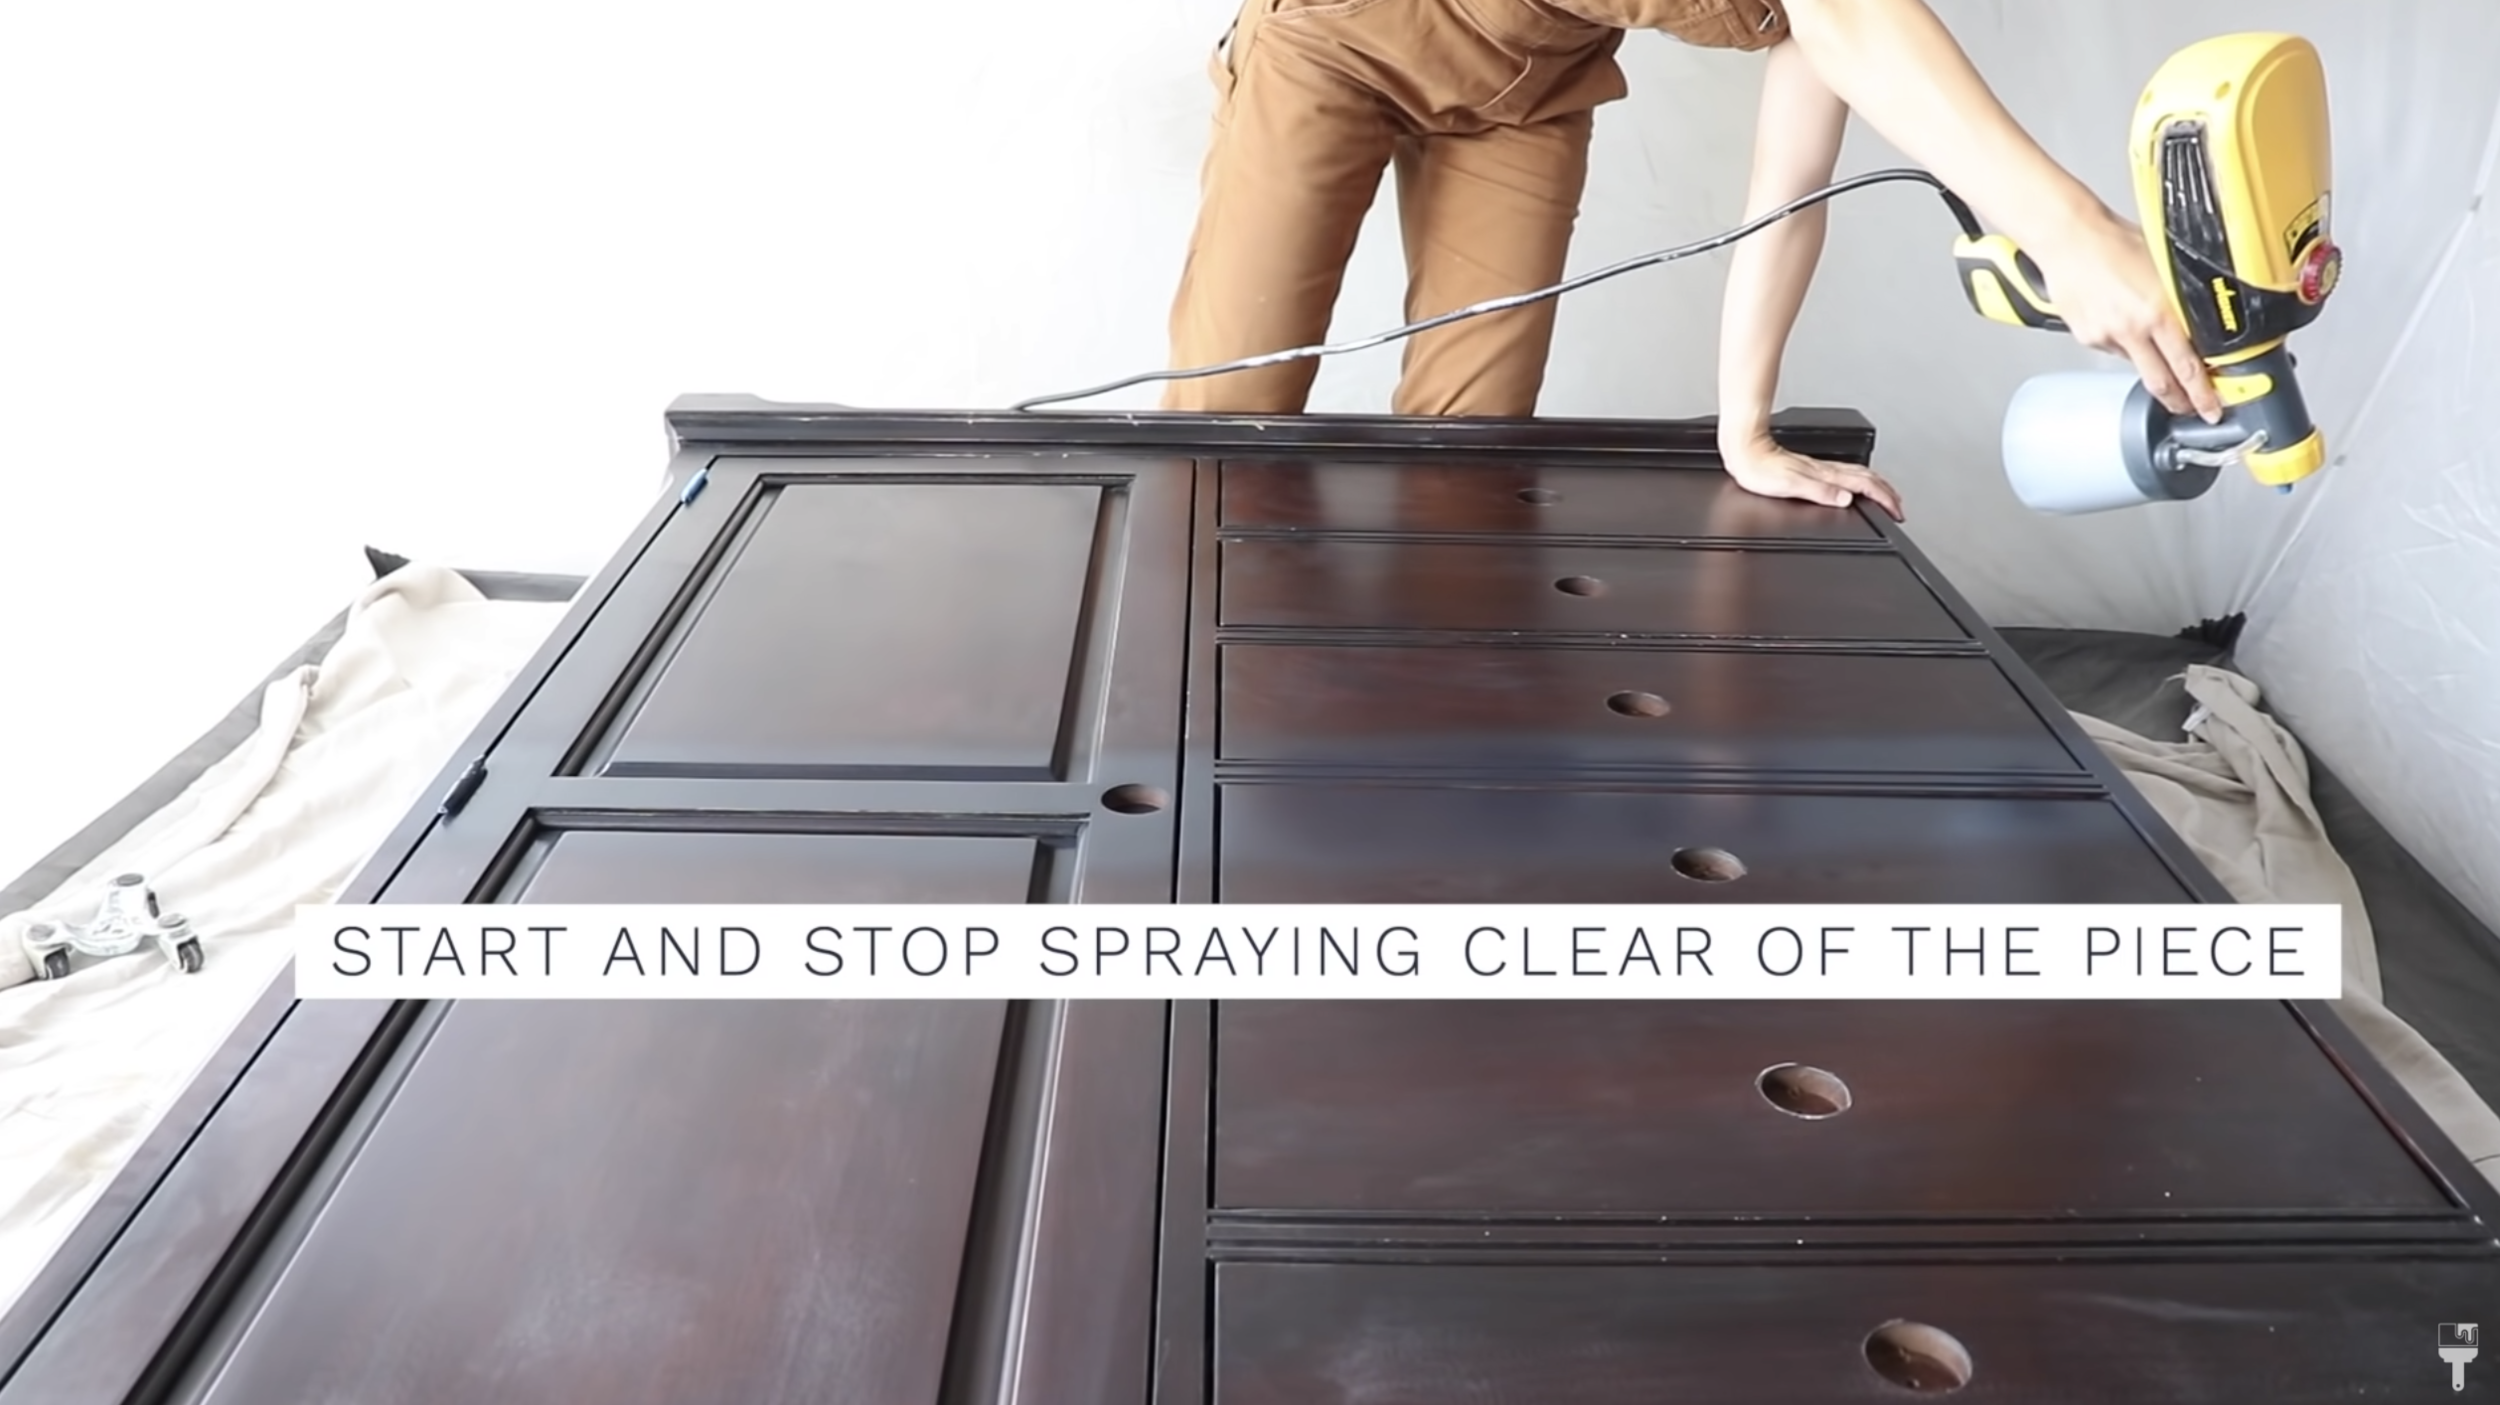
Bonus Tip #3:
Here are my best beginner's tips for you. You want to start off your piece before you pull the trigger and then go a little bit past your piece before you let go. You want to be about six to eight inches away from your surface and you want to go slow and steady.
Paint the First Coat
The easiest way to describe how to spray gun paint your furniture piece is to give you a series of bullet-point tips. so here we go:
If you go too fast, you're not going to get enough paint on your surface. And if you go too slow, it's really going to pull up and sag.
You want to overlap your spray pattern by 50%. So after you do your first pass, when you come back for the second, aim the middle of the nozzle at the bottom of your last spray pattern.
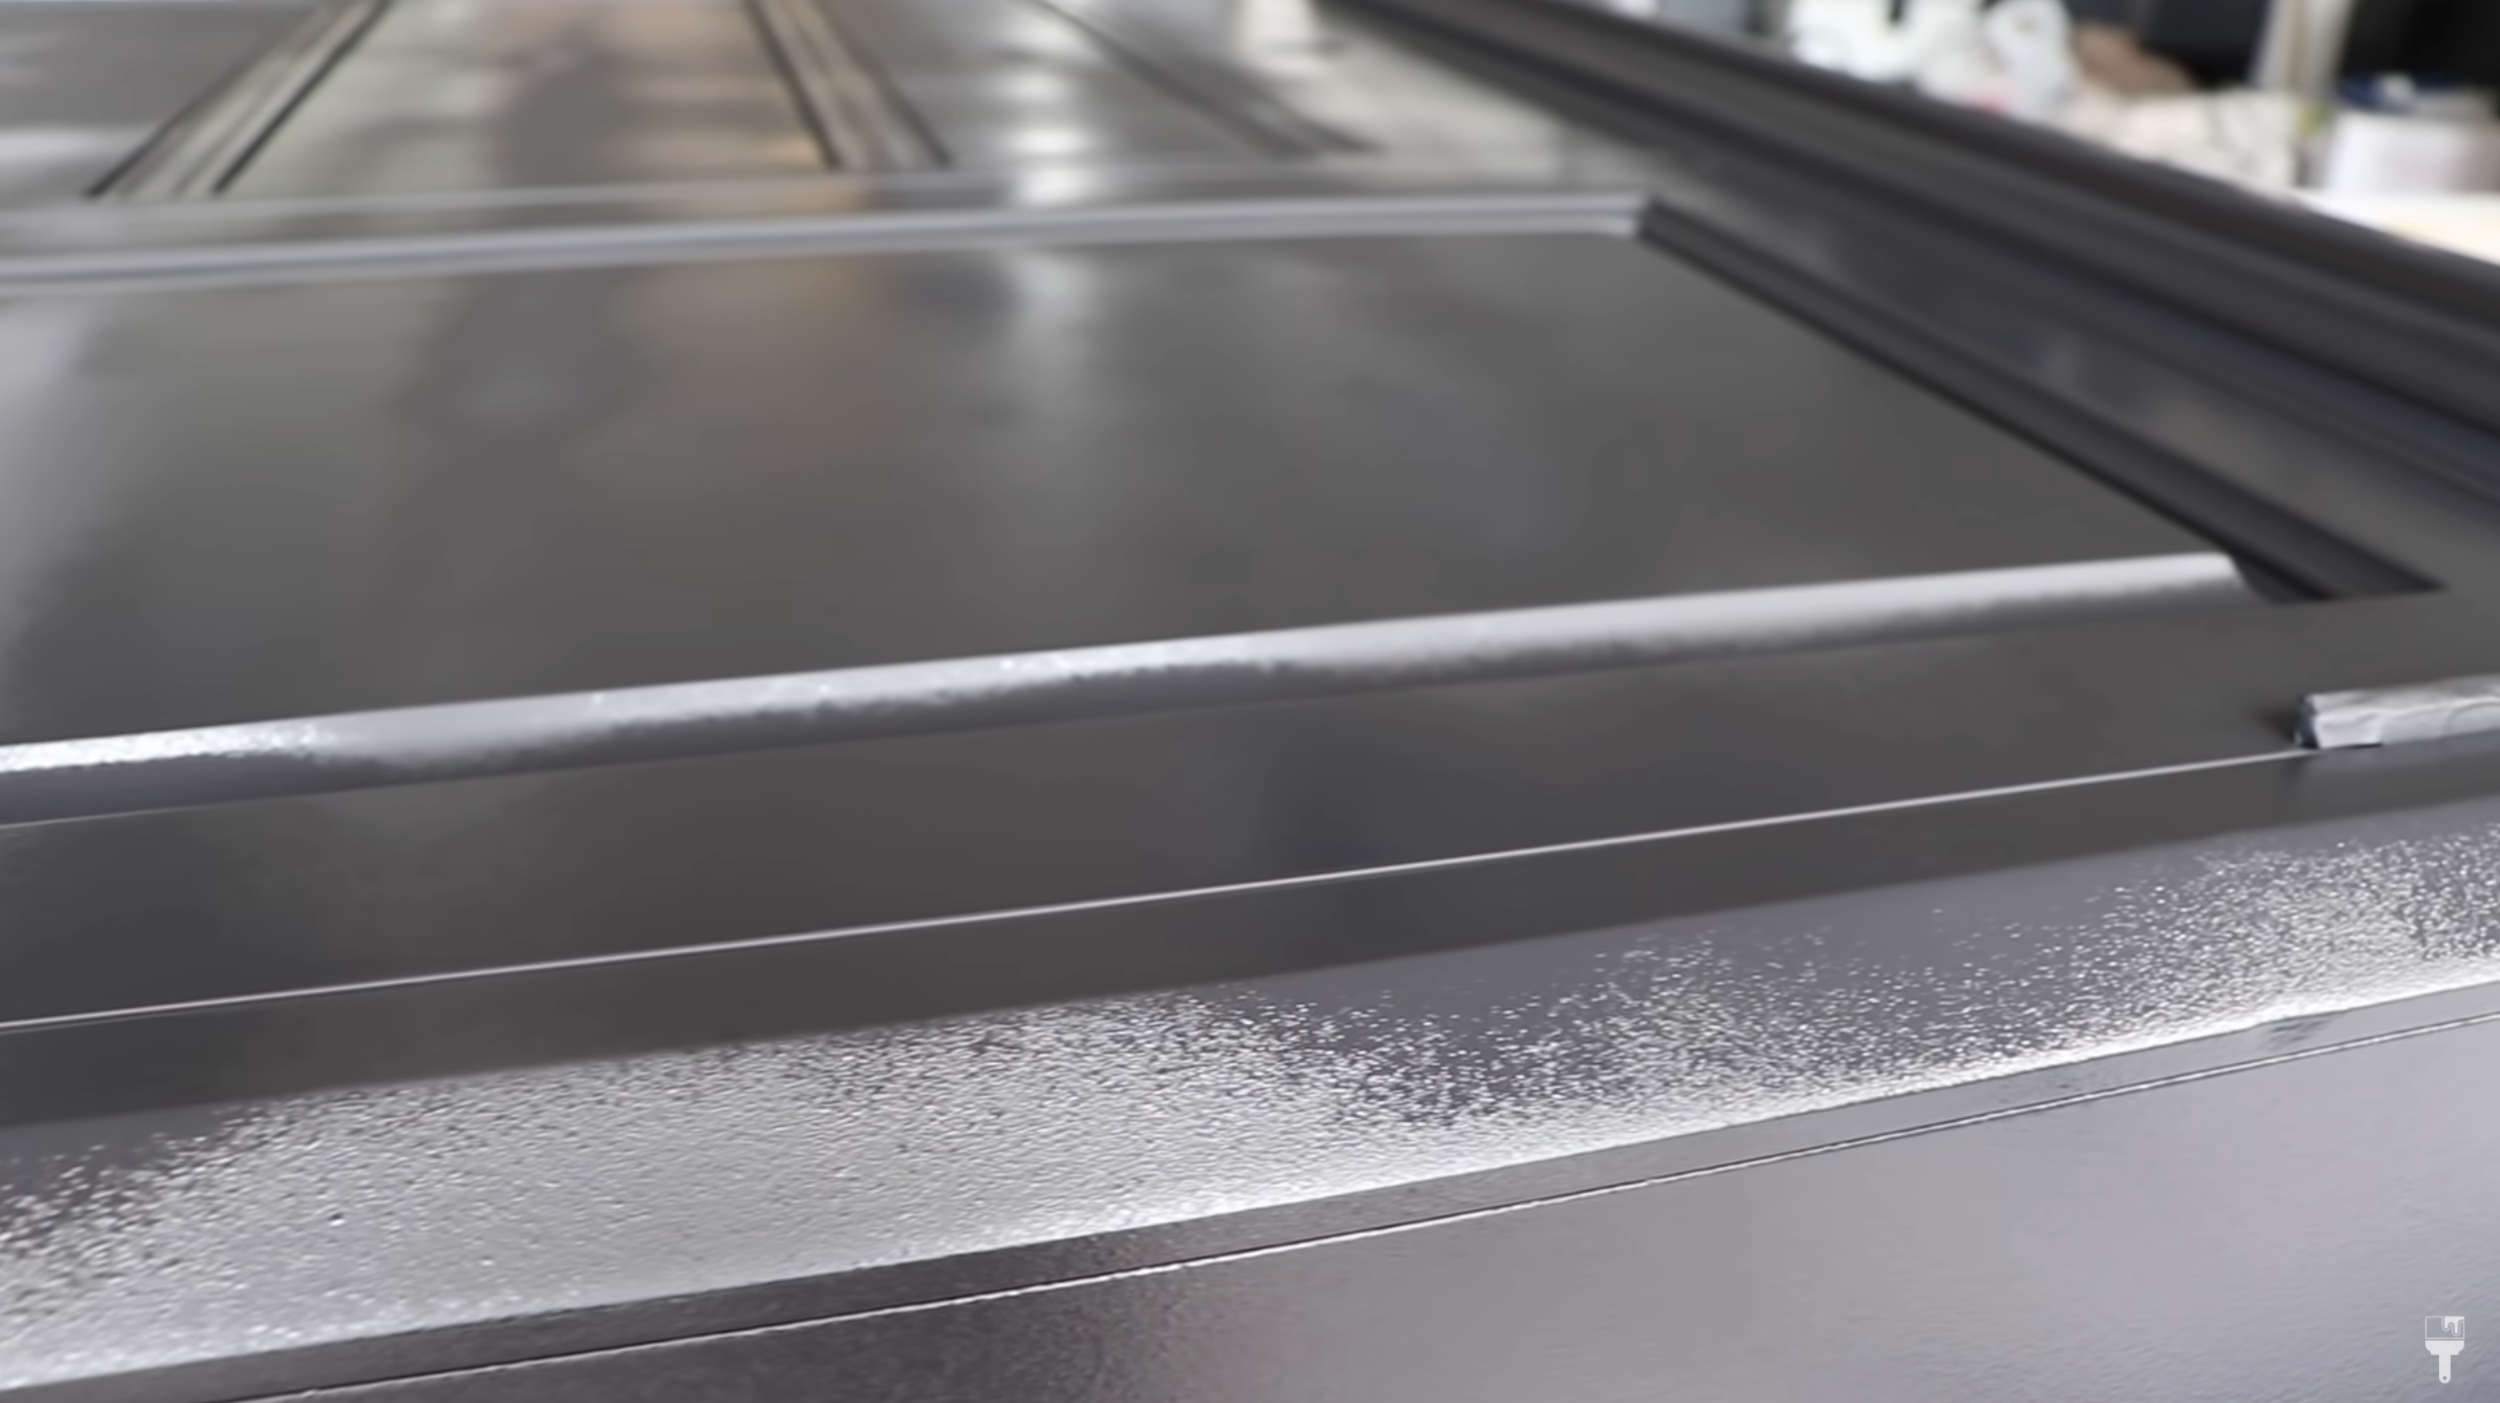
The detail nozzle I used is going to give you a really smooth finish. It's meant for small projects like this, and to give a fine mist finish.
It might look slightly textured as it goes on like an orange peel, but as it dries, it will really level out.
Another beginner's tip for you is to keep your wrist locked. You don't want to flex it or break your wrist. That's going to give you an uneven finish.
You want to try to maintain the same level from your piece the entire time that you're painting, remember to go slow and steady.
Let Dry for Two Hours & Buff Imperfections
So I let the piece dry for two hours, and it just leveled out beautifully. It looked so buttery smooth, but it did have a few little hiccups here and there. Don’t worry if this happens to you… those are easy to buff out.
To buff it out, grab a Super Fine Surf Prep Rad Pad and sand those areas where you see little pieces of fuzz or little imperfections. You could definitely sand down the entire coat to get a really super smooth finish.
After fixing those imperfections wipe back that dust with an old t-shirt (black if you are working with dark paint and white if you’re working with light paint)
Second Coat
The second coat is going on just the way the first one went on. I didn't clean out my sprayer between coats because I did it within a couple of hours. If you were letting your sprayer set overnight, I definitely would clean it out in between coats.
Bonus Tip #4:
If you get an orange peel look (like this image), don’t worry or freak out. This will level out as it dries down.
Step 4: Hardware Makeover
As I mentioned earlier, I made over this hardware because I did not want to fill in the huge recessed holes on my Gentleman’s Chest. This is just going to be a lot easier. so here is a quick step-by-step of what I did:
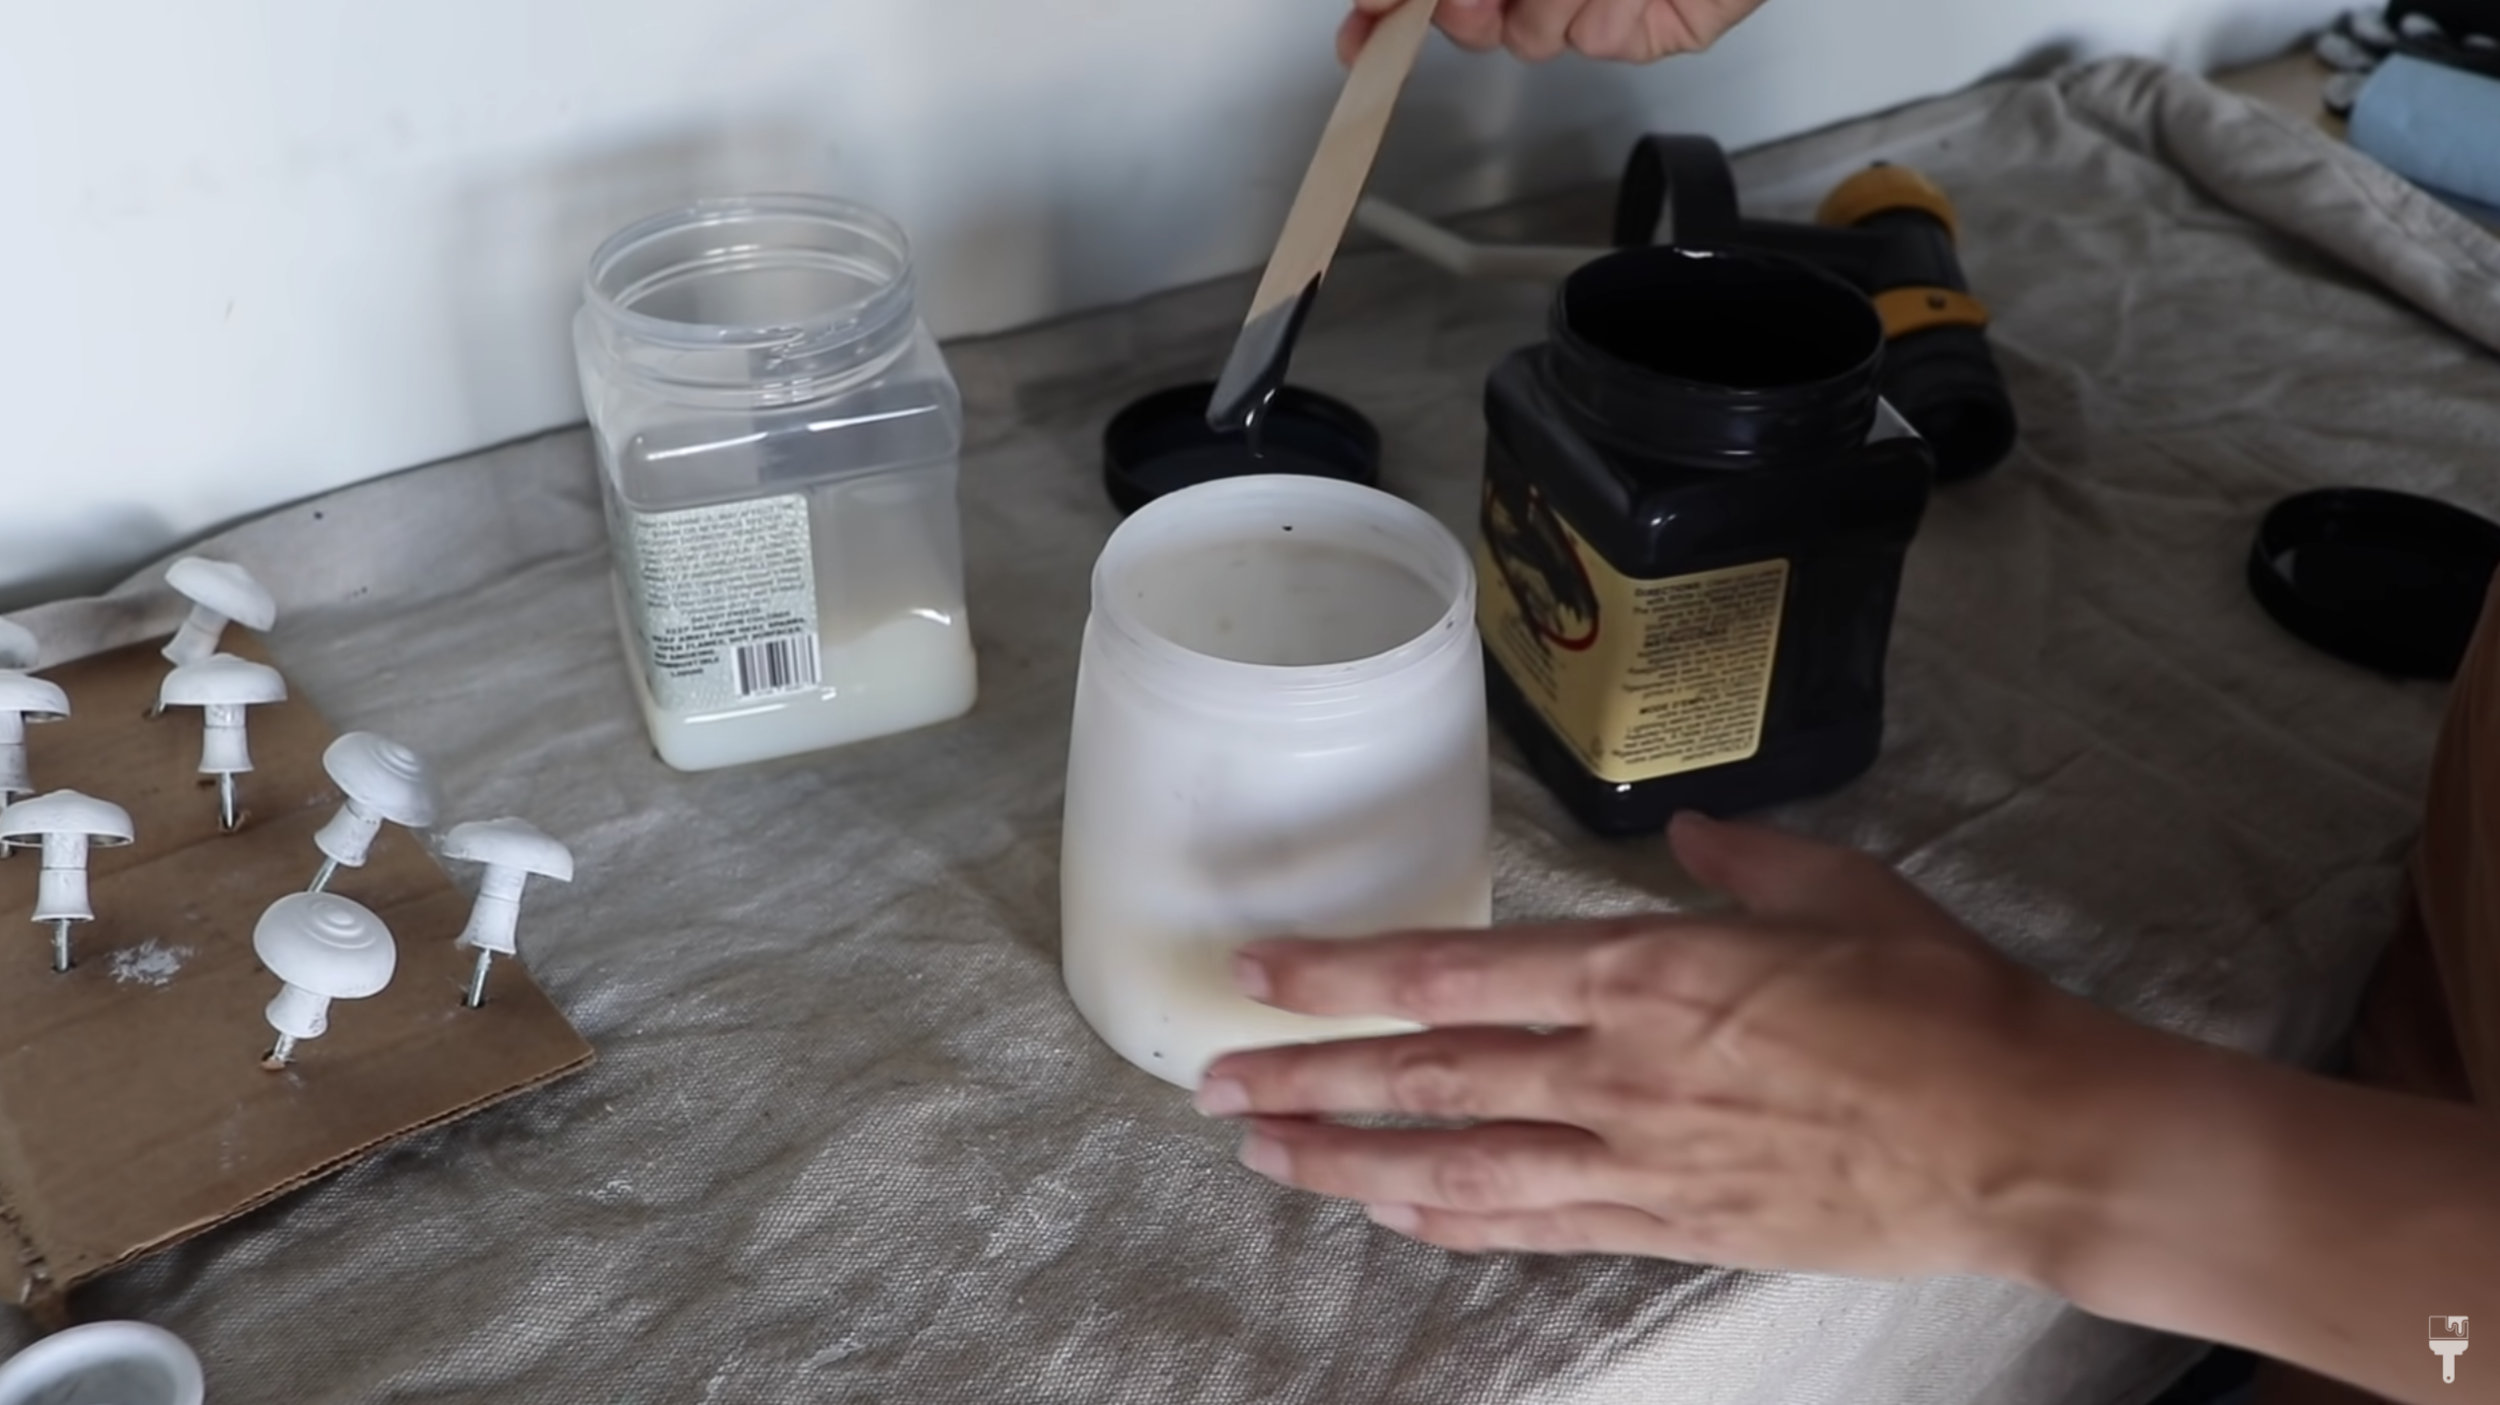
Clean Hardware
I already cleaned the hardware when it was on the piece. So I took a rag and made sure there was no dust on it. Since these are metal and really shiny, I used gilding wax on top of them, but that wasn’t going to stick to this type of finish.
Primer
So I put a coat of Dixie Bell Slick Stick primer on them. Since these are metal and really shiny, I'm going to use gilding wax on top of them, but that's not going to stick to this type of finish. I've tried that before and it did not work. So I'm going to put a coat of the slick stick on. Let it dry for at least 4 hours and put on a second coat.
Gilding Wax
To apply the Gilding Wax, I used a little detail brush. You could definitely start off with doing a paint first, but I kind of liked the effect it gave having the white underneath. So this is just saving me a step by going right on with the gilding wax. And it worked perfectly, and these look like brand new hardware now.

Step 5: Time for the Top Coat
I would suggest letting your piece dry overnight before moving on to the last step. Hopefully you are as thrilled with your piece as I was…but even still…we’ve still got the top-coat to go!
Dust with Old T-Shirt
First, I took that old black t-shirt again and wiping back any dust that has collected overnight.
Prepare Top Coat & Paint Gun
I’m going to be spraying my top coat with Dixie Belle Gator Hide. Make sure to stir your topcoat really well before running it through the strainer to make sure everything is incorporated evenly.
This topcoat is a lot thinner than my paint, even when my paint was watered down. So you want to have your settings between the minimum and three, and you want to have your flow turned all the way down to low.
And again, practice on that cardboard! I’ve found that having it set on three and having my material flow just a little bit off of the lowest setting is the sweet spot for me.
Bonus Tip #5
If you are working with dark-colored paint, stir in just a dab of it to your topcoat so you don’t get any haze.
Spray on Top Coat
As I mentioned, I use Dixie Belle’s Gator Hide, which is water repellent and their most protective top coat.
After prepping your top coat and spray gun as described above, everything else about spraying is the same as the paint.
Stop and start off of the piece
50% overlap
6-8 inches away from the piece
etc
Sand Back Imperfections
Let that first round of topcoat dry for about two hours. Go back with a Super Fine Sanding Pad and buff out any imperfections or little hairs that may have fallen in the finish.
Second Coat of Top Coat
Then I quickly went to work on putting on my second coat of the Dixie Belle Gator Hide. I decided to go in a different direction than I did on the first pass because it was easier to reach across the piece this way. with this coat, fill in any gaps that I may have missed on that first coat.
Dry Over Night & Finishing Touches!
I let my second coat dry overnight, and then I put my hardware back on. After 12 hours of the gilding wax drying, you are able to buff it out. So I just took a clean cloth and buffed off any excess.
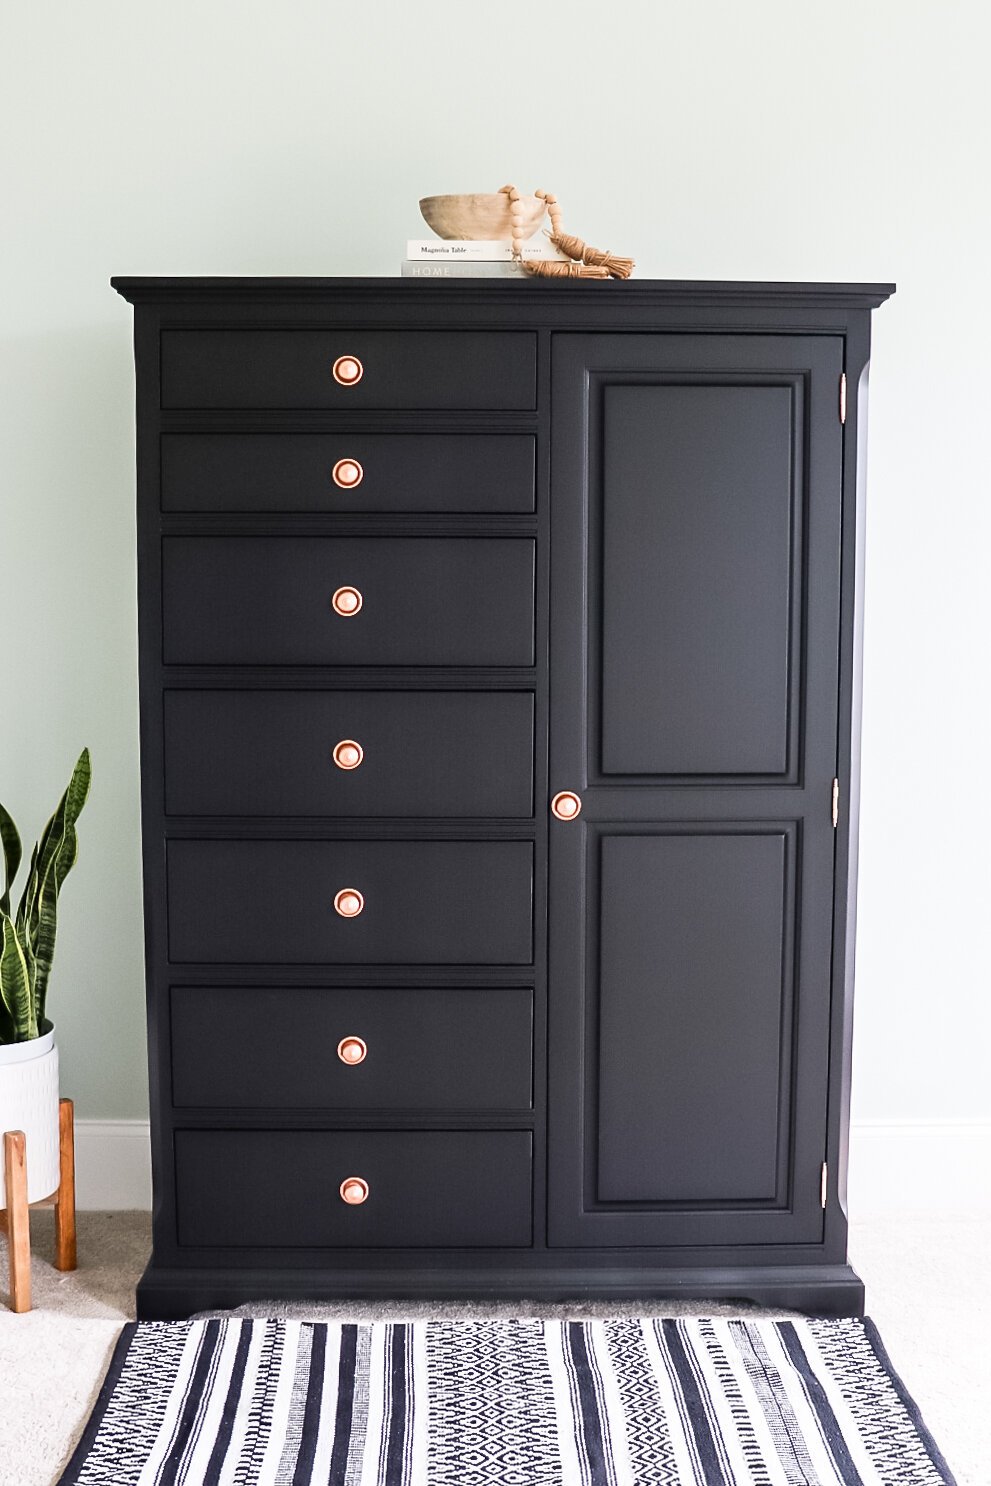
Paint Spray Gun: The Finished Project
Okay…now that was a doozy! I finished the biggest piece that I have ever sprayed, and I am loving the drama that this is bringing to my bedroom. This piece just fits in so much better now with all these light-toned woods that I have that espresso finish was really just fighting it before.
I had put off making over this piece for so many years because I was just thinking it was going to take forever. But you guys, the sprayer made this go so fast and it is such a smooth, beautiful finish. It's bringing all the drama and moodiness to my bedroom and I'm here for it. Check out the finished product below or over on the full YouTube tutorial!