Evergreen Fog Paint using Dixie Belle's Color Lab
Disclosure: This blog contains affiliate links. I will receive a commission for items purchased through these links at no extra cost to you. I appreciate your support. Please read all labels and follow all manufacturer safety recommendations when working with paints, stains, and other equipment.
I’ve got a big project today! I have a big, outdated hutch that I’m excited to flip, and I’m even more excited to recreate the very popular Evergreen Fog paint color using Dixie Belle’s Color Lab feature. It was so fun to use, so I can’t wait to show you how to create custom paint colors with this really cool tool.
So let’s get on with it. But first, check out the hutch that I am refinishing today.

Materials for Evergreen Fog Paint Project
Dixie Belle White Lightning Cleaner
Dixie Belle Synthetic Angled Mini
Dixie Belle Chalk Mineral Paint Stormy Seas
Dixie Belle Chalk Mineral Paint Burlap
Dixie Belle Gilding Wax Bronze
Surf Prep 3" x 4" Electric Ray (Use Code PRETTYDISTRESSED10 for 10% off your order)
Prep Work for the Custom Evergreen Fog Paint Project
Mirror
As you know, prep work is important. It may be repetitive, but we all know it has to happen. The first thing I did to prep for this furniture flip was remove the mirror. It really dates this piece, so it’s got to go. I have a fun idea for what I’m going to put in its place.
I started with a screwdriver but quickly realized that was going to take forever. So a power drill did the trick.
Hardware
Because this is an old piece, the hardware was also pretty dated. I won’t be using them, so I removed them and put them aside. I got some new hardware that I know will go perfectly with the Evergreen Fog paint that I’ll be creating.

Drawers
If you can, I always suggest removing the drawers of your piece before painting. So here's a little trick. If you can't get a drawer out, feel underneath for the drawer-stop. Usually just pushing it down will allow you to pop the drawer right out.
Clean

I know cleaning is boring, but it’s such an important step in getting your paint to stick. My go-to for cleaning before painting is my Dixie Belle White Lightning Cleaner. I mixed it in a spray bottle with some warm water and sprayed the whole piece.
When wiping it down, it was looking pretty dirty, so I grabbed a scrubby sponge to help me get some of the grime off.

Bonus Tip:
While cleaning your piece, it’s a great time to assess it. Check out how your piece is constructed. Check to see if you have a “bleeder” by seeing if you get some stain on your cleaning rag. I’m not seeing that while I’m cleaning this piece, so I don’t need to prime it. But you would definitely want to prime if the stain comes off as you’re cleaning.
Optional: Scuff Sand Your Piece
If you’ve seen any of my YouTube videos or have read past blogs, you know that I’m a fan of scuff sanding my piece. It’s not necessary unless you have a really slick piece…but it definitely provides some insurance.
My theory is that a little scuff sanding is never going to hurt. It can only help.

So I have my Surf Prep 3" x 4" Electric Ray, and I’m going to use a 220 grit sandpaper. If you don’t have an orbital sander, you can use a sanding pad. It all works great. :)
We aren’t stripping back the finish when we’re scuff sanding. It’s just a light sand to give the paint some teeth to stick to. After getting all of the flat pieces, I got out one of my foam pads which helps get the curves on the piece.
After sanding, I used a tack cloth to wipe back the dust. You can also use a damp cloth to do this step.
How to Use Dixie Belle’s Color Lab to get Evergreen Fog
The moment we’ve all been waiting for. Dixie Belle has a new feature on their website called The Color Lab. It is the COOLEST!
Input Custom Color Code
I saw an image of someone’s wall on Instagram that I loved, and I was able to look that color up… it’s no surprise it was the very popular Evergreen Fog. I was able to look up the Red, Green, Blue color ratio for it and plug that into The Color Lab.
If you want to recreate the Evergreen Fog paint color, here are the RGB colors:
R: 149
G: 151
B: 138

Dixie Belle’s Color Lab will then kick back out a combination of their paint colors that will create your custom color. So to get our Evergreen Fog paint color, we need to mix 40% Burlap to 60% Stormy Seas.
Mixing Your Custom Paint
To make it easy, I’m going to make 20 ounces. So I’m going to put 12 ounces of my Stormy Seas paint and 8 ounces of the Burlap.

Note: when you open your paint, it’s going to be very thick and clumpy. Make sure to shake and stir the paint until you get a smooth consistency before mixing them together in a separate container.
Oh my gosh, guys. The color is PERFECT! It’s exactly what I was going for. I’m so excited about this new tool…if you try it out, comment below to tell me how you like it! I can’t wait to keep on using it for some guided custom paint colors. This Evergreen Fog paint color is dreamy.
Getting a Smooth Paint Finish with a Roller
Most of the time, I do brush painting to refinish furniture. I have also sprayed a lot. But I often get asked if you can use a roller for these projects? YES! You totally can. I don’t ever really do it, so I wanted to attempt it on the large piece to see if it saves me time and goes on just as smooth as brush painting.
I have a microfiber roller, which I have used before. And I also have a foam roller. I like them both, but I think I'm going to go with the foam roller and see how that goes. If I don't like it, we can always switch to the microfiber roller.
The downside of a roller is that it’s not going to get in every crevice…it’s really meant for flat pieces. So before getting into rolling, I’m going to be using my Dixie Belle Synthetic Angled Mini to get in the details first.

Bonus Tip: I’ve shared this tip before, but it’s worth sharing again. I like to line my paint trays with foil so that I have less waste and less clean-up. Try it!
After getting the details, I grabbed the foam roller to get all of the flat surfaces. If your piece lays flat on the ground like mine, the roller won’t go all the way to the bottom. This is also where you’re going to use your brush to feather out that area.
And remember, this is just the first coat, so it doesn’t have to be perfect. If you see wood coming through, that’s ok. We’ll hit that up on the second coat.
Pros of Using a Paint Roller for Furniture Refinishing
I’m not sure I’ll be rolling often. It is a pretty smooth finish, but it still had a little bit of that orange peel look. I will say there were a couple of obvious positives though:
Using the paint roller definitely went way faster than hand-painting with a brush.
It’s way less prep than spraying which was so great.

Bonus Tip: My day was done after the first coat of paint, so here is a tip on how to prep your materials for a break in painting. I like to put saran wrap on all of the brushes and rollers so that they stay nice and wet and that paint won’t dry up.
I applied my second coat the same way I did the first coat…so nothing new there!
I did want to note how much paint I ended up using on this large piece. I started with 20 ounces and had about 8 ounces leftover. 12 ounces for a big piece like this isn’t so bad!
Apply Top Coat
If you’re new to Pretty Distressed, you might now know this, but Dixie Belle Clear Coat Flat topcoat is my favorite. It has a beautiful finish and is very forgiving. And to apply this topcoat, I’m actually Not going to use the paint roller.
When you’re applying topcoat, you want to do thin, multiple coats. The roller puts on a lot of product, so it’s not the best option.

Bonus Tip:
When working with paints and topcoats, you never want to put an oil-based topcoat over paint. It will yellow. Definitely use a water-based product like this one.
This clear coat goes on really milky white, but don’t worry about that… it dries clear with a beautiful matte finish.
The top of the hutch is a big, flat surface. I really like to use these blue sponges to apply the topcoat for surfaces like that. To use these sponges, I poured some topcoat into a canister and began by misting the sponge to get it damp. If you’re using these, just get a little bit of topcoat on the sponge and wipe off the excess on the side of the canister.
Apply it with light pressure and make sure you’re evenly applying the product with one long stroke across the surface. And if you miss any spots, just go back over and do that again.

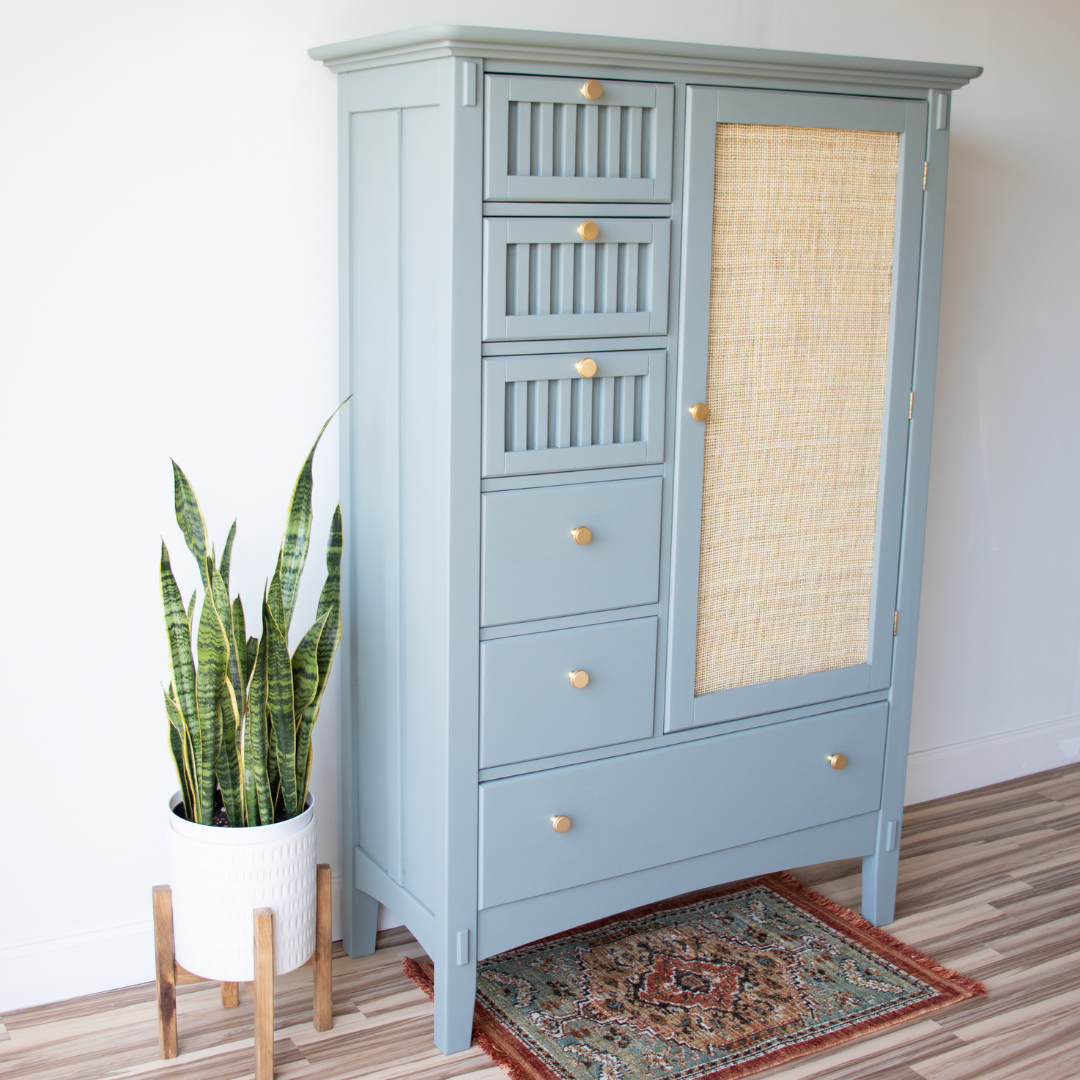
Updating with Radio Weave Cane
As you may remember, the mirror on this piece really outdated it. I took the mirror out and decided to use some radio weave can to give it a more modern look.

I recently did a DIY Cane Bed Headboard Makeover where I used designer cane… this time I’m using real cane, so I have to soak it in the bathtub for 15 minutes so that it’s pliable enough to work with.
You want to make sure the whole thing is submerged, so use something to weigh it done. I just used a plate from my kitchen.

So I lucked out with this door because there is a pretty big lip from where the mirror was. That made it much easier for me to get the cane on there.
If you remember my headboard makeover, I made the mistake of not measuring the thickness of the wood, so when I stapled the can, the staples poked through the other side. So pro tip, measure and make sure your staples are not too long!
I grabbed my ¼ inch staples because I had about ¾ inch of thickness to work with.

I would love to use my compression staple gun, but it just doesn’t get up against the edge enough, so I went ahead and used my manual one, which is totally fine.
This part is a little bit of trial and error. Enlist help if you have it. The key is to keep the can tight so that it doesn’t sag.
Finishing Touches
Reassemble
Not that the painting and topcoat is all done and dried, it’s time to reassemble. I put the door with the new radio weave cane back on and the drawers back in. It’s all coming together.
Add New Hardware
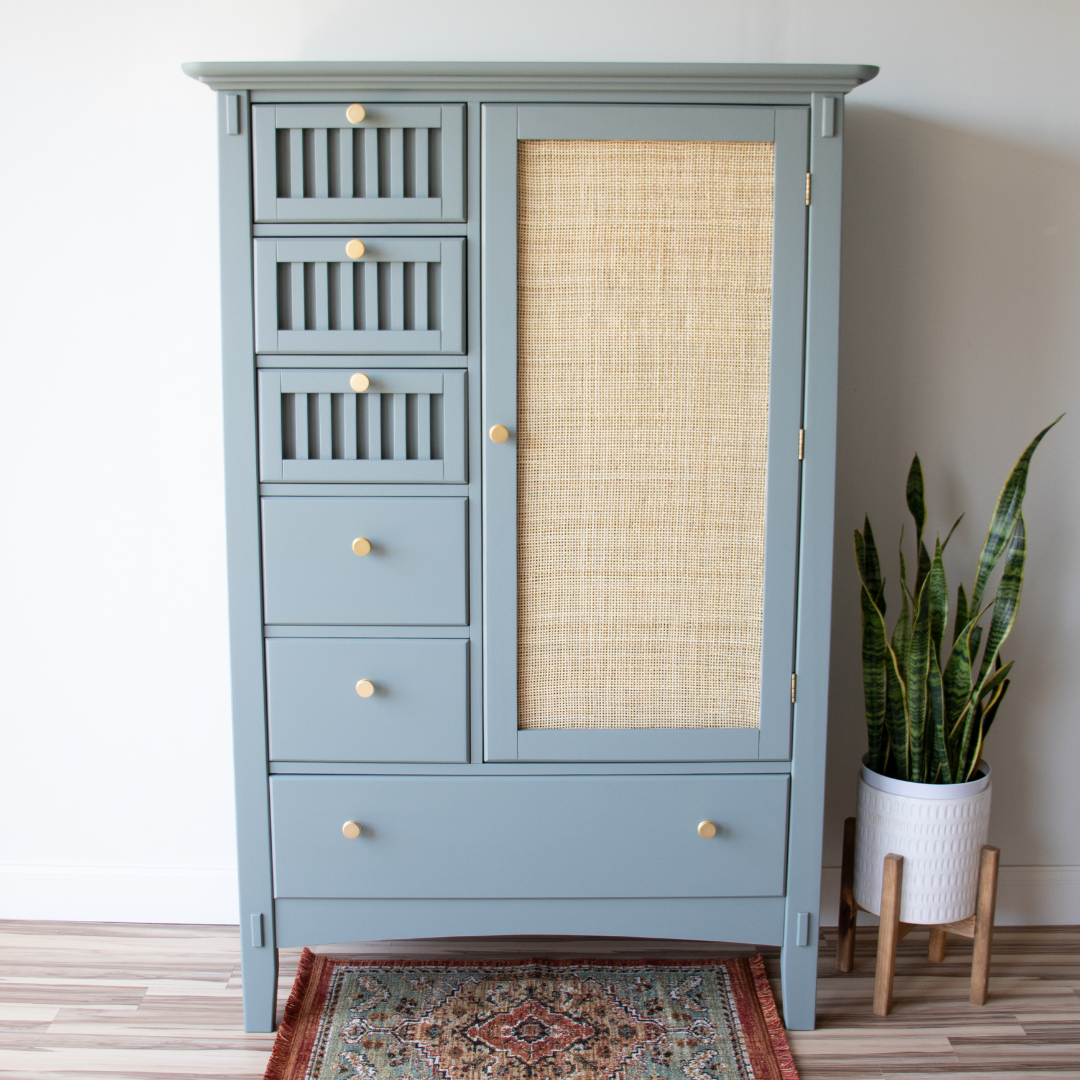
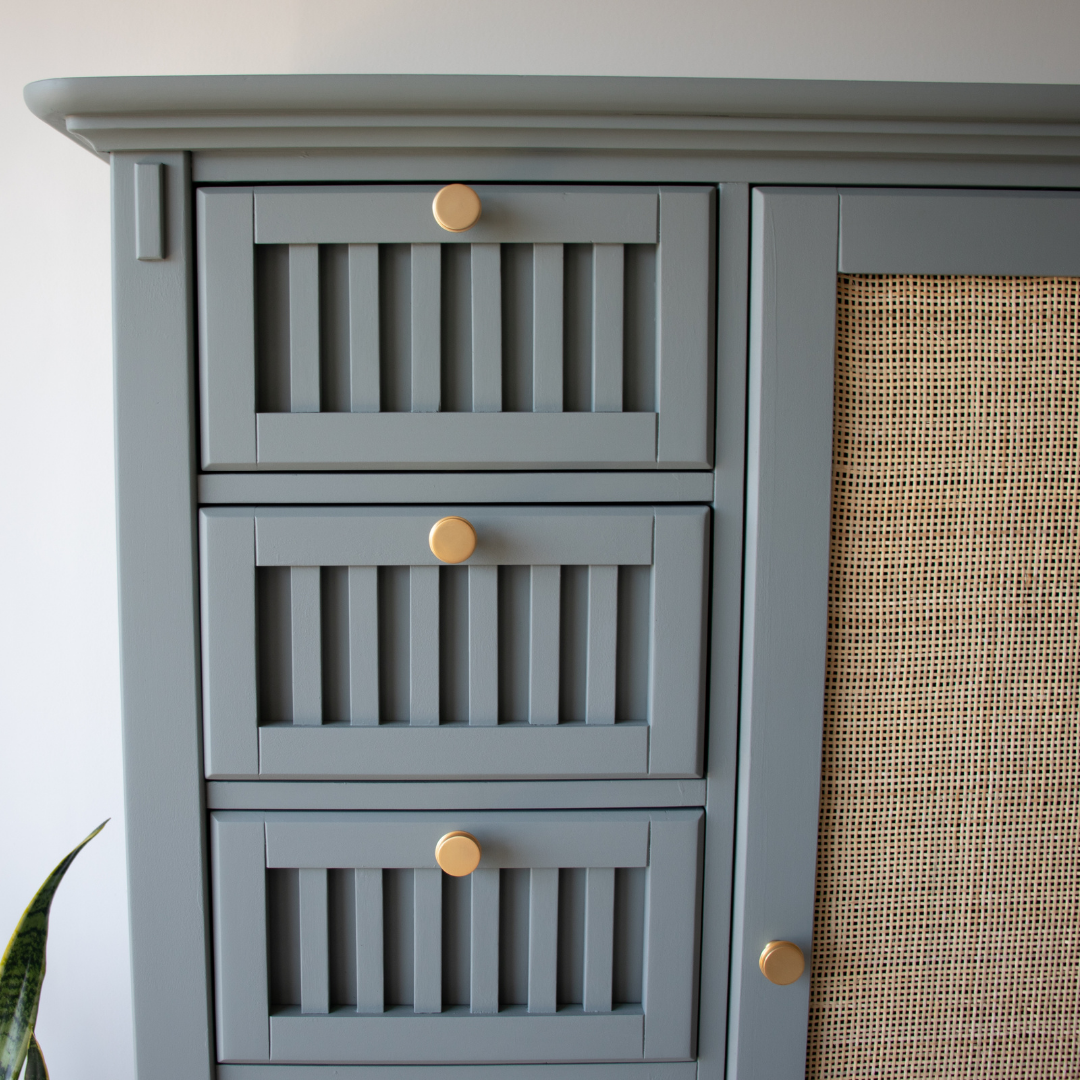
I love the Liberty Classic Elegance Knob that I found at Home Depot. I’m all about brushed brass, and they go amazing with my Evergreen Fog paint look.
I wanted to make sure that my hinges matched, so I got my little artist brush and painted on my favorite Dixie Belle Gilding Wax Bronze. All right, this piece is finally done. Just to remind you, here is what we started off with. And here is the after

The Evergreen Fog Paint Makeover Reveal
I love the way this piece turned out. It’s so fresh and airy, and the cane just takes it to another level. The best part of this project, though, is the custom color. The Evergreen Fog paint color I created using Dixie Belle’s Color lab turned out better than I could have imagined.
And I’m glad I tried out the roller…it worked out! This hutch looks amazing! Take a look at this reveal.
And if you want to see my step by step makeover, check out the YouTube video here.