
Trying The Graco TC Pro Cordless Paint Sprayer On Furniture
Disclosure: This blog contains affiliate links. I will receive a commission for items purchased through these links at no extra cost to you. I appreciate your support. Please read all labels and follow all manufacturer safety recommendations when working with paints, stains, and other equipment.
My last furniture painting piece of 2021 was a doozy! I loved the way it turned out, but there were a lot of lessons learned on this one because I was trying out a new product. Graco sent me their Graco TC Pro Cordless Paint Sprayer to try out!
I got this piece of furniture for free from a friend of mine, and I just love trying new products and tools when I can experiment on free furniture.
This is a huge dresser, heavy, and a really unique mission style. Graco sent me their TC Pro Cordless Sprayer back in July, but I've just been so intimidated by it. I know this was the right piece for this project, so I'm braving it today.
As I mentioned, this spray is cordless which I’m really excited about. And with it being airless, it’s very different from the other sprayers that you see me use on my channel.
So let’s get to it! But first, let’s just take a look at the before-image of my piece and the materials that I used for this project!

Products Used in this Graco TC Cordless Paint Sprayer
Graco TC Pro Cordless Paint Sprayer
Dixie Belle Chalk Mineral Paint Stormy Seas
Surf Prep 3" x 4" Electric Ray (Use Code PRETTYDISTRESSED10 for 10% off your order)

Prep for Spray Painting
Remove Hardware
I’m going to be replacing the original hardware. It’s actually great hardware and would have looked amazing if I took the time to spray paint it gold, but I want to do this final flip of the year as fast as possible! So I put this hardware aside for a future project and used these gold pullouts that I got on Amazon.
Clean with Dixie Belle’s White Lightning
So I'm gonna take all this hardware off clean with white lightning. I rinsed everything with some clean water, filled some dings with some wood epoxy.
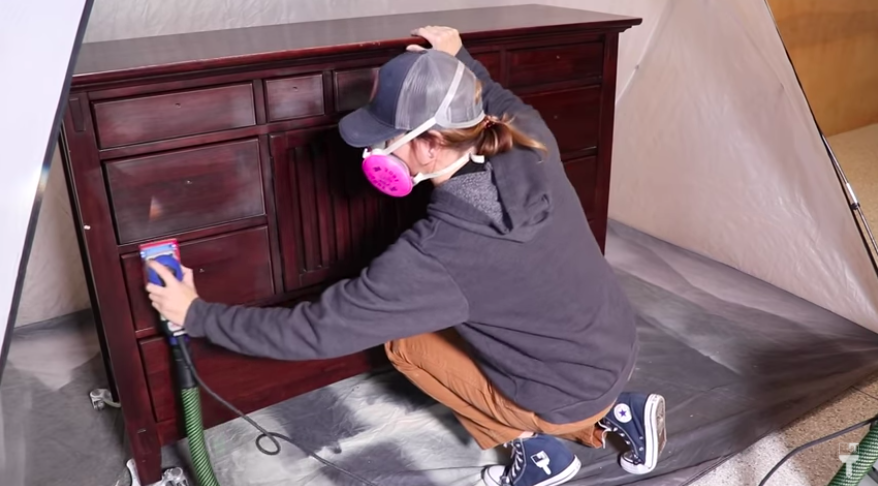
Scuff Sand
After cleaning my piece, I went ahead and used some wood epoxy to fill in some dings. And because this piece wasn’t a “bleeder,” I just did a quick scuff sand to help my paint stick a little bit better.
Dixie Belle Boss
After sanding, I used my Dixie Belle BOSS in clear to spot prime the areas that I made repairs and where the finish came off.

Set-Up Spray Tent
I love my spray tent, and if you’re going to venture into the spray painting world, I highly recommend getting one.
Lastly, I quickly taped off the hinges to protect them from the spray paint. Now we’re reading to get going with the Graco TC Pro Cordless Sprayer!
Prime the Graco TC Pro Cordless Sprayer
Ok, guys…so prepping this sprayer was a doozy. And before I get into it, I have to tell you that I had the manual right next to me the whole time. I also watched Graco’s tutorial videos as well. There’s no way I could have done this without it, so make sure you have your manual and videos open.
Flush It Out (first-time use)
Since it was the first time using the sprayer ever, I followed the instructions on flushing it out.
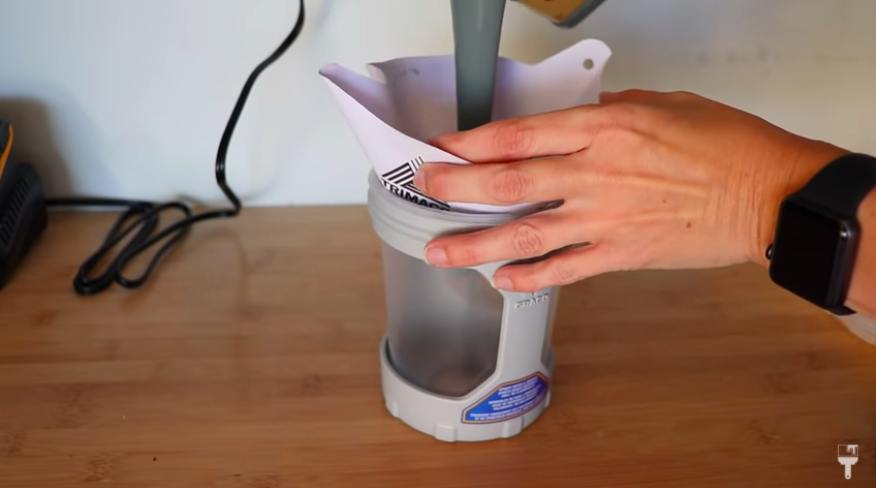
Strain the Paint
Now it’s time to add my paint to my container for the sprayer. I always strain my paint, so I don't get any bits or gunk stuck in the gun. That'll clog it up. The color I'm using today is Stormy Seas from Dixie Belle. And it's so beautiful. It's like a deep gray, but it has green and blue undertones. It’s gorgeous.
Add Water (optional)
This is completely optional because really, you don’t have to add water. I’m just used to a certain consistency when I’m spraying so I like to add just a tad. Figure out what works best for you.
Prime the Pump
This sprayer has a lot of steps that you have to do before you spray in priming the pump. Again, I used the manual and the Graco YouTube playlist. It’s a little complicated and I think if this is your first time using this sprayer, it’s best you go check out these videos. ;)

Tips on Using the Graco TC Pro Cordless Sprayer
Move Quickly
If you use this sprayer, you do have to move pretty quickly with this gun. It shoots out a lot of paint, but I do love the finish that it creates. And I like the fact that it's airless, cuz it's not kicking up dust onto the piece.

Lowest Setting First
So the first pass was not that bad. I had the sprayer on the very lowest setting you can have. It goes from 1 to 10 and I had it on 1… and it still put out a lot of paint. I definitely had to move faster and pull back from my piece compared to what I'm used to, but the first coat went on really well. It was fun.
One Pass Only
Because so much paint comes out, you definitely want to make sure you do one pass only and don’t overlap. I did a second coat on day two when my dresser was standing up and I got some serious sagging. BOO!

I realized that I was spraying too close to the piece and did a little bit too much overlapping. There are always mistakes to be made when using a new product. Lesson learned!
I waited for it to dry, sanded it down, and smoothed it out with some touch up paint. No big deal! Anything is fixable.
Beware of Overspray
Another thing I noticed is that there is a lot more overspray than I'm used to. You use a lot more paint with a sprayer anyways, but this just seems like a lot of wasted paint. So that's kind of hard to swallow.
Watch the YouTube Videos & Read the manual
Again, if you ever feel like you’re not sure how to properly use the sprayer, check out the YouTube videos and keep your manual close by.
Cleaning the Grace TC Cordless Sprayer
And if you thought the priming and all that was complicated, it's a little complicated to clean it too.
You have to flip it upside down, clean it in spray mode and un-spray mode. You have to turn the tip a bunch of different ways and turn that spray prime button. It’s a lot. But remember, YouTube videos will be your best friend in this process.
Using Dixie Belle’s Gator Hide Topcoat in Sprayer
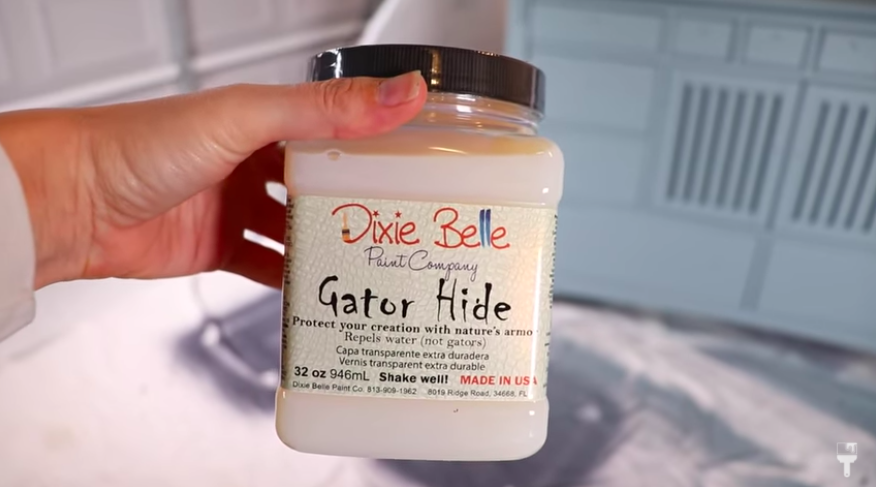
I'm ready for my topcoat! I’m going to be using Dixie Belle’s Gator Hide and will be using the sprayer to apply this as well. Before adding the Gator Hide to the sprayer, I added a little bit of the paint to tint it since my paint is a darker color.
I also changed my spray tip to one that was a little bit finer. This one is a little bit finer. It’s nice that you can change out or even replace these tips. It will give you a little bit longer life with your machine which is a perk.
You have to go through all the steps of priming, just like I did with the paint. After I prepped it I started to spray. I moved really fast when I was putting this on and I backed up further from my piece than they recommend. I just knew how thin this stuff was, and I thought that would be the best way for this. I actually kept the trigger down the whole time because I watched some videos of people using the sprayer and it seems like that is what they did.

So this coat actually turned out great, except for at the top, I did get a little bit of sagging because I did two passes on accident. My fault! But another thing I realized when I went to clean out my gun at the end of spraying both of these top coats is that I had it set at a level 10 instead of a level 1 #facepalm. When you clean the gun, you crank it up to level 10 and I just completely forgot to put it back to that setting.
So I don't think this would've happened if I would've had it correctly set on 1. No big deal. I let it dry and buffed it out.
Grace TC Sprayer Review
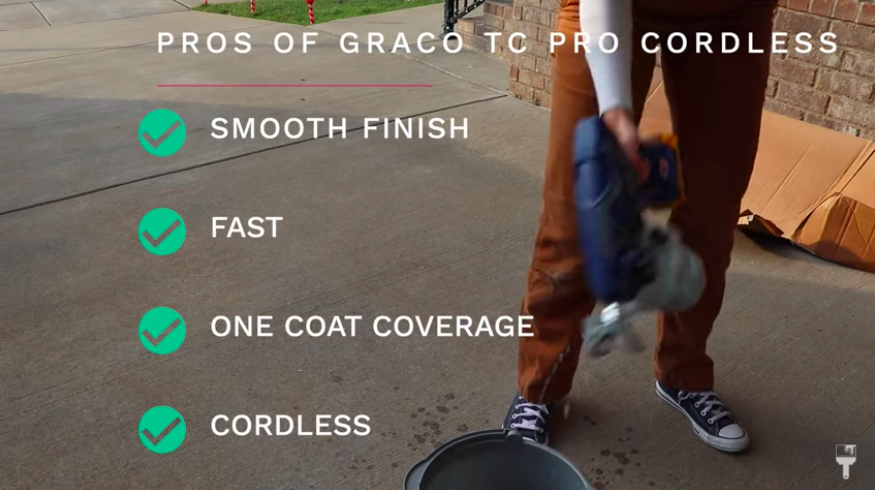
Hallelujah. I made it through this project. Let's go over the pros and cons of the sprayer. Let's start with the pros.
Pros of Sprayer
Smooth finish - this sprays really smooth…it’s the smoothest finish I’ve gotten with a sprayer.
Fast - It sprays so fast, so you can get the job done really quickly.
One coat - The one coat coverage put on enough pain that I don’t think you would have to do a second coat.
Cordless - I love that it's cordless. You don’t have to worry about the cor getting in your paint and messing up your finish.
Now, in my opinion, there are a lot of cons as well.
Cons of Sprayer
Price - The price is super high. It's definitely a professional tool.
Complicated Setup and Cleanup - As you can tell, the setup and clean-up were complicated…it would have been impossible without the videos.
Uses a lot of product - There was a lot of overspray, and I used a lot more paint than I do in other sprayers.
Not for beginners - This sprayer is great, but I would say it’s definitely not for beginners. This is definitely a step-up sprayer for someone who has used an intro-level sprayer before.

Graco TC Cordless Sprayer Reveal
Right before the reveal, I had one more thing to do. Can’t forget about the hinges. I pulled the tape off of them and protected the area around them so that I could put my gold gilding wax on them. This takes 4 hours to dry, so after a few hours, I came back to brush away any excess.
Okay, that’s it for this project.... And I just wanna remind you what doesn't kill you, makes you stronger.
I definitely didn't do everything right in this project, but I learned a lot of stuff along the way, and I'm not throwing this sprayer out. I'm gonna try it again. I'm gonna try to perfect it.
I love a challenge and this piece is not perfect, but it's definitely still really pretty. And I'm excited to have it find a new home. So that's my inspirational speech, but let's get to what you're really here for. The big reveal of my last furniture makeover of 2021! Let me know what you think in the comments!
Don’t forget to check out the video tutorial for this project on YouTube.
