My Anthropologie Enchantment Dresser Dupe With Decor Moulds
Disclosure: This blog contains affiliate links. I will receive a commission for items purchased through these links at no extra cost to you. I appreciate your support. Please read all labels and follow all manufacturer safety recommendations when working with paints, stains, and other equipment.
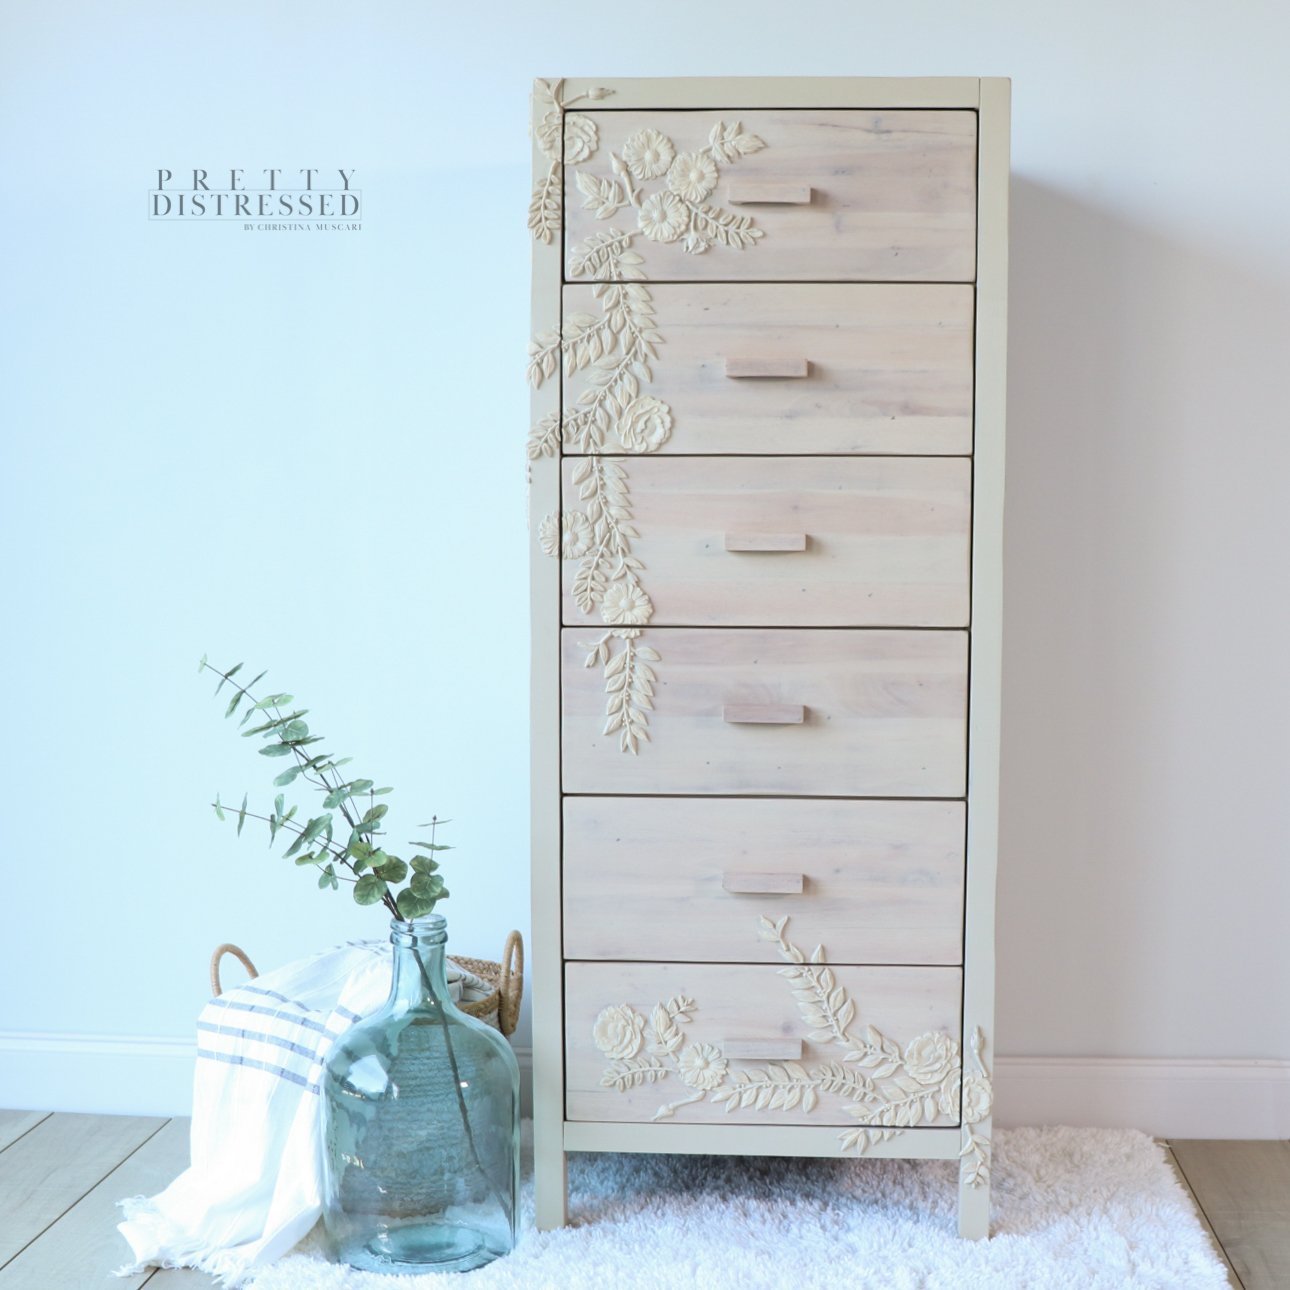
Dupes are my favorite. In the furniture refinishing world, there’s nothing like creating a piece on a budget that looks just like a high-end product.
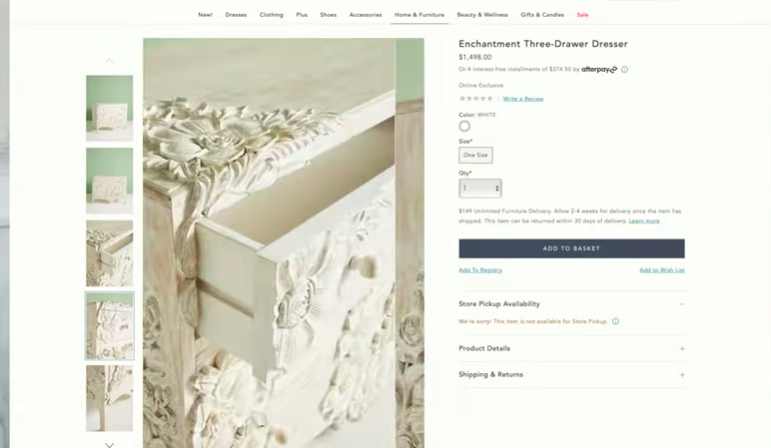
So today, I’m going to be making over a little lingerie chest that I got off of Facebook Marketplace. I’m going to be doing my version of the super-popular Anthropologie Enchantment Dresser. It is GORGEOUS and I’ve seen lots of my YouTuber friends and furniture artists attempt their version of the piece...so today is my turn.
I’ll be walking you through how I went about recreating the enchantment dresser step by step. And since I’m not a skilled woodcarver, I will be replicating, in my own way, the beautiful floral details using Redesign with Prima molds. This turned out to be one of my favorite pieces ever. Check out my original piece and the Enchantment Dresser that is the inspiration for this project!

Materials Used for Anthropologie Enchantment Dresser Dupe Makeover
Shop this Furniture Makeover on AMAZON
ReDesign with Prima Leafy Blossoms
ReDesign With Prima In the Garden
Alumilite Amazing Casting Resin
Jolie Matte Paint Farmhouse Beige
Tite Bond Thick & Quick Multi-Surface Glue
Surf Prep 3" x 4" Electric Ray (Use Code PRETTYDISTRESSED10 for 10% off your order)
3M Household respirator w/ particle filters for sanding
Step 1: Prep Work
I didn’t have too much prep work with this piece, which I was thrilled about because I wanted to get to the super fun parts of this project. But with any project, there is always some preparation involved, so here we go.
Clean the Piece
I kept it simple here and used some Dawn, warm water, and a sponge to scrub off any dirt and grease from the dresser. Then I rinsed it with warm water. After removing the drawers, I did a quick wipe down of the inside of the frame to get rid of some dust that had collected. Super quick and easy.
Repair if Necessary

This lingerie dresser was in pretty good shape, but it did have some small nicks and gouges in it, so I used some KwikWood Wood Repair Epoxy Putty to fill it in to repair the damaged areas. This is a two-part wood epoxy putty, so if you use it, you simply mix it up by squeezing and massaging it with your fingers until it is one uniform color. It dries really quickly and is ready to sand about an hour after application.
Remove Handles
I decided to use the handles that came with this dresser because it was the exact look I was going for, but I removed them because I wanted to make sure I was able to give them a good sanding.
Step 2: Strip the Finish and Sand
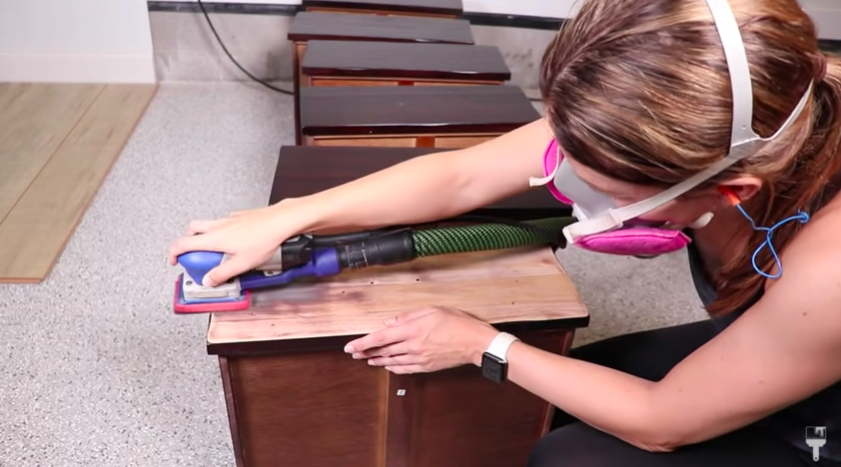
Sanding drawers & handles
In order to prep for my paint, I needed to strip the existing finish of the drawers and handles. So I sanded with my Surf Prep 3" x 4" Electric Ray using a sanding screen. I put my pad saver on and used the 120 grit sanding screen. It worked perfectly.
Sand down repairs
By the time I was done stripping the finish from the drawers, my epoxy putty was ready to be sanded as well. I sanded this down with a 220 grit sandpaper.
Note: doing this did strip some of my finish here, and when this happens, I worry about bleed through (especially with a light color). So I grabbed a can of BIN primer that I had and did some spot priming because I didn’t want to prime the whole piece. I haven’t done this technique before, but it worked out really well.
Step 3: Painting
Painting Drawers and Handles
My first step in painting this piece was to grab my Jolie paint in “Farmhouse Beige” and make a wash to stain the drawers. Shocker. If you’ve seen any of my YouTube videos, you’ve seen me do this a hundred times.
I am just addicted to this process. Haha. So to create the wash, I mixed a 1:1 ratio of paint and water and stirred it well. This will make it really watery.
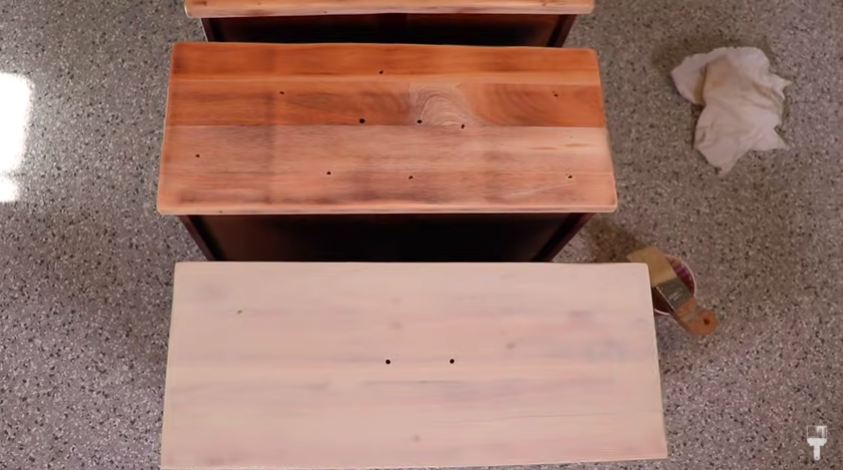
Right before I applied my DIY wash, I wiped back any dust I created when sanding. I grabbed my Zebra Palm Pro to apply the paint/wash. After I got it coated completely, I came in with an absorbent cloth and wiped back the excess paint which left me with a beautiful light bleached wood look.
Paint Base Full Strength
Now moving on to the base of the piece, I used the same “Farmhouse Beige” paint, but this time I used it in full strength. I didn’t create a wash, but instead, I spritzed it with a water spray bottle just to make it a tad thinner than it comes out of the can.
I did this paint application with the Country Chic Oval Brush. I wanted to have a monochromatic look which is why I chose the same paint color but really wanted the beautiful washed look of the drawers to stand out. I didn’t sand down the entire piece because it wasn’t necessary and would have taken so much longer.
Note: you will need two coats of paint. I saved that for last so that the first coat could dry while I was doing the decor molds.
Put handles back on after drying for a couple of hours
After the first coat, I came back in and applied all my handles to my drawers. Then I flipped the base of the dresser on its back so that I could put the drawers back in. And I figured this was going to be the easiest way to put the molds on so that they wouldn't fall off.
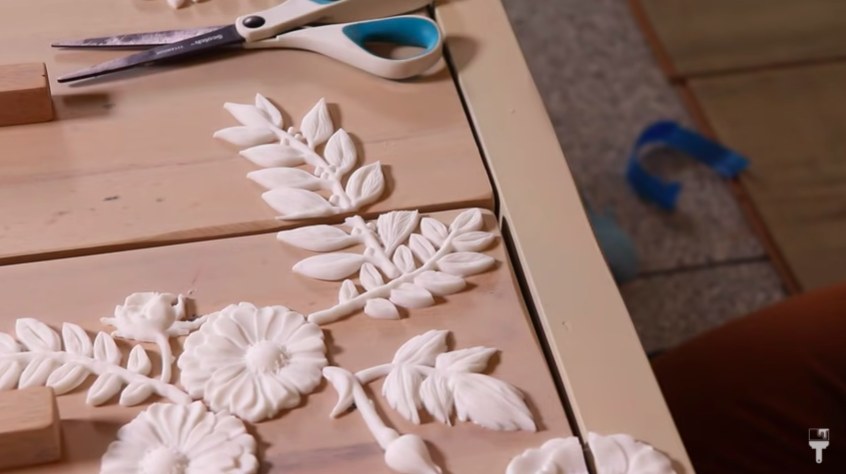
Step 4: Create Anthropologie Enchantment Dress Dupe Using Molds from Redesign with Prima
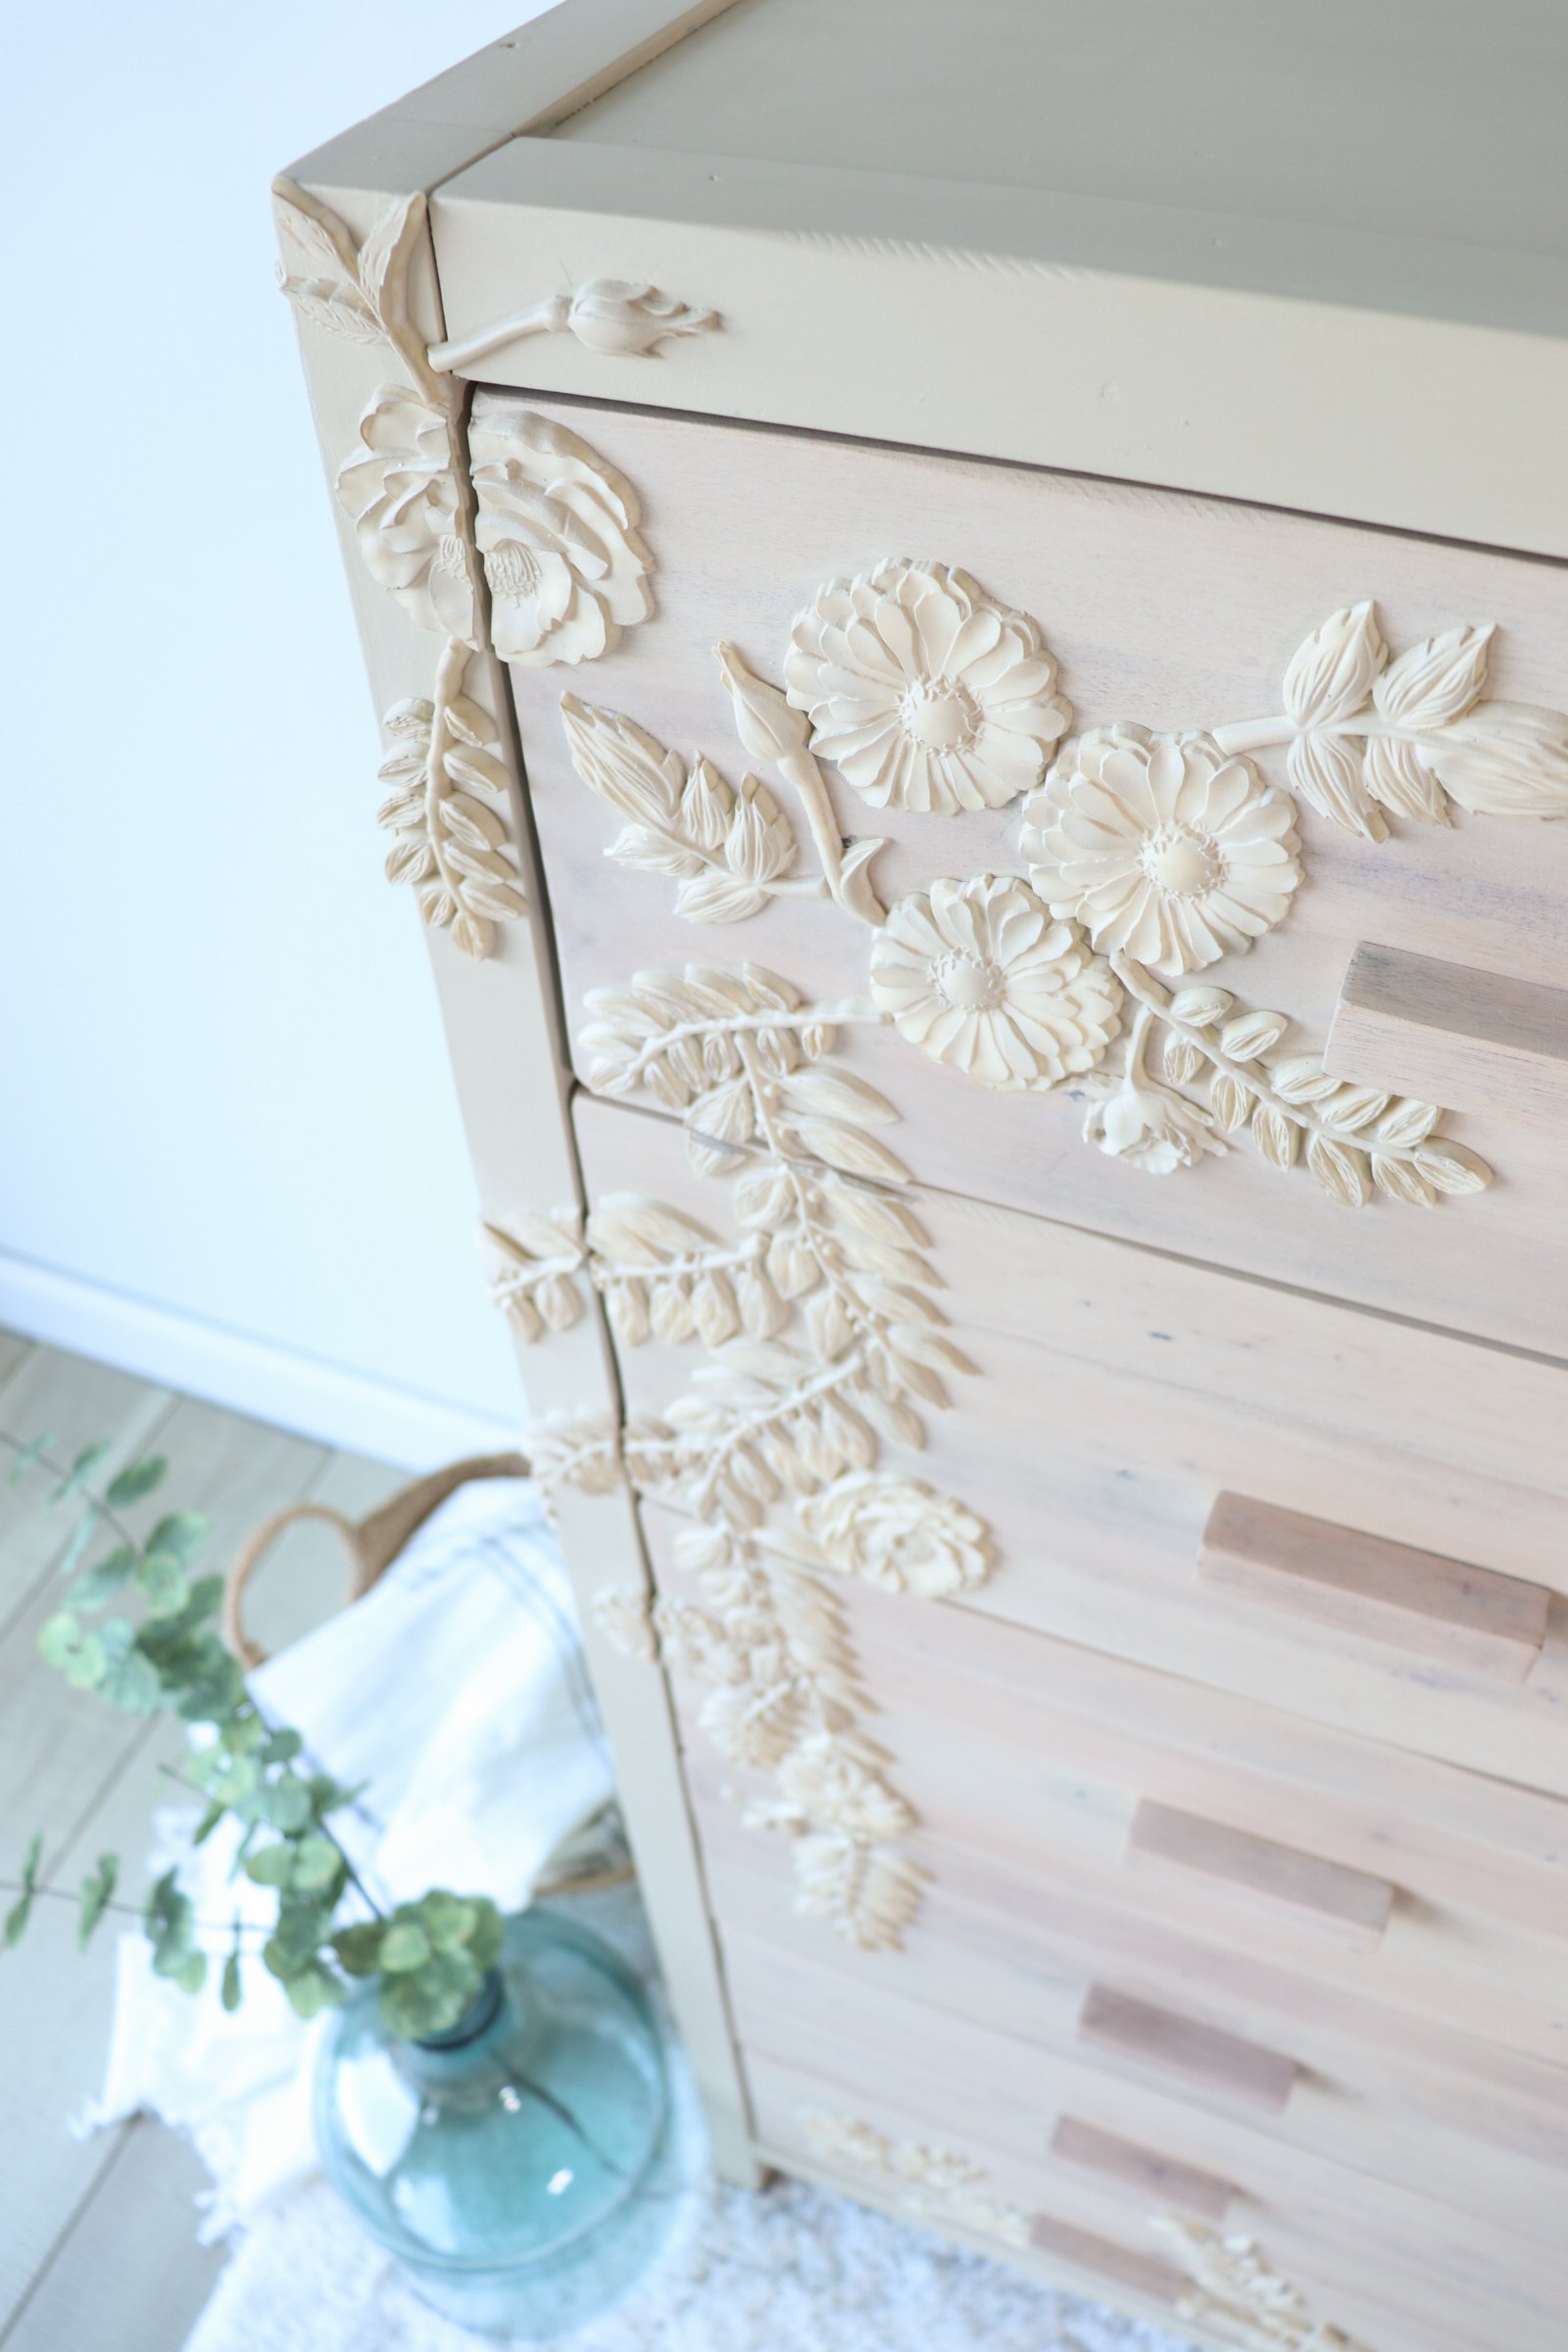
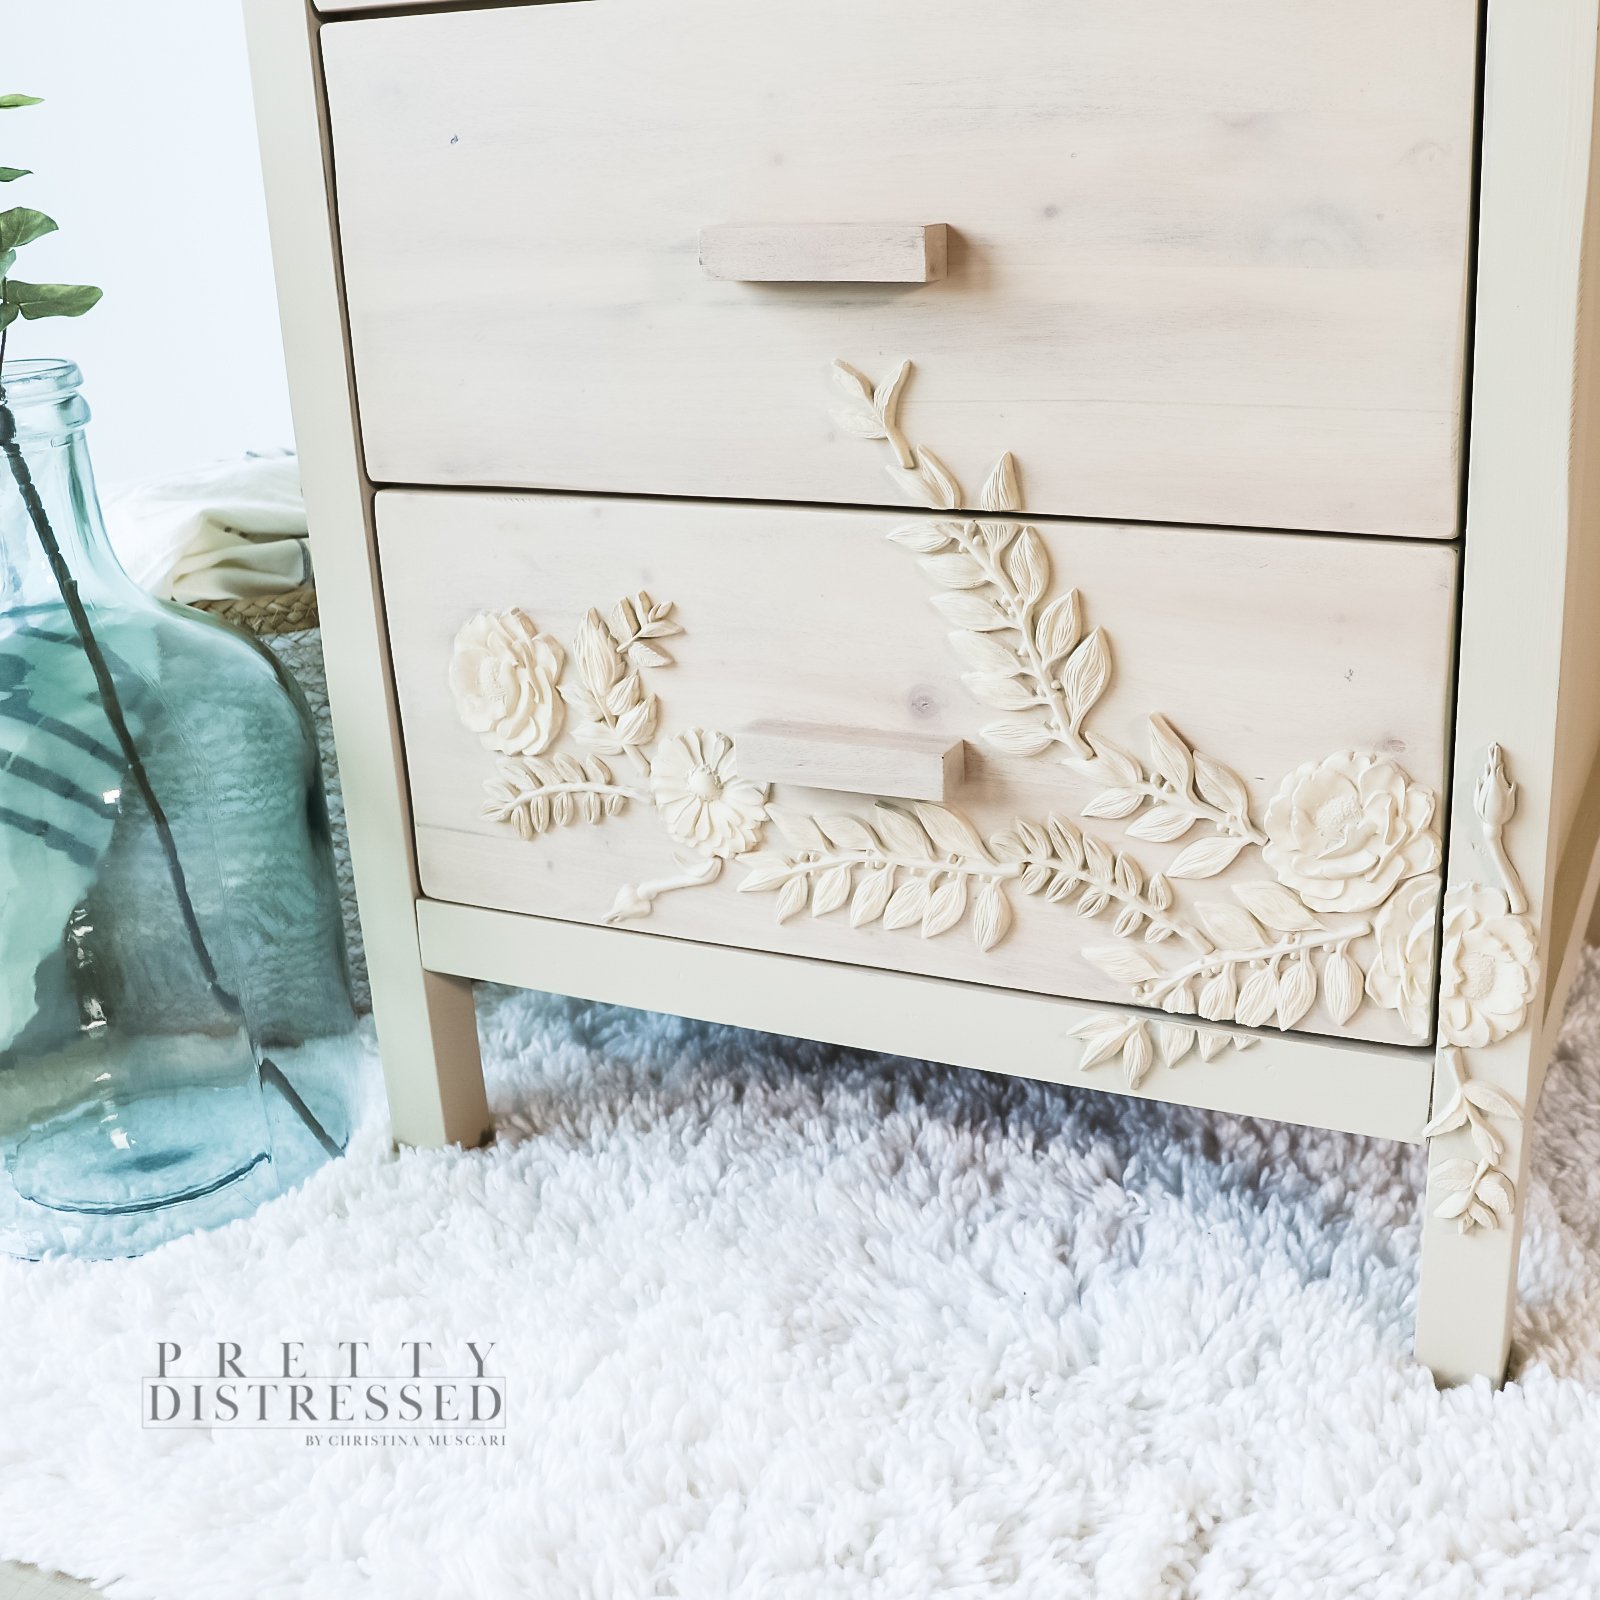
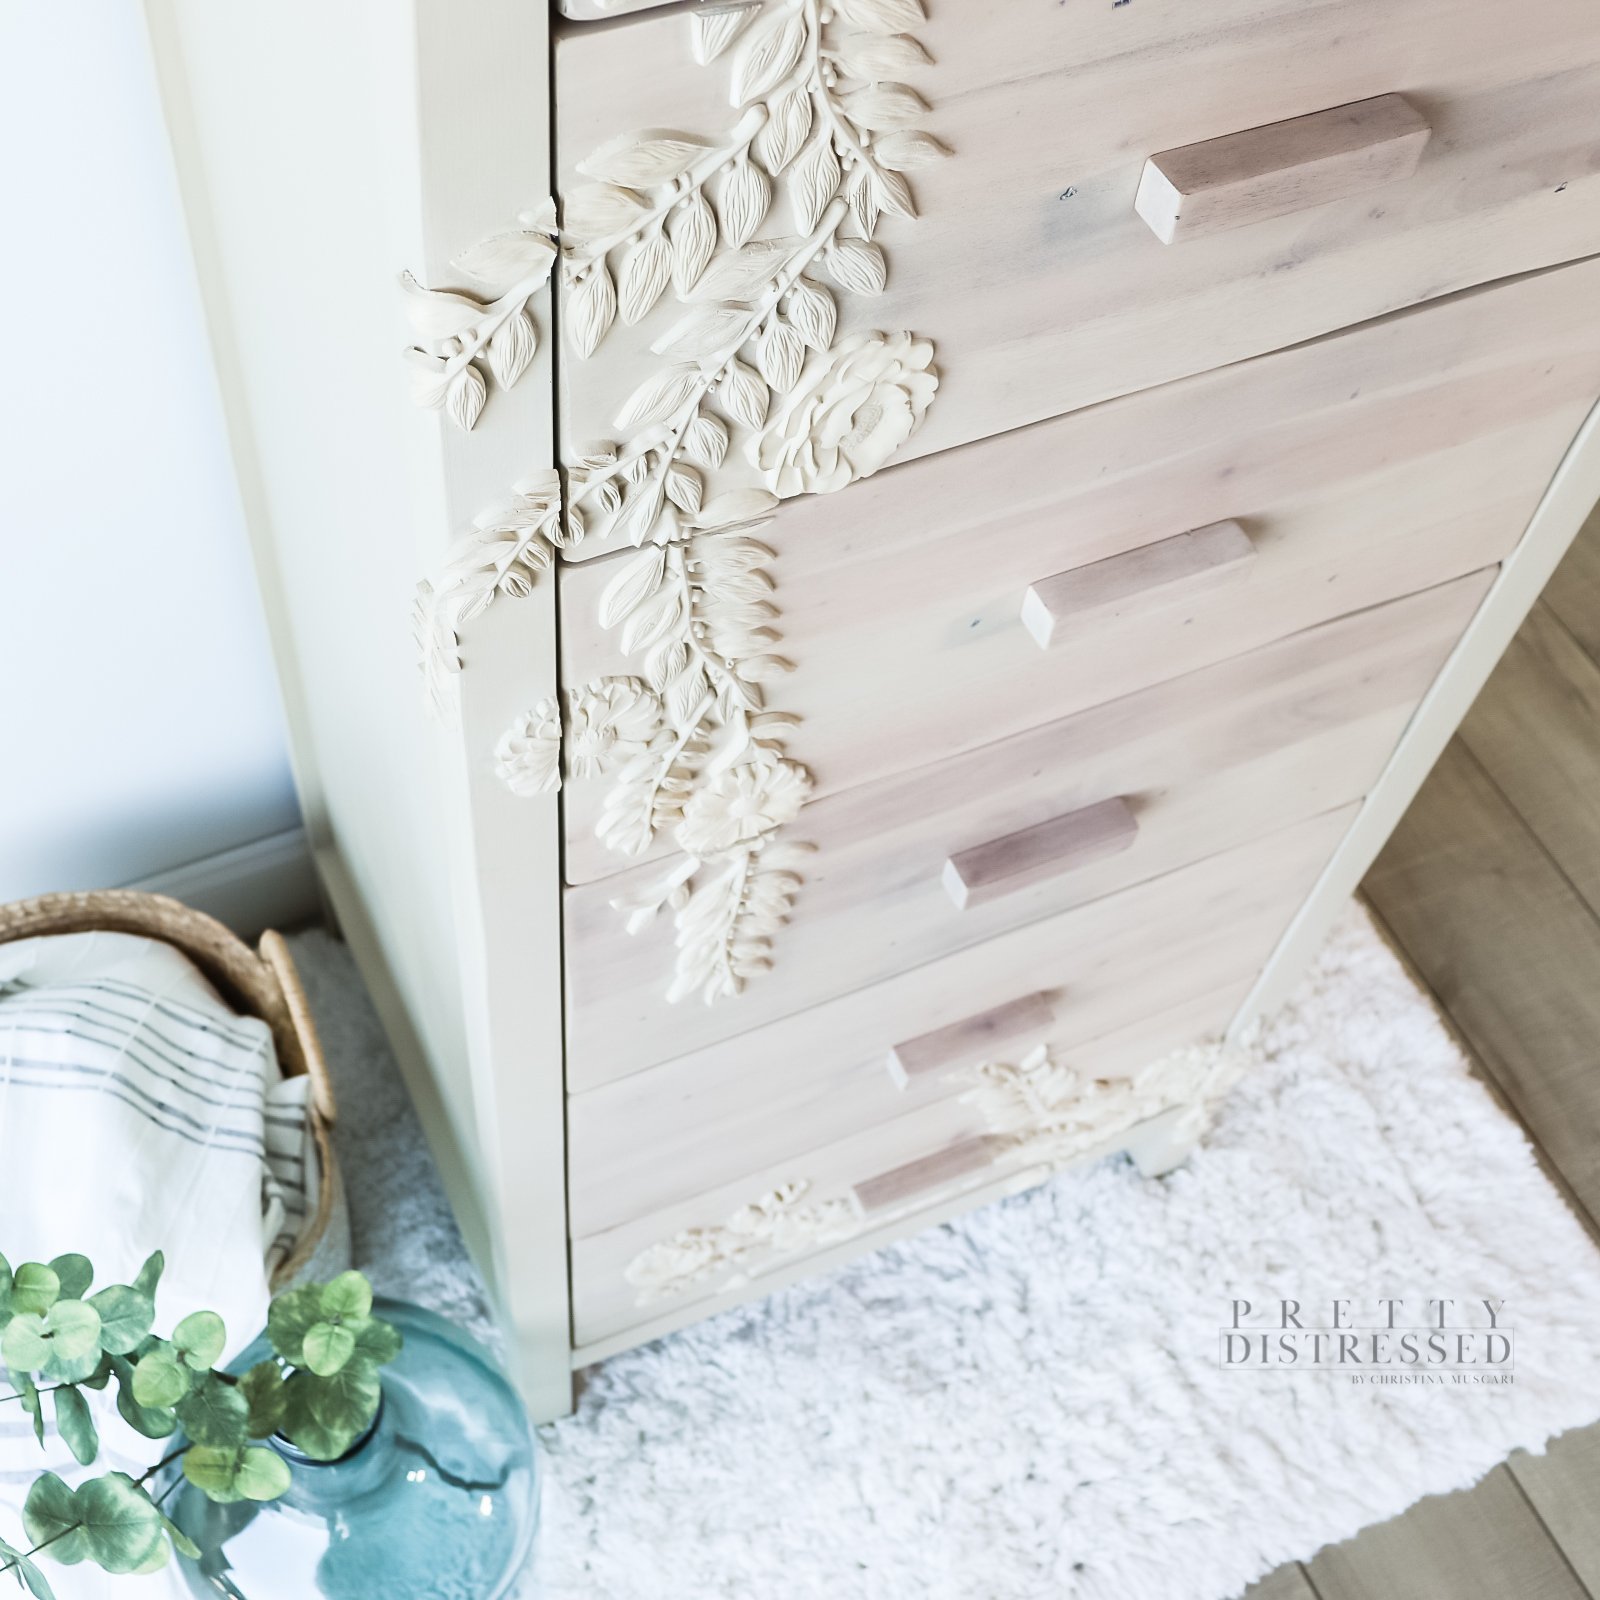
Okay. Now it's time for the fun part. So I'm going to be using these at decor molds from redesigned, with prima. I have grabbed the, in the garden and the leafy blossoms to kind of recreate this beautiful flower landscape of the enchantment dresser.
Create Resin Mixture
The first step is to combine the resin mixture. I grabbed this amazing resin from Amazon. It sets in 10 minutes and is super easy to use.
Note: You can use other mediums with these molds, but I just thought this was going to be the easiest one for me.
To create the resin, you mix equal parts of solution A and B and stir them up really well. Then you're going to slowly pour them into the molds. Having never done this before, I was surprised by how easy this process was! I recommend a SLOW pour so that you don’t overfill your molds and spillover. You want to fill them enough to get a nice rounded back.
Okay. Now here's the super fun part, these harden and 10 minutes and turn white. So how cool is this? Time-lapse, it's like a science experiment.

Step 5: Apply Molds to the Enchantment Dresser
The finished molds are really easy to pop out, and I recommend applying them to your dresser fresh out of the mold because they’re a little bit more pliable. The longer you let them set, the harder they’re going to get. When that happens, it’s not as easy to glue them to your piece.
Note: If you do overfill the molds, you can use scissors to cut off any excess around the edges.

Making the molds was so easy and so fun. But when it came to designing and placing the molds on my dresser, I got completely stressed out and panicked for a minute. I even went on Instagram and shared my freak-out moment with everybody.
But I got it together and put myself in a zone. I threw on a podcast, played around with the pieces, kept making molds, kept going back and arranging them...and it started to transform right before my eyes. It was so much fun!
To adhere the molds to my piece, I used a Titebond Quick & Thick glue. You can actually use it on vertical surfaces, but I did lay mine down flat just to make it easier. I used a chip brush to spread out my glue, and as my brush would dry up a bit, I would just grab a new one. They were only $.99, so it seemed the easiest way for me to spread my glue.
Because I was working with the decor molds while they were still pliable, it was easy to cut with scissors when I needed the pattern to go across the drawers.
Note: I used some painter’s tape to tape down any edges that were sticking up. I also bent one of the vines around the side of the dress, so taping that down helped too!
Step 4: Paint the Molds
The sooner you paint your molds the better, so I painted as I went along with gluing them down.

I started with a dry brush technique which just entails removing a lot of the paint from the brush with a paper towel. This helps the bristles and paint to get in the details and stuff without creating big blobs of paint.
I started out using the Zibra Square brush, but I ended up actually really liking the round brush instead. It seemed to get into the details better, and it was really easy to use. I had no idea how this was going to turn out, but it was amazing!
This was definitely a trial and error thing, but the combination of the white resin and the beige color dry brushed on made this look really cohesive and like it was actually carved into this piece.
I wanted to add another little vine on the bottom of the piece coming over horizontally. So I went to work on that and this one was a lot more fun. Cause I feel like I was really in the zone and a little bit more confident about what I was doing.
Step 5: Finishing Touches
I let that all dry overnight and came back in the morning to flip it upright, which really gives you a whole new angle on your piece.

Touch Up Decor Paint
So I took the small detail brush and I did a little bit more dry brushing in the areas on the sides that I didn't necessarily hit up with a dry brushing. I'm just using the smaller brush. Being able to get into the detailsjust really was the finishing piece that I needed.
Second Coat of Base
Once I got all those details taken care of, I added my second coat to the base and I made sure I was really careful around all the carvings that I had on the side, not to glob any pain on there. I originally had plans to whitewash this after I got this color on because I wanted it to look similar to the enchantment dresser, [00:13:30] but I loved the way this color was looking so much. I could not bring myself to put anything else on top of it. I was just ready to seal it.
Wax Seal
So I'm going to be sealing this in the azole, finishing wax in clear and using one of their wax brushes to apply it. This gave me the protective finish I was going for, and it dries out completely matte giving it a natural look. It's one of my favorites. After applying I went back with a lint free rag and wiped back all of the excess.
For the next step of the top coat, I grabbed my smaller wax brush with a pointed tip to help me get into these detailed areas of the discord molds.
Try New Things
If you follow me on Instagram while I was making this piece, you know that I was pretty emotional once I got done with this piece. And I just want to encourage you guys to try new things. Don't be scared. Don't tell yourself you're not artistic.
I mean, the worst thing that could have happened if I would have had to chip all these off and start over.
It was super emotional and spiritual for me, but I'm glad I went through the whole process and I hope it encourages you to try things that scare you and just push through those boundaries. Don’t listen to that little voice in your head that tells you that you can’t do stuff,...because you CAN DO IT!
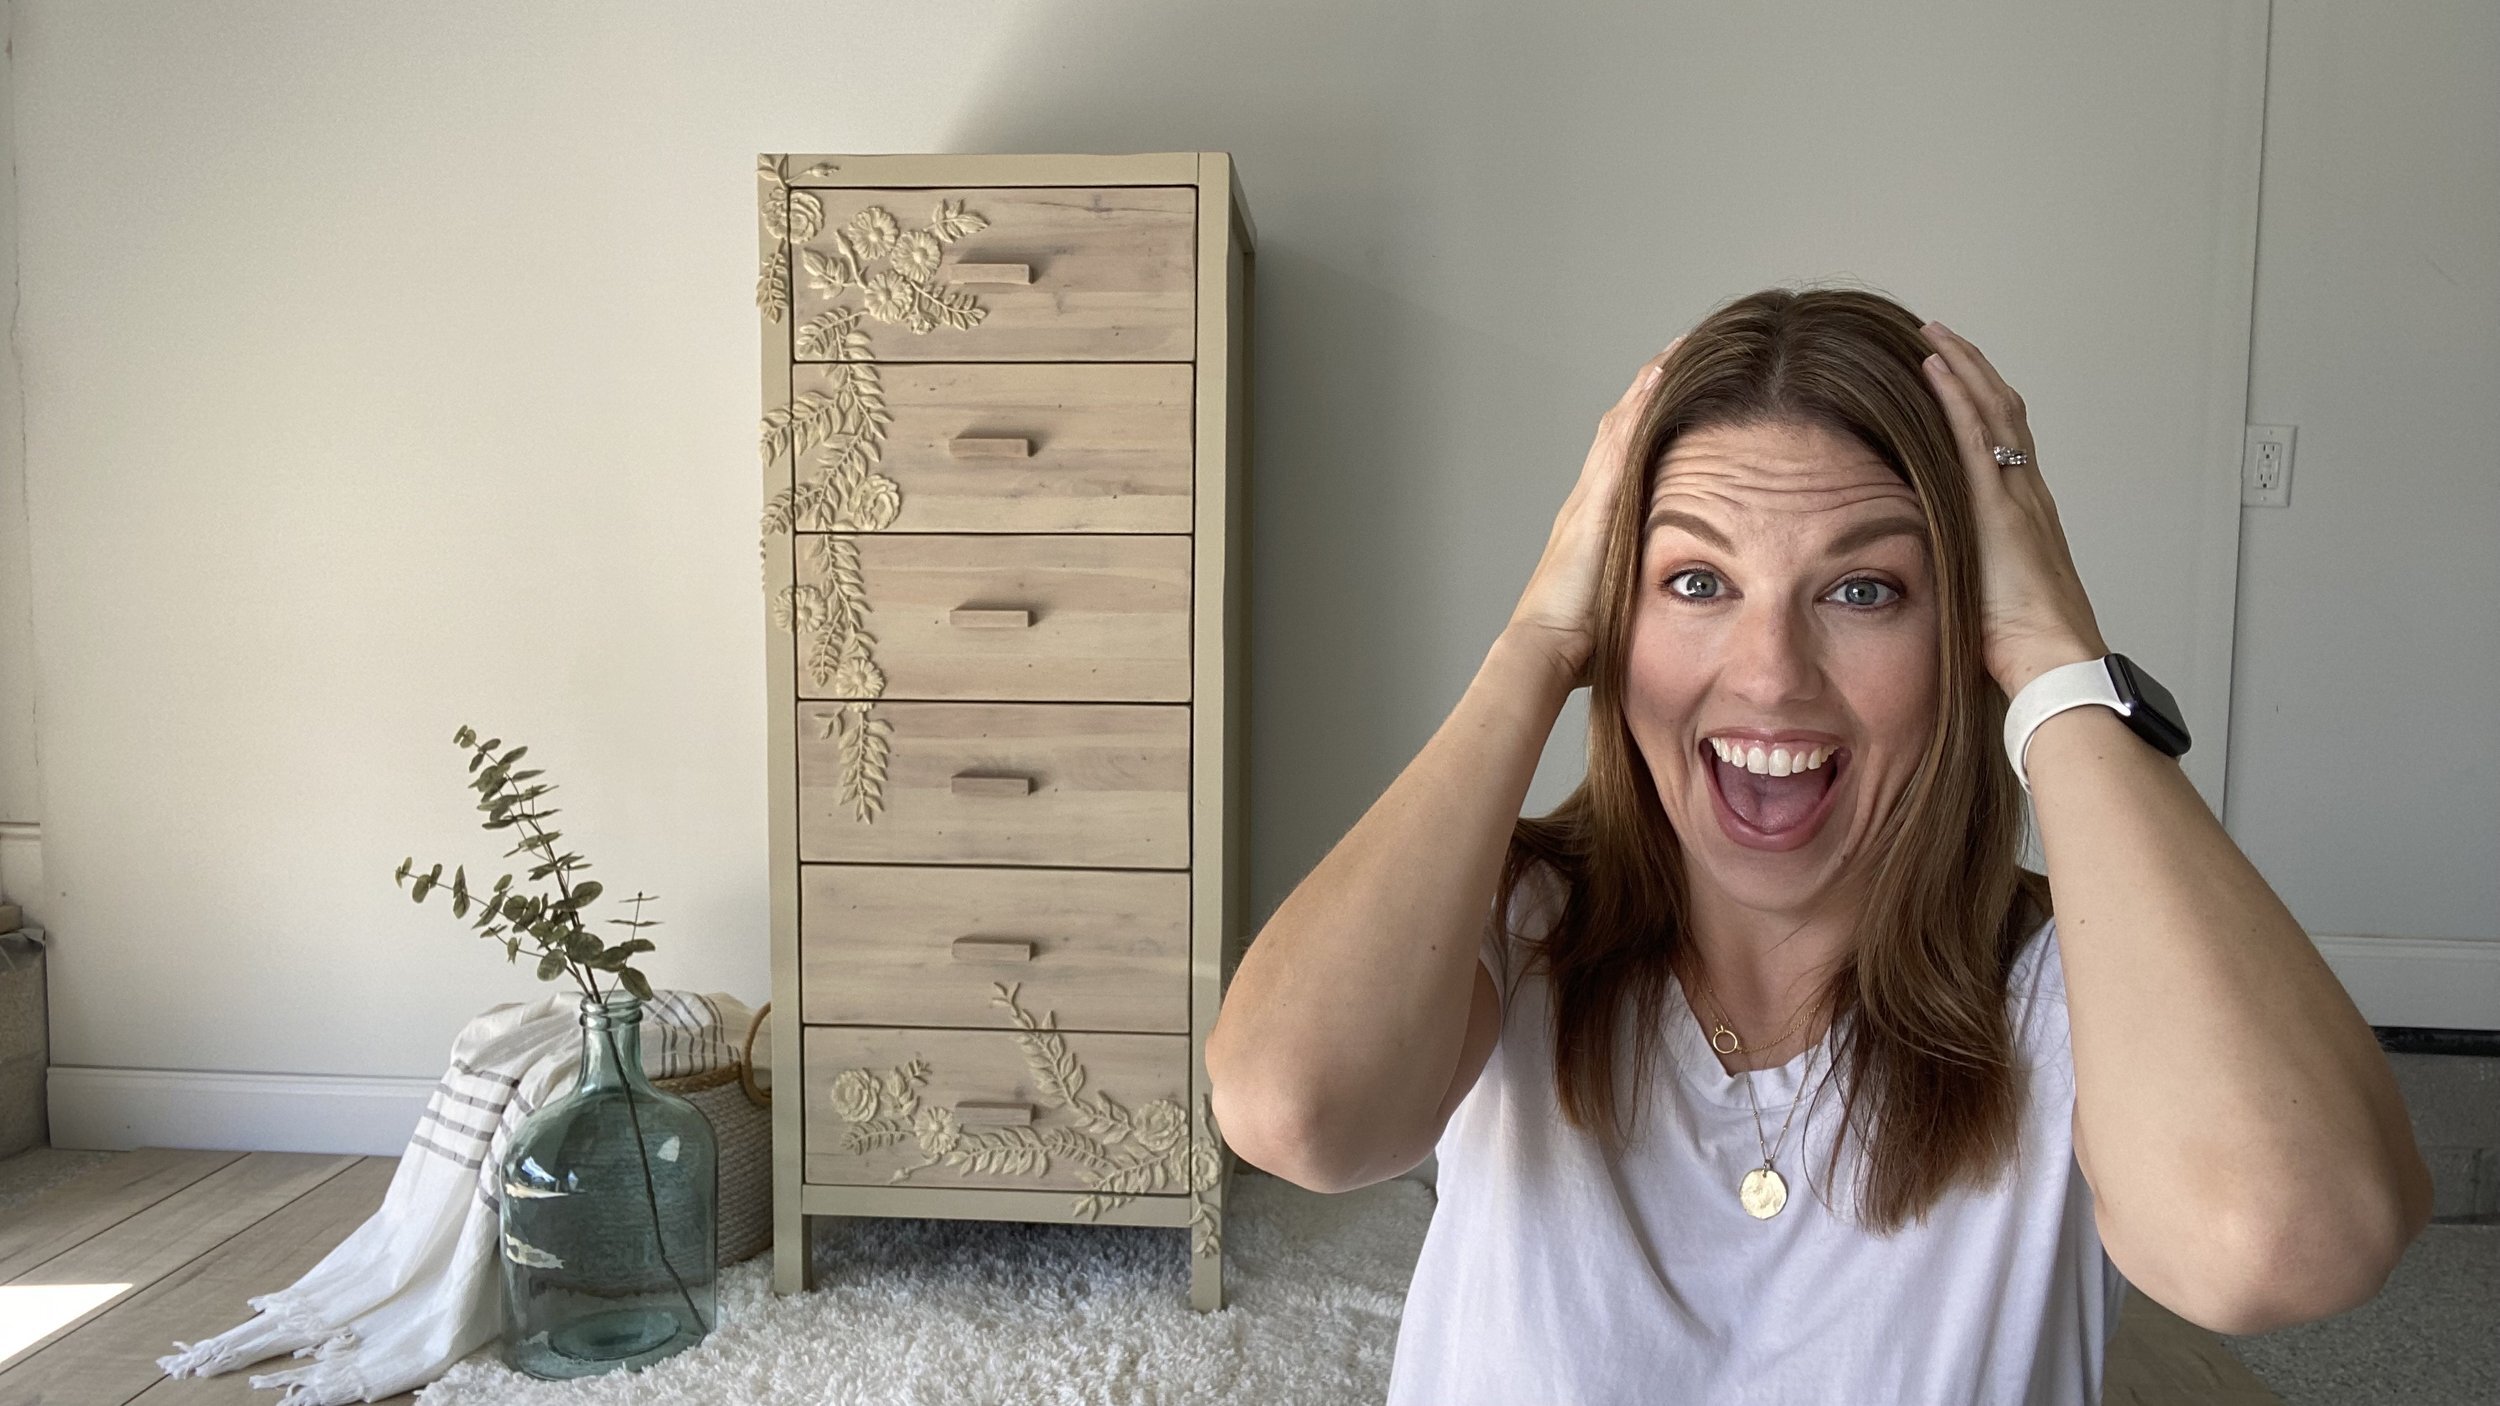
Okay. It's time for the reveal. You guys, I am IN LOVE. I just think she’s so pretty. Thank you for joining me for today’s project. I hope you guys enjoyed it.