Dining Room Makeover: Silk All-in-One Paint
Disclosure: This blog contains affiliate links. I will receive a commission for items purchased through these links at no extra cost to you. I appreciate your support. Please read all labels and follow all manufacturer safety recommendations when working with paints, stains, and other equipment.
I’m asking the question again… is farmhouse style decor dead? Now, don’t freak out. I don’t think it’s dead, so if you still love it, keep it! But for today’s project, I’m going to be making over this provincial dresser that I redid a couple of years ago to create a more modern, classic look. Not only that, I’m going to be doing a complete dining room makeover!
You’re not going to want to miss it!
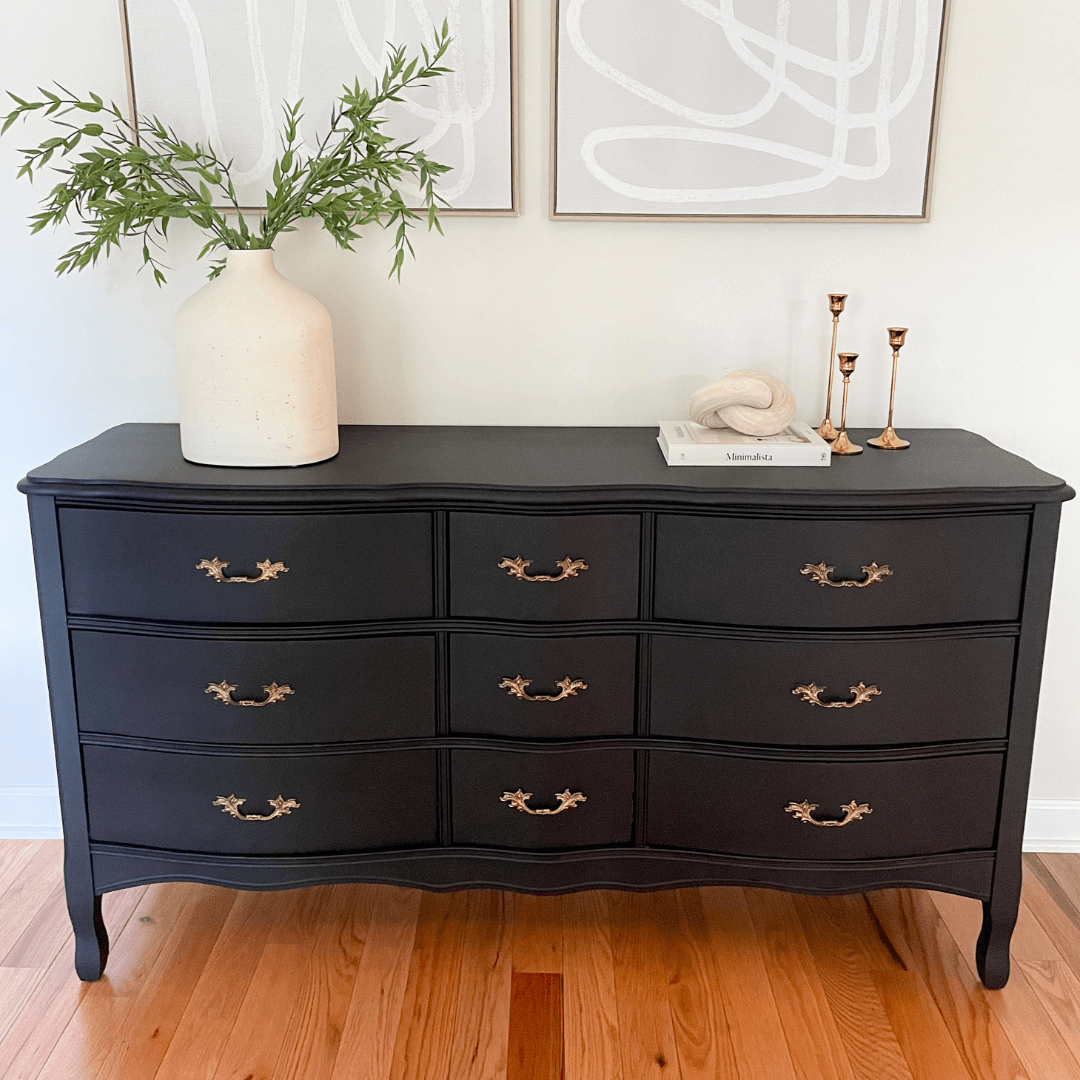
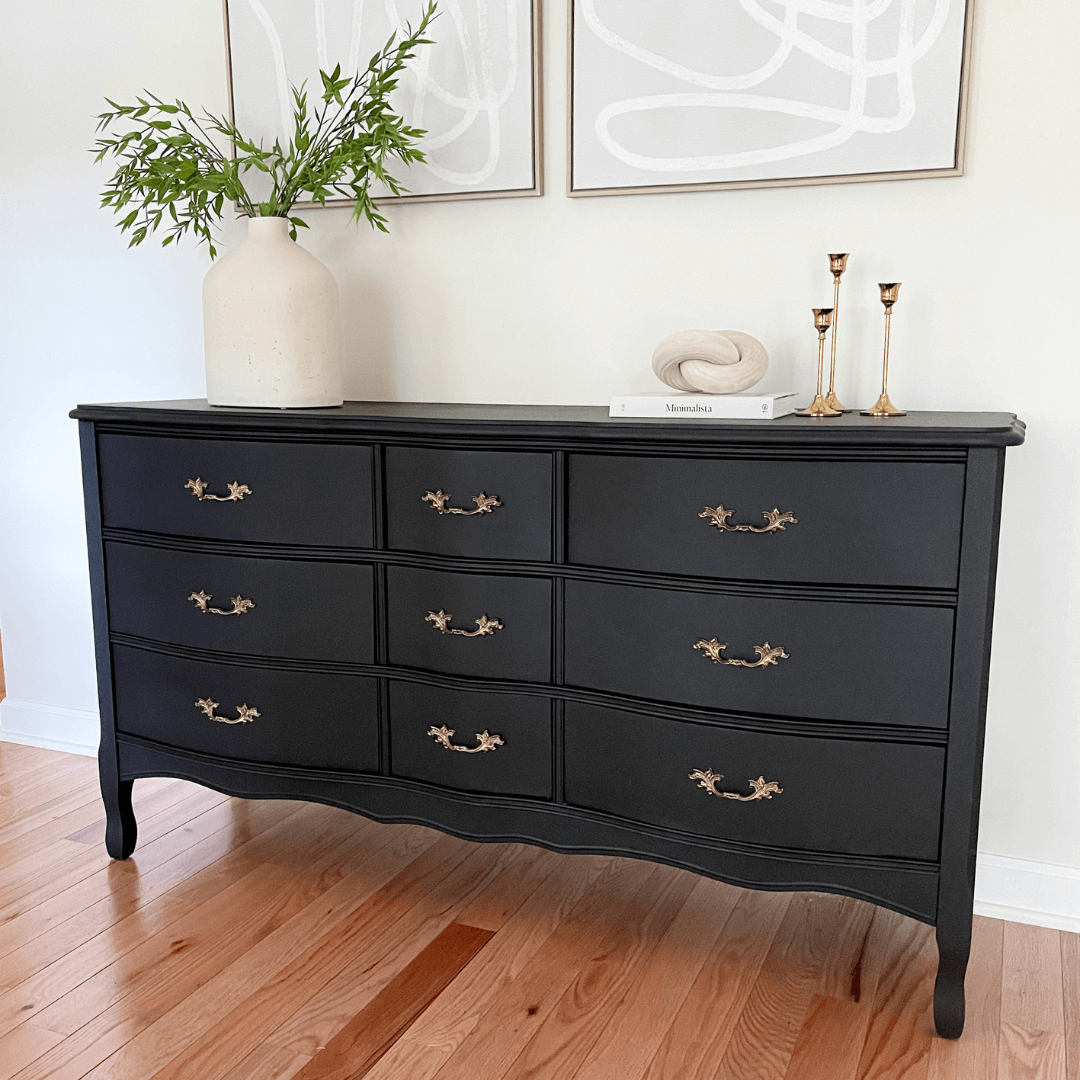
I have seen so many of these French provincial pieces done in all black, and it's so gorgeous. That’s what I’m going to do today, but let’s take a look at our dresser before we get to it.

Products Used for this Dining Room Makeover
Dixie Belle Silk Provincial Dresser
Wagner Flexio 3500 Paint Sprayer (Detail Finish Nozzle)
Dixie Belle Gilding Wax (Gold)
Surf Prep 3" x 4" Electric Ray (Use Code PRETTYDISTRESSED10 for 10% off your order)
Dining Room Makeover Styling:
Prepping Dresser for Dining Room Makeover
Remove Hardware
The first step in any furniture makeover is usually to remove the hardware. I’m going to keep these ones because they are very decorative and perfect for the french provincial look we’re going for. I’ll be updating later, but for now, I’m just going to place everything in a plastic baggy to keep it all together.

Remove Wax
If you know that you have a piece of furniture that was sealed with wax, it’s super important to remove it before painting because your paint won’t adhere to it. I originally waxed the body and the drawers of this piece with Easy Peasy spray wax, so I’m going to remove it with some rubbing alcohol.
To do this, I put some rubbing alcohol on a rag and wiped down the piece. Then I went back over with a clean rag to wipe it back.

Clean with White Lightning and rinse
Now that I've broken down all the wax, it’s time to clean my piece with my White Lightning. I added some powder to my bucket with some warm water, mixed it up, and used a rag to clean the dresser with the solution. And as always, after you’ve cleaned your piece, make sure to use some warm clean water to rinse everything down.
Dixie Mud to smooth out the cracks
On the top drawers, I had a little bit of cracking. That’s not going to be easy to paint over, so I grabbed my Dixie Mud to smooth it out.

Scuff sand
Now that my piece is all clean and my wood filler is dry, I’m going to sand back the Dixie Mud and give the whole dresser a good scuff sanding. If you’re using Silk All-in-One paint, you’ll want to make sure you scuff sand because it’s going to help your paint adhere better. You can do this by hand with Surf Prep Rad Pads. They come in a variety pack, and I love these because they are super flexible and easy to use.
I’m going to use my Surf Prep sander because it’s going to make it go much faster, but sanding by hand is totally doable.

Prepping the Spray Gun

Before I get into it, I wanted to address a question I get a lot when spray painting. Why do I spray with the drawers in sometimes? When I have a piece where the drawers fit flush with my frame, I leave them in. It’s a lot easier to just spray it with them in, so if I have the chance, I leave them. If I do, I use some tape to protect the inside of the frame… easy peasy. It really is a preference thing, so it’s up to you!
Drain and thin paint
So again, I’m using the Silk All In One Paint for this dresser and dining room makeover, so this part is going to go fast! I’m using their darkest color which is called Anchor. When prepping this paint for the spray gun, you can’t thin it out as much as you can with chalk or mineral paints. To water it down, you’re going to use 1 oz of water for every 16 oz of paint.

And as always, drain the paint into the spray gun container to get a super smooth finish.
Test on cardboard
I don't care how many times I spray, I always do some test runs on a piece of cardboard.
If you’re using the same Wagner Flexio 3500 sprayer as me, here are what settings I use for this Silk All-in-One Paint:
Detail nozzle
Set at 5
Material flow is almost all the way open
Don’t worry if you’re a beginner with the spray gun. It’s quickly becoming my favorite way to paint furniture.

Spray Painting with Dixie Belle Silk All-in-One Paint
1st Coat
I won’t go into detail here on how to use a spray paint gun, but my two biggest tips for you when working with a sprayer are:
Be a lot close than you think you should be. You want to be 6-8 inches away.
Overlapping is key. I like to overlap 30% to 50% on each stroke.

2nd Coat

I waited one hour in between coats, and I decided to flip it on its back to get some of the details that I missed when it was standing up straight.
Remember, I'm not going to have to do a top coat with this because I’m using a one-step paint. It has a top coat built-in, so it’s going to cure to a really hard, beautiful finish in 30 days. It will be wipeable, cleanable, and even UV protected.
Touch up edges or drawers
After I got the dresser in the dining room for this dining room makeover, I just needed to do a few touchups on the drawers. When you paint this with the drawers in, it goes a lot faster, but you can’t actually hit the edges of the drawers. So a quick trick is to grab a foam brush, grab your paint, and paint the edges.

Update Hardware
As I mentioned, I’m using the original hardware, but it’s looking a little dull and patinaed. And you know what that means, friends. Yep, my handy dandy Dixie Belle Gilding Wax to the rescue. I just grabbed an artist brush and applied my favorite gold gilding wax to make the hardware shine and pop.
After everything is dry, take a soft microfiber towel and lightly buff it to polish it up a little bit!

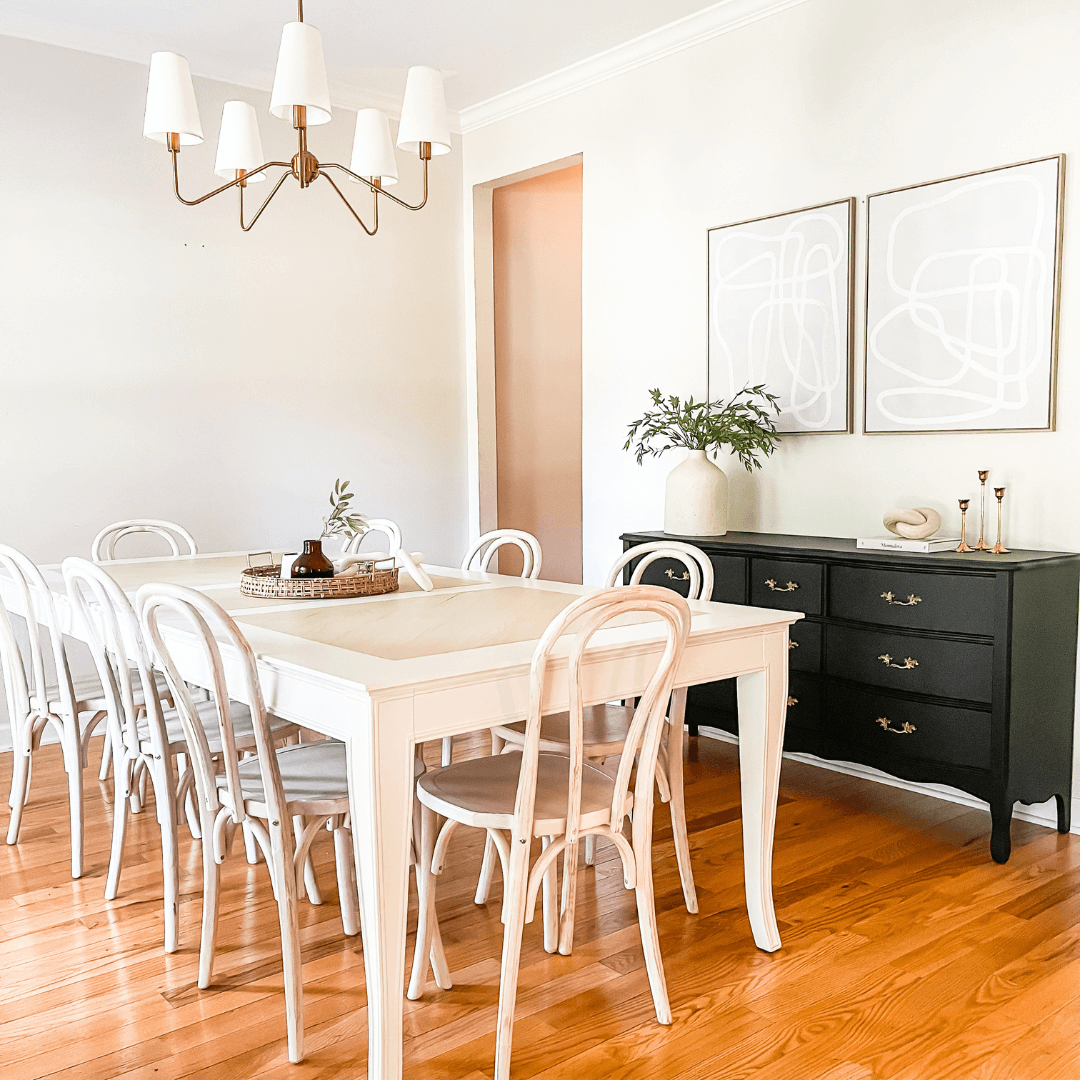
Full Dining Room Makeover

Now that we’ve got the anchor piece of this room done, we’re going to do a full dining room makeover for my dear friend, Meggie. If you don’t know, Meggie is the glue that keeps Pretty Distressed together. She’s always working so hard behind the scenes, and I’m so happy that we are making over her dining room for her!
And what’s so exciting is that because we’ve saved so much money on this dresser, we’re going to be replacing some of the farmhouse items here. With some new lighting, curtains, and decor, we’re going to transform this dining room!
Replace Light


Let’s start with changing out the lighting. Originally, Meggie had a beautiful farmhouse fixture, but we’re going to replace it with something a bit more modern and softer. We got this amazing brushed brass chandelier from Amazon! It’s definitely a designer piece dupe that is super affordable. It came in a box, and I had to assemble it, but it was pretty simple!
Change out curtains


Next up, we're going to change out the curtains. These ones were a little heavy and blocked a lot of natural light, so we are replacing them with some linen light filtering panels. I only did one panel per window because 1) it would save us some money, and 2) since it's a light filtering curtain, you can drape it across the entire window, and it looks really great.
Update wall art


There were a few farmhouse art pieces on the walls, so we’re going to be replacing them with more modern pieces from Target. I also love Desenio Wall Art if you’re looking for other inexpensive wall art options!

Wall Art Tip
Use painter's tape to mark where your nails are going to go and then place the tape on your wall to mark it. Just make sure the tape it level and you find your studs. It makes it so easy to hang wall art!
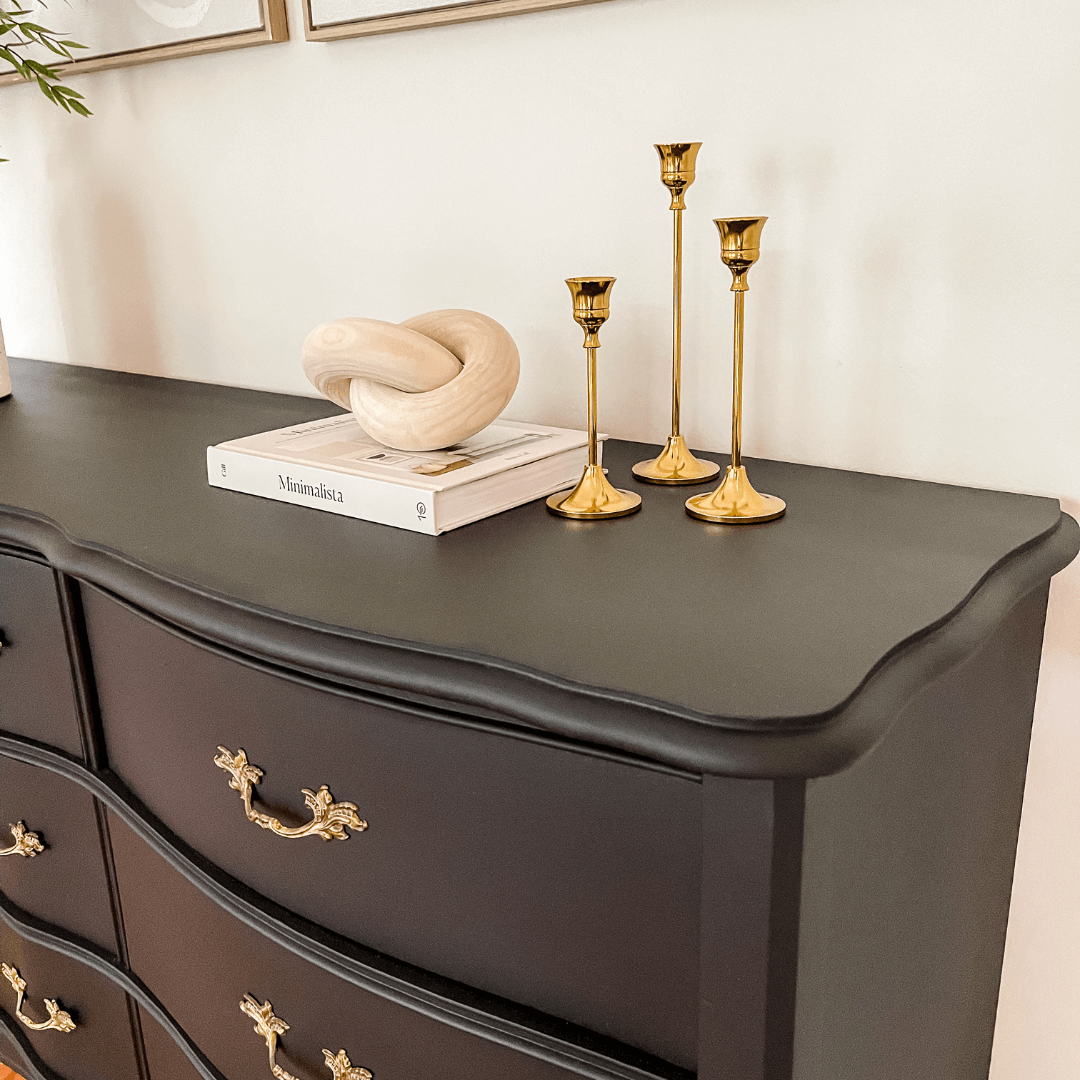
Dining room makeover decor
Now we’ve just had some finishing touches to make this a complete dining room makeover. We are using the dresser as our buffet, and so now it’s time to style it up. Here are all of the fun items we got on both Amazon and Target to style up this dining room!
Dining Room Makeover Reveal
Oh my goodness, I am obsessed with this makeover. I love how the dresser anchors the whole room and makes it look so much more sophisticated! We saved tons of money doing a quick all-in-one paint makeover, so we were able to splurge to make this dining room makeover a reality!
So is farmhouse dead? I don’t think so! The table we left in this room is definitely farmhouse style, but because we’ve updated other parts of the room, it all blends together perfectly.
Take a look at this dining room makeover reveal, and check out the video to see it in action!